When I first started getting into tomatoes, I bought seedlings from the Santa Clara County Master Gardeners' Spring Plant Sale and got others from the store. But once the bug hit me, I decided to try growing my own tomatoes from seed. One of the first online stores I visited was Gary Ibsen's Tomatofest site. I was enthralled by the many varieties he offered and the beautiful pictures that accompanied the description of each variety.
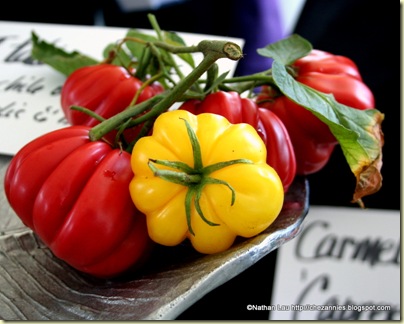
Yellow and Red Ruffled Heirloom Tomatoes @TomatoFest
So I did order some seeds from TomatoFest.com, and I must say I was very impressed by the service they provided. See, in my order of 6 varieties, they made a mistake and sent the one wrong variety. When I emailed Gary to let him know I had received one I did not order, he was very prompt to reply and in less than a week, I not only had my correct variety but also 3 other tomato varieties to make up for the mistake. On top of that, he said I could keep the variety that was sent by accident (that's 4 extra that I got for free--woohoo!). Now, that's customer service :-) !
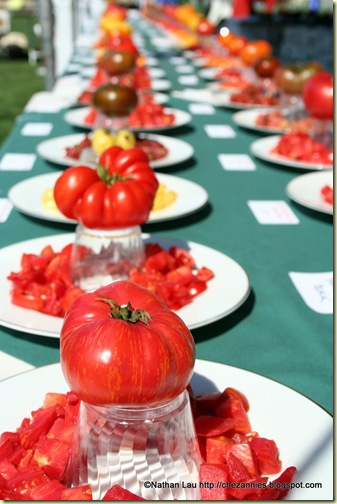
Anyhow, when we got to Tomatofest, I was very excited to look at the Tomato Tasting Tent which had over 350 different heirloom tomato varieties on offer. I actually did my homework before the event itself by visiting the Tomatofest site and looking at all the varieties they had to offer. I wrote down the ones that I was most interested to try so that I would not end up being numbed by trying to taste them all.
Tomato Tasting Table @TomatoFest
Nate and I stepped into the tasting tent after we had made our rounds eating all the foods from the chef's tents. This part was truly fun for me. I got to talk to others in line who were just as crazy about tomatoes as I was. Where else would you be able to talk about tomatoes and not have people roll their eyes after 5 minutes?
The tasting tent lived up to my expectations BIG TIME. It was a sea of color. There was basically a square space in which tables upon tables were laid out with every conceivable shape, color, and size of tomatoes. In the center, volunteers were busy cutting up more samples or filling up plates when they ran low. Every variety had its name written in front of it and some varieties actually had two different sample plates if they were provided by two different farms from different areas (as tomatoes can taste different depending on the terroir).
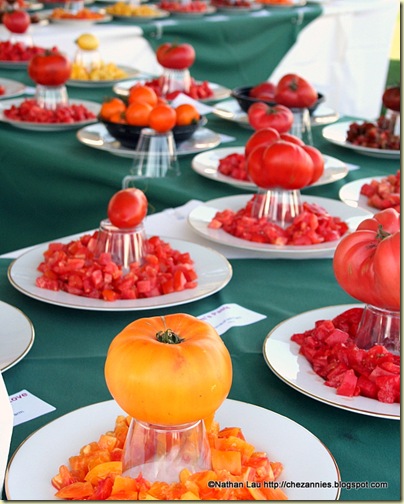
Tomato Tasting Table @TomatoFest
I also got to talk to some people who didn't really know too much about the different varieties but were glad for advice on which ones to try. (I would not recommend trying all in one fell swoop. That would be tomatoing-out in a BIG way!)
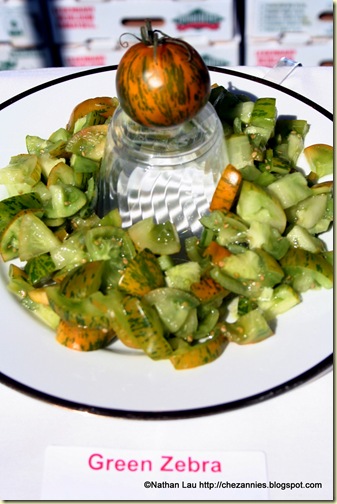
If you've never tried a green-when-ripe tomato, you absolutely must, they are some of the tastiest tomatoes I've ever had. Green Giant and Green Grape would be two examples of very sweet, amazing tasting tomatoes in the green shades. Somehow the green color always turns people off. Don't be afraid -- GO GREEN! ;-)
Green Zebra Tomato @TomatoFest
We actually took a break halfway through to cleanse our palates with some wines before coming back to sample the second half of the tables. Of all the ones I tasted that day, Chocolate Stripes was the winner for me. Apparently, other people felt the same way. The evidence is revealed by how few pieces were left on the tasting plate:
Chocolate Stripes Tomato @TomatoFest
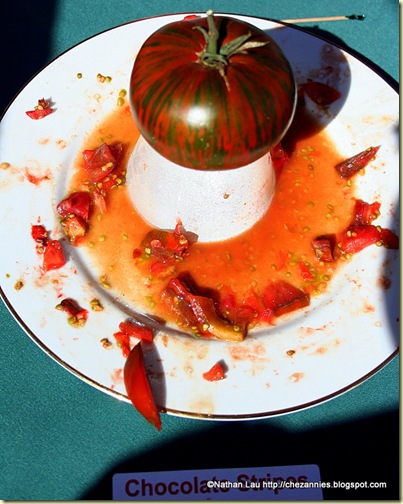
This Chocolate Stripes tomato was robust in flavor, with sweet notes and complex undertones. The whole tomato was a beauty too--a medium globe that was a dark, chocolaty red with green stripes. Both Gary Ibsen and Sunset Magazine's Jim McAusland agree - black tomatoes have the richest, most complex flavors.
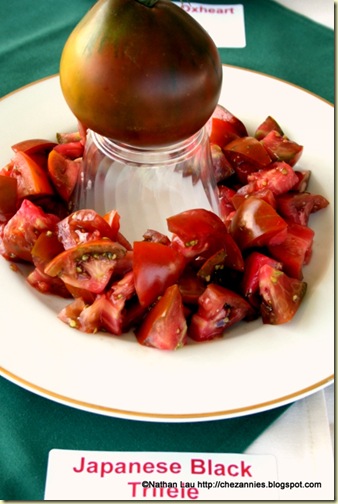
Japanese Black Trifele Tomato @TomatoFest
Green Grape (which I'm also growing this year) was also very flavorful, sweet but with a nice acidic finish that gives it a real punch. Other varieties that I thought were worthy of mention include Mandarin Cross, Chinese Tea, Lahman Pink, Blue Ridge Mountain, Cindy's West Virginia, Green Giant, and Marizol Gold.
You Say Tomato, I Say Toh-Mah-Tow
One thing I do want to note about flavor. Don't discount a tomato just because it didn't taste that great the first time you try it. I actually made a point to taste samples of the varieties that I was growing in my own garden to do a comparison. I found that many of the tomatoes I am growing in my own garden taste better than the ones at the TomatoFest tasting tent. Other varieties tasted way better than what I was growing. The difference in flavors could be due to many factors including soil conditions, watering, temperature, etc.
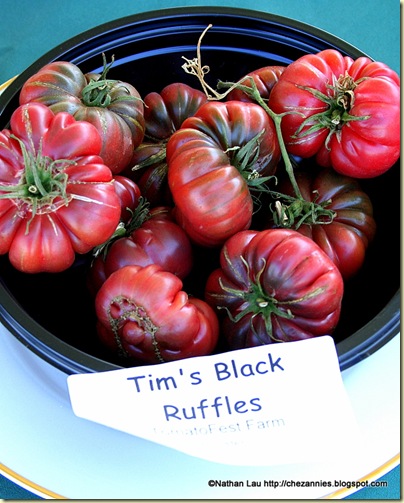
Besides taste, some tomatoes were just beautiful to look at. Varieties like Costoluto Genovese and Tim's Black Ruffles are defined by the ridges that line the whole tomato giving them an almost pumpkin-like look. Some of these can be very tasty but I have found most ruffled tomatoes to be drier on the inside and some even have cavities like a bell pepper. These varieties are especially good for stuffing.
Tim's Black Ruffles Tomato @TomatoFest
Heirloom tomatoes are not boring. There are uniquely colored tomatoes (bicoloreds, white, green, purple, and black to name a few), striped tomatoes, fuzzy tomatoes (looks like a peach, tastes like a tomato), and odd-shaped tomatoes (heart-shaped, pepper-shaped, pear-shaped). All these traits are amazing to me and makes me exclaim in wonder at the beauty of each tomato variety.
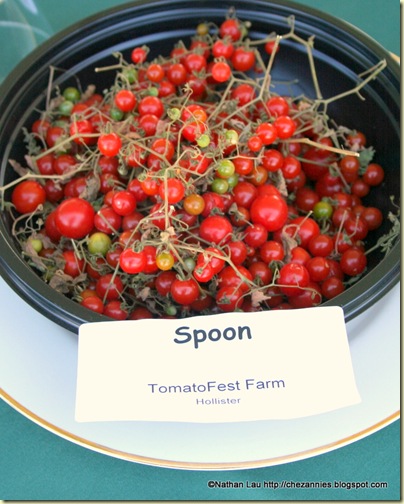
Then there are the sizes. I was tickled by one called Spoon which was sooo tiny that I could imagine needing a spoon to eat them. I also would hate to be the one to have to harvest these babies--they were the size of tiny peas.
Spoon Tomatoes @TomatoFest
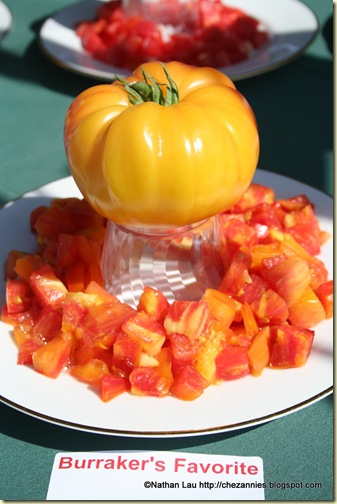
And other tomato varieties were so large, you'd need both hands to hold them.
Burraker's Favorite Tomato @TomatoFest
The biggest one in my garden this year (and also very flavorful) is Grandfather Ashlock, weighing in at a whopping 1lb 7oz!
If I had had more time, I would probably have gone around the whole square a second time to try those I missed in my first pass. But unfortunately, the time flew by and as 4pm neared, my stomach was still so full of tomato that I could not go back to try more even though I really wanted to.
It's All About the Love (Apples)
Today, as I write this, I wish I had been able to try them all to do justice to each variety. I admired every one and I'm truly grateful that Gary Ibsen has put out a festival that allows people to realize that tasting tomatoes is much like wine tasting. Each variety has its own distinct flavor with different nuances and tones. Each is unique, asserting themselves differently to different people. My love affair with tomatoes continues and Tomatofest is an event that feeds my addiction even more.
Even though Gary announced his retirement from TomatoFest, he is planning to pass the torch on to a worthy manager. TomatoFest will live on, and we certainly hope to be able to attend again and again!
If you liked this post, why don't you subscribe to receive all our latest posts in your RSS reader or by email!
Cheers, Annie
Related Posts:
Getting Buzzed at TomatoFest
Wild Boar Farms: These Aren't Your Dad's Tomatoes
Love (Apple) At First Bite
Annie's Top Five Tomato Growing Tips


