Please wait a few seconds while we redirect you
to the new and improved House of Annie website at
www.houseofannie.com !

Monday, May 10, 2010

Pork, Lotus Root and Black Bean Soup

This healthy soup is so delicious, you’ll be begging for more!

lotus root and black bean soup

We were having dinner in a Chinese restaurant the other day. Nate wasn’t feeling very good and so he wanted some herbal chicken soup. But the waitress said they only had two soups for that day—one was a black chicken soup and the other was this lotus root and black bean soup.

I remember that the Chinese believe that chicken is not good when you are coughing. Strange eh? I also remember another friend who had recommended black beans as a cure for coughs. So we agreed and ordered it. I told her that Nate’s throat wasn’t feeling very good and she immediately pointed to the black bean soup.

When the soup came, the whole family drank it up in no time at all. It was seriously good! The pork bones and the lotus roots were tender, the black beans were creamy and the soup was just comforting in flavor besides being very delicious. Esther actually wanted some more soup at the end when we were all done. We tried to get her to do an Oliver and go to the kitchen with her bowl and ask for more but she was too shy :-)

We didn’t want to order another big bowl just for her so I told her I would try to make the lotus root soup for her the next day. Good thing this restaurant was next to a grocery store so I picked up some black beans and lotus roots. I already had pork bones at home so I was good to go.

How’d it Get So Tender?

Oh, during the dinner, Nate and I had a discussion about how they had gotten the pork so tender and the beans so creamy. We ended up pondering double-boiled soups, pressure cooker cooking and slow cooker cooking. All of which I could not do as I didn’t have any of these items at home. Oh well…

I started the soup in the late morning as I wanted to make sure that I gave the soup plenty of time to simmer to get optimum flavor. I did my usual parboiling of the bones and tossing out water from the first boil. Then I started the bones again with new water.

Once that came to a boil, I put in my presoaked black beans and lotus roots along with some red dates. As soon as they all came to a boil, I turned the soup down to low and let it simmer for more than 4 hours.

How do I Get it So Tender?

After that time, I must say, my beans did not soften and get creamy the way the restaurant’s did. It wasn’t hard but it wasn’t creamy. I even made sure not to add any salt until the end as I had learned that beans don’t soften up when you add salt while cooking it. But somehow, the beans still had some bite to it. I couldn’t wait too much longer so I seasoned my soup and a little later served it for dinner.

Esther still drank up the soup and ate the beans but she told me, “mommy, the beans are not as good as the one we had yesterday, but I still ate it!” I guess that is not the worst criticism to get. Overall, I managed to achieve the same flavors in the soup as the restaurant but I didn’t manage to get the tenderness in the meat or the beans. If you know how I could have done this without using a pressure cooker or crockpot or double boiler, would you leave a comment and let me know?

Pork Lotus Root and Black Bean Soup Recipe

Ingredients:
500g pork bones (usually the neck bones are good to use, or rib bones are also good)
8 cups water
10 red dates, washed and rehydrated
4-5 tubular pieces of lotus root (choose the ones that look least bruised and discolored), joints cut off and sliced 1/4 inch thick)

Sliced Lotus Root

sliced lotus roots

1/2 cup dried black beans or peanuts, soaked for several hours before use (at least 2-3 hours)

Dried and Soaked Black Beans

black beans dried and soaked

salt to taste
dash of fish sauce
pinch of chicken bouillon

Method:
1. After parboiling pork bones and tossing out water from first boil, rinse bones and boil again in 8 cups water.
2. Once water comes to a boil, add red dates, black beans and lotus roots. Let stock come to a boil again and then set the fire to low and let simmer, covered for 4-5 hours.

lotus root and black bean soup boiling

3. Once the pork bones, beans and lotus roots are tender, add seasonings—about 2 tsp salt, 1 tsp fish sauce and a pinch of chicken bouillon (or to taste). Stir and simmer to incorporate flavors. Taste and adjust seasonings accordingly.
4. Serve and enjoy!

lotus root and black bean soup

Cheers, Annie

This recipe using lotus root was entered into the Weekend Herb Blogging recipe roundup, organized by Haalo of Cook Almost Anything and hosted this week by Lynn from Cafe Lynnylu.

Continue Reading: "Pork, Lotus Root and Black Bean Soup"...

Friday, January 15, 2010

Leek and Potato Soup Recipe

An easy, healthy, hearty soup with extra oomph.

leek and potato soup It’s only been in the past year or so that I’ve discovered leeks. Before that, I would use it if it was called for in a recipe, like the cioppino hot pot recipe, but otherwise, I did not know how to cook with it. But this past year, I visited the farmer’s market a lot more and tried to experiment a little bit more with unfamiliar ingredients.

Whenever I would see leeks on sale at the market, I would normally buy some and treat them like onions in several of my dishes, putting them in my quiches, soups or even in my stir-fries. But really, this humble soup is one of the most wonderful ways to showcase leeks.

Leeks at the Market

leeks

Leek and potato soup first came into my consciousness when I read the book “The $64 Tomato: How One Man Nearly Lost His Sanity, Spent a Fortune, and Endured an Existential Crisis in the Quest for the Perfect Garden”. I don’t remember much about what he wrote but somehow he made this soup sound really heartwarming and it stuck in my head as something I should try to make someday.

Well, I’ve made leek and potato soup several times now and recently while shopping at the market here in Kuching, I came across a vendor selling leeks. They weren’t as large as the ones I find in San Jose but they were definitely leeks - when I picked them up to give them a sniff, they smelled very pungent and aromatic. That decided it for me and I took home three to make this very soup.

Good to Go

Most recipes you come across will tell you to cut the leek at the point where the green parts meet the white base and use only the white base. Well, I find that in soups, you can get away with using more of the green leafy part and so for this batch, I trimmed only the top third of the leek and used the rest. I think it’s quite possible to use the whole leek if they’re not too fibrous. What do you think?

Another thing about leeks—you have to wash them good. And the only way to get to all the dirt trapped between the layers is to cut them in half length-wise and get in there with water to rinse out every layer. Once they’ve been washed of dirt, they are good to go.

Extra Oomph

Now back to this leek and potato soup recipe. This is a seriously EASY recipe and the flavor is really good. When I made this last week, the whole family devoured the soup including my picky kids. I’m going to have to try to make this soup much more often now seeing as to how easy it is and how much everyone likes it.

You basically need some leeks and potatoes (um, d’uh!), a little bit of garlic, some butter/olive oil, some chicken broth, milk, seasonings and you’re done. If you want the soup to be smooth, you can blend it with an immersion blender or in a regular blender. But if you don’t have a blender, just mash the potatoes up a little in the soup and you’ll still have a yummy soup, just chunkier.

This time around, I chose to add a little extra seasoning to my soup. Normally, just salt and pepper will do it but I have plenty of herbs and spices lying around and sometimes I like to try them in recipes to see what will happen. So I decided to toss some dill in and after tasting the soup, I thought it still needed a little kick so I thought, why not some Old Bay Seasoning? So I did. Put some in, I mean. And it was wonderful—the celery seed and spices in Old Bay gave the soup an extra oomph this round. I think I will be adding it in on a regular basis from now on.

So, if you’re busy and need a quick weekday dish, try this soup. It’s hearty so that on its own, it’s quite filling. Add a salad or some bread and you have a meal. Or you could roast or panfry some meats and have this soup as a side (this is what we did the last time, we pan fried some lamb chops which is also a quick weekday dish).

Leek and Potato Soup Recipe

This recipe will serve 4 for a main course or 6 as a side.

Ingredients:
2 Tbsp butter or combination of butter and olive oil
2 cloves garlic, minced
2 large or 3 medium leeks, cut in half length-wise, washed and trimmed of the top third green parts, and sliced thin
2 large or 3 medium potatoes, diced small
4 cups low-sodium chicken broth or if you don’t have it, use 4 cups water with 1 1/2 cubes chicken bouillon (of course, home made chicken broth is best but that makes it less easy)
1 cup milk (whole milk is tastier but if you would prefer less fat, it’s fine to use low fat)
1/4 tsp kosher salt
1/2 tsp each freshly ground black pepper and white pepper
1 tsp Old Bay Seasoning
1 tsp dill (I used dried but feel free to use fresh, just add more to taste)

Slicing Leeks

chopping leeks

Method:
1. In your dutch oven or heavy bottomed pot, put in the butter/olive oil and heat till melted on medium heat.
2. Add garlic and stir for less than a minute being careful to not let it burn.
3. Add leeks and salt and stir around and cook till leeks have softened but not browned, about 5-6 minutes.

sauteeing leeks and garlic

4. Add potatoes and chicken broth and give it a stir. Let that simmer for about 10-15 minutes or until potatoes are soft.

adding diced potatoes to leek soup

5. Add in your milk and then the rest of your seasonings—the peppers (don’t miss out on the pepper, they really add a lot to this dish), Old Bay and dill. Stir and let the flavors come together for another minute or two. Leave the soup at a gentle simmer at this stage.
6. Taste and adjust your seasonings accordingly.

Plate up and enjoy! We garnished with a little chopped parsley and some crumbled bacon.

Leek and Potato Soup

potato and leek soup

Cheers, Annie

This post was entered in the Weekend Herb Blogging roundup #216, administered by Haalo and hosted this week by Maninas

Hungry for more soups? Click below:

Chinese Winter Melon Soup Recipe

How to Make Miso Soup From Scratch

Barley and Lentil Soup with Swiss Chard

Cream of Corn Soup Recipe

Roasted Butternut Squash Soup with Bacon

Continue Reading: "Leek and Potato Soup Recipe"...

Thursday, December 31, 2009

Chinese Winter Melon Soup Recipe

Dong gua tang (Chinese Winter Melon Soup) is a light yet satisfying soup for cold Winter nights.
Winter Melon Soup
Did you know that we can grow winter melon squash here in Malaysia?
I saw it growing at a friend’s house here in Kuching. She told me that actually, winter melon grows quite wild here. Her vine had started at one end of her fence, given her about 6 fruit and then looked like it was about to die. But then new green shoots continued to come out and now half her fence has dying brown leaves while the other half has new leaves with another 5-6 fruit hanging from vine. Astounding!

What the Heck is That?

One day we were in our backyard inspecting the pandan plant on one side of the yard and the curry tree arching over from our neighbor’s yard on the other side. Imagine my surprise when I spotted a vine creeping among the branches of the tree, and saw this melon hanging on it! It was about the size of a medium watermelon. (I didn’t yet know that it was a winter melon.)
Winter Melon on vine
I struck up a conversation with my neighbour one day and asked her about the vine and she confirmed that, yes indeed, it was a winter melon. Two days later, while I was coming out of my house, she ran up to me and handed me half a melon that she had recently harvested from that vine. Sweet! That half melon was perfect for making pot of winter melon soup.

No Soup for Me!

Now, believe it or not, I had never cooked winter melon soup before. See, I’m not really a soup person. Strange I know.
Maybe it has something to do with the fact that I sweat a lot when drinking hot soups in a hot country. When I left Malaysia and went to live in the US, I enjoyed drinking soups in Fall and Winter when the heat from that bowl of soup really helped to warm me up.
Well, now I’m back in Malaysia where it is HOT! Especially here in Kuching. But maybe age is catching up with me because I am beginning to enjoy soups a bit more. When my neighbour handed this winter melon to me, I was happy to make this soup. What’s more, after I made it, I actually drank two bowls, sweat dripping from my forehead and all! Maybe it’s knowing that this fruit was home-grown or maybe it was the taste of the winter melon soup itself. Whatever it was, it was truly satisfying and comforting.

Making Stock

Making the soup itself is pretty easy. You can make the broth for the soup using chicken bones but I chose pork bones as I had them handy at the time. If you use pork bones, do this one additional step to help you to get a nice, clear soup—bring bones to a vigorous boil, then dump out the water and rinse the bones a few times before refilling with clean water and bringing the bones to a boil again. This technique of first boiling the bones and dumping out the water helps to give you a stock that is not murky from all the scum rising from the pork bones.
Once I’d done that, I added the dried scallops, dates and ginger to the stock and let them simmer with the pork bones for about an hour. While that was happening, I sliced off the skin of the winter melon, then cut it into chunks.
slicing skin off winter melonwinter melon chunks
I already had some boiled peanuts handy so I decided to add that in. I also added some reconstituted shiitake mushrooms to enrich the stock (not too many otherwise it would overwhelm the delicate flavor of the winter melon).

Chinese Winter Melon Soup Recipe

Ingredients:
1/3 lb (250g) pork spare ribs or neck bones, cut into chunks
10 cups water
1/2 a medium winter melon, cut into large chunks (about 4-5 cups worth)
1/4 cup dried scallops
10-12 dried red dates
1 inch ginger, sliced thickly
2-4 dried shiitake, reconstituted
1/2 cup boiled peanuts (optional)
salt and some chicken bouillon to taste
dash of white pepper

Method:
1. Put pork bones in a large pot and fill with water, enough to cover pork. Bring to a boil and let boil vigorously for 2-3 minutes. Remove from heat and dump water. Rinse out pork bones until not much remaining scum can be seen (a little bit will always remain, it’s ok, no need to be too perfectionist about it—after all we’re not Tampopo!).
2. Return pork bones to pot with 10 cups of water. Bring to boil and as soon as it come to a boil, lower heat to a simmer.
3. Add ginger slices, red dates, scallops, and shiitake mushrooms and simmer for an hour. Season with a little bit of salt.

Adding Scallops to the Soup Stock

adding scallops to winter melon soup
4. Add winter melon chunks. Simmer for another hour or until winter melon is tender and all the components have melded together.

pork bones and winter melon soup
5. Season with chicken bouillon (about 1/2 tsp) and salt to taste. I always like to season my soups at the end because that gives time for all the flavors to develop and that is when I know what is still lacking. If you season too early, you might find yourself tempted to add more seasoning than it needs as the ingredients might not have released all its wonderful flavors yet.
Finish the soup with a dash of white pepper. If you want, you can also add a little bit of sesame oil. Serve in individual soup bowls and enjoy with rice and other dishes.
Winter Melon Soup
I just winged the recipe using my own instincts. If this is not the way you make your winter melon soup, please feel free to share yours with me. But I liked how mine turned out—the soup was very tasty, yet delicate. I can’t quite describe it in English—clear and light seems to be the best way to describe it, I guess. The addition of scallops and dates combined with the winter melon gave the soup sweetness while the pork bones and mushrooms added savoriness. The sliced ginger added some depth and heat and gave this soup that warmth to contrast with the coolness of the winter melon.
Quite a simple soup but thoroughly satisfying. Find yourself some winter melon and make this Chinese soup for yourself. It’s a wonderful soup for those days when you just want something comforting without being too heavy. And for those of you facing very cold temps, this soup will deliver warmth and satisfaction to take away that chill from your bones.
Cheers, Annie

Continue Reading: "Chinese Winter Melon Soup Recipe"...

Thursday, December 03, 2009

How to Make Miso Soup From Scratch

What Japanese meal would be complete without miso soup? Sure, you could make it from prepackaged stock but it's more fun to do it from scratch!

Miso Soup From Scratch

miso soup from scratch
Updated 3 Dec 2009
Originally posted 10 March 2007
My son loves miso soup almost as much as he loves Mac and Cheese. Whenever we are at a Japanese restaurant, it’s so easy to feed him. Get him a bowl of miso soup and a bowl of rice. He would take that bowl of rice and proceed to dunk it all into the bowl of miso soup, treating it almost like rice soup! Then, in less than 10 minutes, he would’ve slurped up the whole bowl and many times, would ask us to get him another one. We always watched in bemusement because it’s so simple and so cheap (compared to our love for sushi which costs a gazillion times more!) to make. Happily I’ve learned to recreate miso soup at home for him.

Miso Soup-er Easy

And miso soup is so easy to make! Not only that, it’s fast. It’s not like making chinese bone soups which require hours of simmering for it to taste really good. Miso soup requires only a dashi to make. And dashi is not something you simmer for long. It’s a quick cook which yields a yummy soup. Of course, you could go the easier route by using instant dashi packs or even instant miso soup packs but do give this a try. The flavors, when making your own, are more subtle and will contain less MSG than the instant ones.
Once you have the dashi made, it’s just a simple process of prepping some tofu, green onions and wakame seaweed. Then a few spoonfuls of miso and – tada - miso soup! One good trick I’ve learned from watching my friend make miso soup is when adding the miso paste, place it into a strainer and rub the miso paste in the soup base through the strainer. This will prevent clumps of miso paste from sinking to the bottom of your pot and also strains out the larger bits of beans that makes the soup gritty.
Another lesson I learned is to never bring your miso soup to a hard boil. It should just barely come to a boil before lowering the heat to a simmer. This preserves the flavors of the soup without making them harsh.
Give it a go if you’ve never made miso soup from scratch!

Miso Soup Recipe

adapted from The Japanese Kitchen by Hiroko Shimbo
Ingredients
2 quarts dashi
3-4 Tbsp miso (use any type you like but traditionally, it's white miso)

Shiro (White) Miso Paste for Miso Soup

shiro miso for miso soup
6oz soft tofu, cut into cubes (more if you like your miso soup to have more tofu)
2 Tbsp wakame seaweed, soaked in some water to soften

Wakame Seaweed for Miso Soup

wakame seaweed for miso soup
2 stalks of green onions, sliced thin
Method:
1. Heat up dashi to near boil.
2. Add miso paste and mix till dissolved in dashi. Use a small strainer to mix the miso paste into the dashi.
3. Bring to simmer. Add tofu, wakame that has been softened and green onions. Serve immediately.

Miso Soup From Scratch

miso soup from scratch closeup
Enjoy!
Cheers, Annie
For the use of wakame seaweed, I am entering this dish in the Weekend Herb Blogging roundup, administered by Cook Almost Anything and hosted by Just Making Noise

Hungry for more Japanese dishes? Click below:

Japanese Oden Recipe
Pan-fried gyoza
Gyoza
Broiled Miso Seabass

Continue Reading: "How to Make Miso Soup From Scratch"...

Tuesday, December 01, 2009

Basic Dashi and Second Dashi

Dashi is a simple broth that is a very important component to a lot of Japanese foods. The Japanese use dashi as a base for miso soups, noodle soups and as a liquid in many simmering braises.

Making Dashi

making dashi
We’ve been living in Kuching for a little over 3 months now. We’re settling in all right, getting to know the place and people. But we haven’t had a big party of guests over to our house yet, like we used to do almost weekly back in San Jose. We really wanted to invite our friend Paul (who welcomed us on our first day to Kuching) and his family over for a meal.
Annie mulled over the different menu options and eventually decided on a Japanese menu. Of course, there would have to be miso soup. She also wanted to do niku-jaga (meat and potatoes) dish. Both dishes call for dashi as part or most of the ingredients list.
The base of making dashi is the use of kombu/konbu (a dried piece of kelp seaweed) which is placed in cold water then heated to almost a boil. The other ingredient is katsuobushi (bonito flakes) which is added after taking the kombu out. These days, you can get handy instant dashis that you just add to water. But there is nothing like making your own dashi from scratch. And they are not very hard to make at all.

Smells Like the Sea

On its own, dashi is not very strongly flavored but it has a very nice "sea" aroma. And when used to make miso soup (miso is really salty already), it adds that briny sea flavor to the soup. My Japanese friend tells me that the flavors are different based on the kind of kombu you use. I had some miso soup at her home where she had used some very good quality kombu and the miso soup was excellent.
I got this dashi recipe from The Japanese Kitchen by Hiroko Shimbo. I love this cookbook quite a bit. Shimbo has done a great job in presenting Japanese food to a novice and her book shows her evident love for the details of cooking Japanese. Sometimes, she does get a little bit too complicated for me and I do simplify when I think it’s necessary but her detailed instructions and steps are what makes this book a lovely instructional on traditions of Japanese food and cooking.
Try out this dashi recipe if you’ve never made your own from scratch. The ingredients can easily be found in Asian grocery stores (Japanese and Korean stores will have more choices of kombu and bonito flakes but in a pinch, the other Asian groceries will also carry at least one of each of the above items).

First dashi

adapted from The Japanese Kitchen by Hiroko Shimbo
Ingredients:
3-4 pieces of dried kombu, about 6 inches in length each (seaweed)
a large handful of bonito flakes (around 1 cup pressed down)
2 quarts water (about 8 cups)

Method:
1. Wipe kombu with damp cloth (do not rinse kombu). Place kombu into pot with cold water.

Wiping Kombu

wiping kombu for dashi
2.Heat pot over medium heat and wait till it's almost boiling. Do not let it come to a boil. Once you start seeing some bubbles, remove kombu.
3. Reserve kombu for second dashi. Add bonito flakes now to the broth. Heat for roughly two minutes. Turn off the heat and wait for bonito flakes to sink to the bottom.

Adding Bonito Flakes to Dashi

adding bonito flakes for dashi
4. Pour broth through a sieve and reserve bonito flakes for second dashi.

Second dashi

1. Take another 2 quarts of water and put kombu and bonito from first dashi into pot of water. Heat until almost boiling and then simmer for 15 minutes or a bit more. Remove kombu and bonito and reserve stock.
Note: Use first dashi when you want clear dashi flavors like miso soup, or dishes that are lighter and where the dashi carries the dish.
Use second dashi for stronger flavored dishes like those that contain meat where the dashi is not the main player in the dish.

You can also make it vegetarian by not adding the katsuobushi. Instead, add dried shiitakes (rehydrated first) to the stock and you will have a mushroomy flavored dashi. We’ve also tried adding ginger to our dashi for a little extra heat. Play around with your dashi—if you want a more fishy flavor, try adding some dried anchovies. The added ingredients do change the character of the dashi so be mindful of that when you are thinking of adding different flavors.
Once you have your dashi, there are plenty of ways to use them. Look out for our coming posts on Miso soup and Niku-jaga (braised beef and potatoes) that utilize dashi.
Cheers, Annie
I am entering this recipe in the Weekend Herb Blogging roundup for this week, administered by Cook Almost Anything and hosted by Just Making Noise.

Hungry for More Japanese recipes? Click below:

Japanese Oden Recipe
Broiled Salmon Collar Recipe
Pan-fried gyoza
Broiled Miso Seabass
Korokke

Continue Reading: "Basic Dashi and Second Dashi"...

Wednesday, November 25, 2009

Thanksgiving Turkey Leftovers: Turkey Tortilla Soup

Tired of eating the same old dried out, microwave-reheated breast meat for days? I sure would be. This Turkey Tortilla Soup will spice up your leftovers!

Turkey Tortilla Soup
Originally posted 27 Nov 2007
Updated 25 Nov 2009
In the past, we've always saved the carcass of the turkey to make stock, and most of the time we turn that stock into turkey jook (rice congee). It's pretty easy to do.
But I was getting tired of Asian food. I just didn’t want to fall back on warming up leftover turkey again. I wanted some kicked up flavors and spice! So I went Southwestern with a Turkey Tortilla Soup.

Turkey Tortilla Soup Recipe

Adapted from Fine Cooking Magazine November 2006
Ingredients
2 Tbsp olive oil
1 yellow onion, finely diced
2 Tbsp ancho chili powder
2 Tbsp tomato paste
1 quart homemade turkey broth
6 cilantro sprigs (I left them out)
Kosher salt
2 cups shredded or medium-diced leftover roast turkey
1-1/2 cups medium-diced fresh tomato
1 cup cooked fresh corn kernels (or substitute thawed frozen corn)
1 can black beans, rinsed and drained

Garnishes:
1/2 to 1 ripe avocado, medium diced
1/4 cup crumbled queso fresco or feta cheese
3 Tbs. chopped fresh cilantro
2 Tbs. sour cream, or to taste (optional)
1/2 lime, cut into wedges

Turkey Tortilla Soup Ingrendients

Turkey Tortilla Soup Ingredients
Method:
1. Heat the 2 Tbsp oil in a medium saucepan over medium heat. Add the onion and cook, stirring occasionally with a wooden spoon, until softened and just beginning to brown.
2. Add the chili powder and tomato paste and cook, stirring, for 15 to 30 seconds. Pour in the broth and scrape the bottom of the pan with the spoon to loosen any cooked-on bits.
3. Bring to a boil over medium-high heat. Reduce the heat to medium low and simmer, uncovered, until the broth has reduced by about a third, 20 to 30 minutes. Season to taste with salt.
4. Divide the turkey, tomato, corn, and beans four bowls.

Esther and Daniel dividing the ingredients

Daniel and Esther assembling Turkey Tortilla Soup
5. Ladle the hot broth into the bowls, top with chopped avocadoes, a sprinkle of feta cheese, and a dollop of sour cream.

Turkey Tortilla Soup

Turkey Tortilla Soup 2
If you have it, squeeze some lime juice on top to give it a tart bite. I would have garnished with chopped cilantro but the cilantro was sitting in the bottom of the veggie drawer and I didn't find it until later. Instead of fresh fried corn tortilla strips, I just crumbled some corn tortilla chips and mixed that in to the soup.
So there you have it, another delicious way to enjoy your leftover turkey!
Aloha, Nate

Hungry for more recipes for turkey leftovers? Click below:

Turkey Jook
Recipe for Leftover Turkey (or Ground Turkey) and Pinto Bean White Chili with Lime and Cilantro on Kalyn’s Kitchen
Turkey Noodle Soup on Andrea’s Recipes
Turkey and Squash Risotto on Closet Cooking
Tips for Using Thanksgiving Leftovers in Bento Boxes on Just Bento

Continue Reading: "Thanksgiving Turkey Leftovers: Turkey Tortilla Soup"...

Monday, November 23, 2009

Turkey Jook

I hope you save that turkey carcass from Thanksgiving dinner, because you can use it to make turkey jook ("rice congee" -- aaahhh, just call it "jook"). And because I'm making it, you know the recipe has to be easy!

Turkey Jook

turkey jook
Originally posted 1 Dec 2008
Updated 23 Nov 2009
The Thanksgiving feast is done. Much of the remaining turkey meat has been cut off the carcass and saved for making sandwiches later. Now you’ve got a bare carcass sitting on your counter. You’re not going to throw that away are you?
Oh, heck no!
One of the best ways to deal with the turkey carcass is to make a big pot of turkey jook the next day. Making turkey jook takes relatively little work, especially compared to the culinary acrobatics that normally take place in the kitchen on Thanksgiving. Here’s what you do:

Put the turkey carcass in a big stock pot along with the thigh bones and wings, cover with water and simmer for 3 hours or more. You should get a rich, brown stock.

Turkey Stock

turkey stock for jook
Ladle out half of the stock (about 7-8 cups) into another pot. Remove the carcass bones and let them cool. Chill the remaining stock and reserve it for something else (turkey tortilla soup might be good).
Optional: add to the stock pot a cup of dried scallops that have been reconstituted in warm water.

Adding Dried Scallops to Turkey Stock

adding scallops to turkey stock for jook
Add a half cup of uncooked Japanese short grain rice, rinsed. We recommend short grain rice as opposed to jasmine, because the starchiness of the short grain will help thicken the jook. Let the rice simmer in the stock for 2 hours.
Meanwhile, peel the meat off the cooled turkey bones. Add half the meat to the jook and reserve the other half for (you guessed it) something else. (If you have any more leftover turkey meat, you might want to chop that up and use that too. But I'm lazy ;-) )

Peeled Turkey Meat

shredded turkey for jook
Adjust the seasonings with soy sauce to taste. Ladle the jook into bowls, then garnish with chopped green onion or cilantro, and a couple dashes of white pepper. Drizzle a little sesame seed oil on if you like.
There you have it. A nice, warm bowl of turkey jook to feed your soul.

Turkey Jook

turkey jook closeup
Aloha, Nate

Hungry for more easy recipes? Click below:

Braised Char Siew (or Non-bake Char Siew)
Stir-Fried Green Beans with Savory Tofu and Peanuts
Lazy Heirloom Tomato Gazpacho
Five Quick Asian Dishes: Two Tofus, Two Ways

Continue Reading: "Turkey Jook"...

Tuesday, November 10, 2009

Homemade Pho Ga (Chicken Pho Noodle Soup)

Learn a few simple tips to make un-pho-gettable, pho-lavorful pho like a pro.

chicken pho

When I first moved to Hawaii, I discovered Vietnamese noodle soup - more specifically Pho. The first time I had it was in Honolulu’s Chinatown where a friend had recommended we go to this one restaurant that specialized in Pho. When we got there, there was a line out the door—a sure sign that the food was going to be good. And it was and my love affair with Pho started.

Un-pho-gettable

When we got to San Jose, I discovered that the Vietnamese population here was even bigger and we got exposed to so many more Vietnamese dishes. But even as I learned to love many other dishes, I had to have my pho every so often and every time I sat down to a bowl of Pho, that first sip of the broth would have me sighing contentedly. There was just something so heartwarming about the soup—the spices and herbs along with the hearty meat stock marrying together and creating a fragrance unlike anything else.

Even though beef pho is more common, Nate and I will sometimes order chicken pho (pho ga). The broth is often cleaner but with a more distinctive sweetness from using chicken stock, I suppose. Whatever it is, it is just as compelling as beef pho. We love them both equally. How about you? Which do you pre-pho?

Looking Pho-ward

Now that I’m in Malaysia, I find that Vietnamese food is not as popular here. I suppose that Malaysians have so many noodle dishes already that people are not as impressed by the subtleties of pho (or maybe they just aren’t aware of it). Our family misses this noodle soup quite a bit (Daniel and Esther gave a cheer when they heard I was making it). Thankfully, we brought most of the spices we would need to make it ourselves.

However, I have never made beef pho. Every so often, I have made chicken pho in California. That being the case, I decided that I would save the more daunting task of cooking beef pho for another occasion (it seems more daunting because beef stock is very unfamiliar to me). So today, I went to the market to get all that I needed for chicken pho.

The first thing I did was to make sure I got myself a really good chicken (I bought a free range chicken) and some extra chicken bones (I had saved some from previous cooks). Then I went looking for the fresh herbs and beansprouts that I would need for the garnishing. The noodles were an easy acquisition since pho noodles are very similar to kuay teow and I could find fresh ones at the market.

Everything else I already had at home in my pantry so I was set to go.

Can We Say Pho-lavor?

Before I first made pho, I heard from friends that making pho broth is a real production that takes days. But I learned how to make this dish from a student friend in my graduate student days. She made it look so simple, basically just boil some chicken with spices and aromatics that had been charred in a fire, add some seasonings, garnish with fresh herbs and dashes of lime and fish sauce. She alone convinced me that pho could be a simple meal and soon I was making it like a pro.

The one key thing that I learned from her was that the flavors in pho formed from the charring of the spices (cinnamon, black cardamom, cloves, star anise) and aromatics (ginger and onion). When we were in the dorm, we didn’t have access to a gas stove so we just broiled these ingredients in the oven till they had blackened in some parts. The charring lends the soup stock more depth and color.

Charring Onion and Ginger
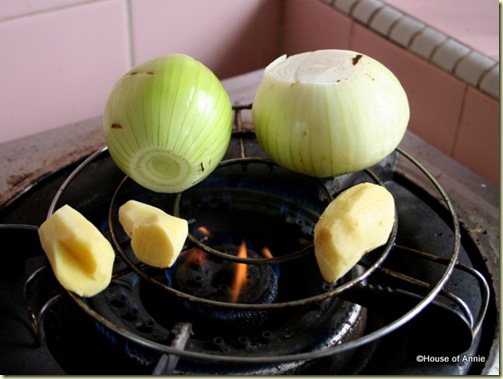
roasting onion and ginger for pho

Once that is done, just put all the spices in a large stock pot and add the chicken and chicken bones. Fill with enough water to cover the chicken (about 15 cups). You want to have enough water at the start so that you don’t have to add water later which will then dilute the flavors. The stock is then simmered for a long time to extract the most flavor out of the chicken bones. You do want to take the whole chicken out midway (around 30-40 minutes) and cool it before removing the meat. The carcass is then tossed back into the stock to simmer some more.

As for seasonings, I find that you need to season quite strongly as the noodles themselves are very bland. I normally add salt and fish sauce and also a little bit of chicken bouillon. I also add some rock sugar into the stock to sweeten it up a little (I learned this from a former ESL student who was a cook at a popular pho restaurant in San Jose, and Andrea Nguyen also recommends it). When you taste it, it should be more strongly flavored than a normal soup. This will balance out once you add the noodles and beansprouts.

Pho-nishing Touches

The rest of the dish is really pretty simple. As the stock is simmering, just assemble the garnishes—beansprouts, Thai basil, sawtooth leaf herb, some jalapeno or other chilli peppers, and lime. Prepare the noodles—if you have dry ones, blanch in hot water quickly to soften, or if using fresh noodles, just give a quick rinse in cold water. Cut up the chicken meat into bite sized pieces.

One other trick that I have when serving I learned from observing the hawker stall vendors here that serve noodle soup. Ladle some hot soup into your assembled bowl of noodles and beansprouts and herbs, drain the soup back into the soup stock (which should be boiling hot by the way). Then ladle the soup back into the noodles again. This is to blanch and heat all the ingredients thoroughly and ensure that the soup itself is piping hot when served.

Finish by adding a squirt of lime and peppers to your taste. Serve hoisin and sriracha on the side if you like (I mainly use this as a dipping sauce for my meats but omitted it this time as the chicken was tasty enough without it)

Chicken pho (Pho Ga) recipe

serves 6-8

Ingredients:

1 whole free-range chicken (the better the chicken, the more superior the stock), about 1.5 kg (3-4lbs)
additional chicken bones (I used some chicken feet and neck and also an extra 2 whole rib bones)
2 large yellow onions, skin removed
3 inches ginger, skin removed
3-4 star anise
3-4 cloves
1 inch stick of cinnamon (thank you White on Rice couple for providing us with authentic Vietnamese cinnamon)
1-2 black cardamom pods, slightly pounded to allow flavors to be released
15 cups water
2 Tbsp salt
3 Tbsp fish sauce
1 inch chunk rock sugar
1 tsp chicken bouillon
1 tsp ground black pepper

Garnishes:
2 cups beansprouts (I err on the side of more in case some people like more sprouts in their bowl, whatever is leftover can be used in a stirfry or in making Vietnamese summer rolls later)
1 bunch Thai basil, washed
8 sawtooth herb leaves (optional)
2 limes, quartered
1 Jalapeno chilli, sliced
4-5 green onions, diced
Hoisin sauce and Sriracha sauce on the side

1 kg (about 2 lbs) fresh pho noodles (koay teow noodles) or a packet of dried rice noodles that have been softened in hot water

Method:
1. Char the onions and ginger over an open flame till they have dark brown bits all over. Do the same with the star anise, cloves, cinnamon, and cardamom (I just hold it with my tongs under the fire for a few seconds).

Charred Onion, Ginger, Cinnamon, Star Anise, Black Cardamom, Cloves

roasted aromatics for pho

2. Put the charred aromatics into a large pot with the chicken, chicken bones and water.

chicken and aromatics for pho

3. Bring to a boil. Skim off the scum that has risen to the top. Turn fire down to low and let simmer for about 2 1/2 to 3 hours.

skimming pho broth

4. About 30-40 minutes into the simmer, take out whole chicken and rinse in cold water to stop cooking. Drain and let it dry and cool. When cool enough to handle, remove wings, legs, thighs and cut off the breast meat. Return the rib carcass to the stock pot. Place the meats (uncut) on a platter and keep cool until needed.
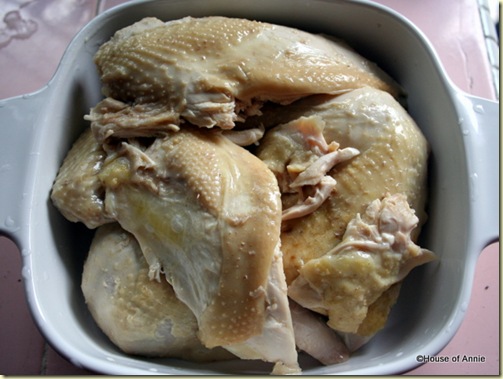
boiled chicken

5. Clean and wash beansprouts, sawtooth leaf herb, and Thai basil. Prepare plate with the garnishes, green onions, lime wedges and chillies, if using.

Garnishes for Pho: Thai Basil, Bean Sprouts, Sawtooth Herb, Lime Wedges

Garnishes for Pho: Thai Basil, Bean Sprouts, Sawtooth Herb, Lime Wedges

6. Prepare noodles (wash with cold water if using fresh noodles, and soften dried noodles in hot water).
7. Slice chicken into bite sized pieces. Remove dark meat from bone.
8. When ready to eat, taste broth and adjust seasonings if needed. Remember that the stock should be strongly flavored (it should have a nice saltiness with an underlying sweetness). Put in freshly ground black pepper and bring stock back to a rolling boil.
9. Assemble bowl: place noodles, sprouts, herbs and chicken on the bowl. Ladle hot stock into bowl and then drain back into stock pot, without letting the other ingredients fall in (use a slotted spoon to hold them back). Re-ladle stock into soup bowl. Finish with a handful of green onions.
10. Squirt lime and add chillies to individual taste.

Pho Ga: Chicken Pho Noodle Soup
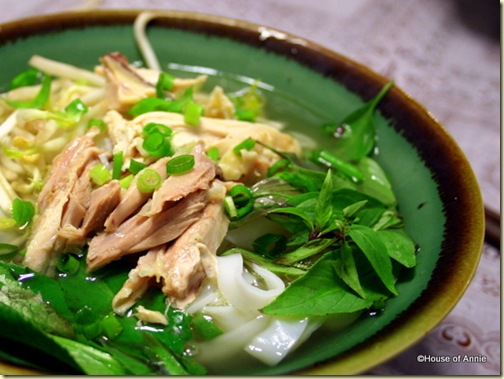
pho ga chicken pho

Go Pho It! (i.e. Enjoy)

Cheers, Annie

Since we used White on Rice Couple’s Vietnamese cinnamon in this dish, we are entering this post in Weekend Herb Blogging #209, hosted by Paul Chen’s Food Blog and administered by Cook Almost Anything.

Hungry for more noodles? Click below:

KL-Style Hokkien Mee Recipe

Pumpkin Mee with Prawns Recipe

Bun Rieu Cua

7 Tips for Making Mouth-Watering Char Koay Teow

Hokkien Prawn Mee

Continue Reading: "Homemade Pho Ga (Chicken Pho Noodle Soup)"...

Thursday, October 01, 2009

Grace Place Sarawak Laksa

First off, I want to say thank you to all our readers, who have been bearing with us while we get settled in to our new home in Kuching. Even though Annie has been cooking most nights of the week, there haven’t been too many House of Annie recipe posts lately. Most of our posts have been about goingout someplace to eat.

The main reason for this is, the big shipping crate carrying all our stuff (including kitchen appliances, all our normal herbs and spices, and the home computer with all our archived food pics on it) from San Jose hasn’t arrived yet. On top of that, the one tiny fluorescent lamp in our wet kitchen (where most of the cooking is done) has gone out, so it’s nearly impossible for me to get good pics of whatever Annie is prepping for dinner.

I never intended for this blog to be a restaurant review site. Most of you readers probably couldn’t fly here to Kuching to eat at the places we’re eating out at. That being said, I do want to tell you about a place we’ve found that serves some good Sarawak laksa.

Grace Place Sarawak Laksa

grace place sarawak laksa stutong kuching

What is Laksa?

According to Wikipedia, laksa is a spicy, soup noodle dish, originating from the merging of Chinese and Malay cultures (also known as Peranakan or Nyonya) which is found primarily in Singapore, Malaysia and Indonesia. Okay now, show of hands: How many of you know have tasted laksa? All right, now how many of you have tasted Sarawak laksa? That’s what I thought, very few.

Like me, most people are familiar with the curry laksa, a coconut-and-curry-based dish found in Singapore or KL. There’s also assam laksa, that sweet-spicy-sourish, fish-based dish found in Penang (I am absolutely in love with assam laksa from Penang!). But I didn’t know about Sarawak laksa until one day on maybe my second trip to Malaysia, when Annie’s cousin in KL took us to a stall in Bangsar that was known for its Sarawak laksa.

At first, I didn’t know if I’d like it. The broth was thin and brownish. There were a few prawns in it, plus shreds of chicken and strips of egg omelette. There was coconut in it, but no sharp curry flavor like curry laksa. Instead it was a mysterious but harmonious blend of spices, punctuated by a generous helping of fresh coriander. After first tasting it, and then finishing the entire bowl, I knew it was something I could enjoy again and again.

Looking for Laksa

When we first arrived in Kuching, we tried some Sarawak laksa from a stall near the hotel. It wasn’t very good – heavy on the white pepper, which covered up the nuances of flavor. Disappointing, but not daunting.

Later on, we moved into a house rented from a friend. We were cleaning up the place one day, when the friend brought over some lunch (what did I tell you about Kuching hospitality?). It was Sarawak laksa (of course, being already in Sarawak, they just call it laksa here).

This laksa was awfully good. I finished it all in no time, and was left longing for more. Our friend said that the laksa was made by a relative who owned a laksa stall. She gave us the location so we knew where to find the place.

Grace Place Sarawak Laksa Stall

grace place grace place sarawak laksa stutong kuching

One thing I have to note here. In Kuching, everybody eats early. This is especially true if you want to eat Sarawak laksa. The best laksa stalls are sold out by midmorning; after 10 am, you may either get the dregs, or you may get nothing.

So we were very fortunate when we recently showed up at 10:30 at the laksa stall, to find Aunty Rose still tending there. But as you can see, there wasn’t much soup left in her pot! She was literally scraping bottom to fill our order.

Grace Place Sarawak Laksa

grace place sarawak laksa stutong kuching

Aunty Rose put a lot of effort into making a quality laksa. Every day, she would wake up at 4:30am to heat up her soup. By 6:30, she would be at the stall, selling her laksa. She’ll finish at around 2 pm, then head home to start prepping the ingredients for the next day. By 8 pm, she’d be done prepping and off to rest before the next day comes and the cycle begins again.

I don’t think I could survive that kind of life. But Aunty Rose does it with calm grace, and a smile.

Aunty Rose’s Laksa

aunty rose sarawak laksa

Her laksa is thoroughly enjoyable from the first bite to the last slurp. Mix in a little homemade sambal belacan, add a squirt of kalamansi lime juice, and dig in. The thin rice vermicelli noodles still have a little crunch to them. The shredded chicken is flavorful in its own right. The bean sprouts, normally an afterthought, have their tips meticulously picked (another sign of the care she puts into her food).

And the broth? Oh the broth! Rich, savory, coconutty, with a pleasant chilli heat to it, it is slurp-alicious! This is not a broth to be left alone once you’re done eating the noodles. This is a broth that is good to the last drop. Next thing you know, it’s all gone.

You push back from your bowl with a sigh, face slightly sweaty, nose lightly runny, lips and throat tingly. You’re satisfied for now, but you know you want to come back for more.

Grace Place Sarawak Laksa

grace place sarawak laksa stutong kuching

Unfortunately, you can’t have any more. You see, as of the end of September, Aunty Rose has retired from her stall. (Notice the “Stall for Rent” banner in the pic below.) I literally got the very last bowl of Aunty Rose’s laksa!

grace place cafe stutong

I asked Aunty Rose what she is going to do in her retirement. She laughs. “I’m going to clean my house!” Too many years of dedication to the stall, and to her laksa, left her with little time to do anything else.

I say she deserves her break. Of course, it would be a shame to just let her recipe be lost, wouldn’t it? So we asked her if she would share it.

That’s right. We got her laksa recipe!

And we’re going to share it. Because you see, our shipping crate has arrived in Kuching and will be delivered shortly. We have a contractor who is coming to replace and upgrade the lighting in the kitchen. Soon, we’ll be posting recipes (including laksa!) once more.

Life is good!

Aloha, Nate

Don’t miss out on any of our recipes! Subscribe now to receive our latest posts to your RSS reader or to your Inbox.

Hungry for more Malaysian noodles? Click below:

KL-Style Hokkien Mee Recipe

Pumpkin Mee with Prawns Recipe

Hokkien Prawn Mee

7 Tips for Making Mouth-Watering Char Koay Teow

Continue Reading: "Grace Place Sarawak Laksa"...

Saturday, August 29, 2009

Honeydew Sago Dessert Recipe: A Refreshing Summer Treat!

Updated 29 August 2009

Originally posted 1 August 2008

Honeydew Sago Dessert

honeydew sago

In Malaysia, we have many soupy desserts. Some of them are served hot, like the Chinese “tong sui” (sweet drinks) and others cold (like cendol, ice kacang and es teler). The honeydew sago dessert falls into the cold category and it really is refreshing.

During Summer, melons are abundant in the grocery stores and the farmer’s market. One Saturday, we bought three melons at the Palo Alto Farmer’s Market—a bambino watermelon, an orange-fleshed watermelon and a honeydew melon (read about our encounter with a gross "Asian-girl fetish" man). The watermelons we planned to just enjoy on its own but I had plans for the honeydew melon.

Sago = Tapioca pearls

sago tapioca pearls uncooked

Sago or tapioca pearls can be found in all your Asian grocery stores and probably in some of the regular stores as well. They look like little tiny white beads. I love these things and will put them into any “soupy” Asian desserts abundantly (be careful though as they are also a thickener and too much can turn your “soup” into “pudding”). There’s another dessert that is made entirely of them and I will blog about that later.

Working it out

So anyway, we had brought back lots of stuff from the farmer’s market, right? And Nate had told you that he was working on the grilled pork tenderloin dinner with all the other ingredients. (By the way, I did not agree with his post—we had a little argument about it after it was published, yeah, our first blog fight *lol*. What I think he meant to say was that I also do look at what I have before deciding on what to cook BUT once I decide, I settle on a recipe (or adapt it) and go from there. He, on the other hand, starts chopping the stuff on hand and then continues searching for how to make use of it and what else to make with it…not very efficient…tsk…tsk…).

I love him anyway and sometimes it works out remarkably well. I just have to stay away so as not to get impatient. So while he was putting together this wonderful meal, I took a nap. I woke up feeling refreshed and came into the kitchen to work on my dessert dish. The whole meal came out really great and because pork tenderloin and grilled halibut are pretty light foods, there was room for my honeydew sago dessert which was a delightful way to end dinner and the weekend.

Honeydew Sago Recipe

Ingredients:
½ honeydew melon (save the other half for enjoying plain)
1 cup sago (tapioca pearls)
½-1 cup sugar (depending on how sweet your honeydew is)
½ cup water
1 cup coconut milk shake the can before measuring out the one cup otherwise you will have really thick coconut milk only)
½ tsp salt

Method:

Make a simple syrup: Put water and sugar into a small pot and boil till sugar dissolves to make a syrup. Cool.

Boil the sago: Put a big pot of water to boil (to hold about 7 cups or more of water). When water comes to a boil, add sago to water and cook on med-high heat. Stir occasionally. Sago is done cooking when it looks translucent, about 8-10 mins. Caution: Don’t overcook the sago as it can become a sticky mess. Better to have a few pearls that have not turned translucent than to have a glop of melting sago.

Cut and blend the melon: While sago is cooking, cut half of the half melon into chunks

honeydew chunks in blender

and buzz in your blender till smooth.

honeydew being blended for honeydew sago dessert

Dice the remaining quarter of the melon into small ½ inch cubes (or if you want to be really pretty, you could use a melon baller).

diced honeydew melon

Rinse the sago: As soon as sago is done, pour it out into a fine-mesh colander and rinse with cold water.

Assemble the dish: Put the melon cubes and the melon juice together in a large bowl.

blended and diced honeydew melon

Add the coconut milk.

drizzling coconut milk to sago honeydew dessert

Followed by the cooled sago.

adding tapioca to honeydew for sago honeydew dessert

Pour in the sugar syrup little by little, to adjust the sweetness.

Salt trick

The trick to getting your dessert to taste better is to add a little salt. Salt enhances the sweetness of any dessert!. Stir it all together and chill.

Enjoy!

honeydew sago

Cheers, Annie

This post was entered in the “Merdeka Open House 2009: My Sweet Malaysia” roundup, hosted by Babe in the City – KL

If you like this recipe, then won’t you subscribe to receive all our recipes to your RSS reader or your Inbox!

Hungry for more Asian desserts? Click below!

Es Teler - A Cool Indonesian Dessert

Hearts, eyes, and frog eggs

Mochi Ice Cream from Bubbies (Honolulu)

Evolution of Dessert: Sake-Poached Asian Pears with Ume and Li Hing Sauce

Continue Reading: "Honeydew Sago Dessert Recipe: A Refreshing Summer Treat!"...