Please wait a few seconds while we redirect you
to the new and improved House of Annie website at
www.houseofannie.com !

Saturday, December 12, 2009

Ultimate Italian Almond Macaroons

WARNING: this is NOT a cheap cookie!

Ultimate Italian Almond Macaroons

ultimate italian almond macaroons
So I had checked out FoodGal Carolyn Jung's blog right before Christmas last year, when she had posted a recipe for this cookie. She said it was the one cookie that she did every year and she always got requests for the cookie. Her post was so compelling that I went out that week and got myself all I needed to make this cookie.
It was such a simple recipe! It is a little bit messy and gooey when rolling the cookie dough in the slivered almonds but the resulting cookie is a delight—a really yummy, chewy, almond delight. And the smell of the almonds when it’s baking will get you in the holiday mood like nothing else. The fragrance is so amazing!

Tips and Techniques

These cookies may be simple to make, but they aren’t cheap. It takes 2 1/2 tubes of almond paste to make one batch of these cookies. We paid $8 at Safeway for one 7 ounce tube of almond paste. (Does anybody know where you can get it cheaper?)

7 oz Tube of Almond Paste: $8

7 ounce tube of almond paste: $8
The recipe calls for you to combine the almond paste and sugar in a food processor—I just used my mini prep and that worked fine but if you don’t have either, don’t let that hinder you. Try chopping it up with a knife or even using a mortar and pestle—the main key is to get it crumbly and then whisking in the sugar. You could also use your mixer to do the job.
The one thing I had problems with was rolling the cookies out. After mixing the egg whites into the almond paste mix, the resulting mixture was pretty sticky and gooey. So I used a spoon to scoop out the mix and dropped it into a plate that had the slivered almonds. I gently rolled the mix around the almonds and then picked it up and put it on my baking tray. I was a little worried that the cookie wouldn’t bake up well but it was really pretty once baked.
If you don’t know what to do with all those egg yolks after baking this recipe, may I recommend you try making either my banana cream pie or my lemon curd which calls for egg yolks. The lemon curd would make a wonderful gift for friends for the season as well. A bag of Italian macaroons and a jar of lemon curd—your friends will love you for the homemade goodness you bring!

Italian Almond Macaroon


makes about 5 dozen) taken from FoodGal’s blog which she adapted from “Classic Home Desserts”

Ingredients
1 lb almond paste
1 3/4 cups sugar
4 large egg whites
About 1 lb slivered almonds

Method
1. Preheat oven to 350 F. Line 2 or 3 baking sheets with parchment paper.
2. Be sure to measure the almond paste accurately, as too little almond paste will create a super sticky dough that will be harder to work with (I got a sticky dough anyway, but don’t let that deter you!).
3. Break almond paste into pieces. Place in bowl of a food processor with the sugar. Pulse into almond paste is crumbled finely, and evenly combined with sugar.

almond paste and sugar crumbs
4. In a separate bowl, beat egg whites to soft peaks (I actually beat them till they were fairly stiff). Stir a little of the egg whites into the almond mixture; it will be fairly dry. Fold in remaining whites.
Folding egg whites into almond paste and sugar
5. Place slivered almonds in a shallow bowl. Roll almond paste mixture into 1-inch balls, keeping them as round as possible. If mixture is too sticky, alternately drop heaping teaspoonfuls into the bowl of almonds; use your fingers to roll the dough ball around until coated evenly with slivered almonds.
rolling cookie dough in slivered almonds
6. Place on prepared baking sheets, spacing 1 inch apart.
ultimate italian almond macaroons
7. Bake cookies until evenly pale gold, 15 to 17 minutes.
8. Cool cookies in pans on a wire rack for about 5 minutes. With a spatula, very carefully transfer cookies to the rack to cool completely. I could tell you that they store well but I suspect they will be gone in no time at all.

Ultimate Italian Almond Macaroons

ultimate italian almond macaroons
I brought these cookies to a Christmas party and they were gone very quickly and I got lots of compliments for them. Personally, I thought they were a little too sweet (for my Asian tastebuds) but it was pretty addictive and I *managed* to munch on several before getting to the party!
Enjoy!
Cheers, Annie

Hungry for more festive baking recipes? Click below:

Pavlova Recipe
Chocolate Chip Cookie Recipe
Pandan Chiffon Cake
Homemade Pineapple Tarts
Almond Cookies

Continue Reading: "Ultimate Italian Almond Macaroons"...

Thursday, March 12, 2009

Quick and Easy Pasta With Light Cream Sauce Recipe

Farfalle with Asparagus, Spinach, Mushrooms and Sausage

Farfalle with Asparagus, Spinach, Mushrooms and Sausage

I was having a meal with friends a while ago at Pasta Pomodoro. My girlfriend ordered their Penne Portobello and told me it was one of her favorite dishes. I asked for a taste and decided that I could probably make this at home.

I had already been making pasta dishes that I learned from Fine Cooking Magazine based on their “Cooking Without Recipes” article titled “How to Make a Light, Creamy Pasta Sauce” (Fine Cooking, Issue number 50). So I had the right building blocks to figure out how to make Penne Portobello myself.

For the pasta, I’ve used penne as well as farfalle. You are totally free to interchange them as you please or use any other shape of pasta.

Quick and Easy Pasta Recipe

This recipe is a quick and easy dish. From start to finish, I can normally whip up this meal in half an hour or less. Basically, while your pot of water is boiling for the pasta, you can be prepping all the ingredients and when you put the pasta in to boil, you can start to cook the sauce. Once the pasta is done, all you have to do is incorporate the pasta in the sauce and add a little cream and that's it, you're ready to eat! Easy huh?

And the ingredients that go in the sauce is really up to you. In this one, I am going to use mushrooms and (because I do like lots of veggies), I also add onions, bell peppers, asparagus, sundried tomatoes, and spinach. I find that any combination of these veggies (other vegetables I've used include zucchini, peas, cauliflower and fresh tomatoes) make a really yummy pasta.

You can also vary your protein. I normally try to go with two different types of meat to complement the rest of the ingredients. Sometimes, I will throw in some bulk Italian sausage (about 1/2 lb) and some kielbasa sausage or bacon. At other times, I've just used chicken and sausage or made it a seafood dish by adding shrimp. When I use shrimp though, I keep it more simple—just a veggie or two and let the shrimp be the star. Play around and find your favorites!

Linguine with Pancetta, Zucchini, Shallots, and Homegrown Cherry Tomatoes

Linguine with Pancetta, Zucchini, Shallots, and Homegrown Cherry Tomatoes

The Trick to Tasty Pasta

The trick to making your pasta sauce taste really yummy is to give it a nice liquid ingredient. I always keep a bottle each of dry and sweet vermouth in my pantry (they last a lot longer than a bottle of opened wine as they are fortified) and they really add a delicious flavor component to the finished dish as well as in helping to scrape up all the nice brown bits while cooking. Other liquids you can choose to add include chicken stock, marsala wine, brandy, vodka, and clam juice. After adding your liquids, you do want to reduce it to really give it a punch.

Right at the end is when you add the cream (and not too much--about 1/2 cup is plenty) to enrich the sauce and give it some body. It won't make the sauce so thick and heavy the way a lot of cream sauces are in restaurants but it will give your pasta a more luxuriant mouth feel.

Finally, don't forget to toss all the ingredients together and add final touches like grated cheese or leafy herbs to add one more layer of flavor to your final pasta dish.

Penne with Sausage, Spinach and Mushrooms

Penne with Sausage, Spinach and Mushrooms

How to Boil Pasta

One word on boiling pasta. Growing up, my mom used to boil pasta in a medium sized pot and add a pinch of salt and a teaspoon of oil. I didn't know any better for a long time and did the same. After watching Food TV and also reading cookbooks, I've come to realize that how you cook your pasta is KEY to how the whole dish will taste.

If you plan to cook the whole pound of pasta, you will need:

  • a big pot of water (4 quarts).
  • to salt liberally (at least 2 Tbsp--I never bother to measure, I just taste my water, if it tastes like the sea, you've salted it enough).
  • to forget the oil. Oil does nothing for the pasta.
  • to stir the pasta several times through the cooking time-this helps ensure the pasta doesn't clump together.

And when it's cooked through (follow cooking times on the package but also bite into it to make sure it's cooked through), save a cup of the water and drain. Do NOT rinse in cold water. The saved water can be added if the pasta starts to clump a little (I use this more when I'm making spaghetti or other noodle pasta, I don't need it as much with farfalle).

Save a Cup of Pasta Water

Save a Cup of Pasta Water

Brighten Up the Flavors

One final trick—soy sauce. Yes, soy sauce. Right at the end, I always add a bit of soy sauce to my sauce. You won’t notice it but it will brighten up all the other flavors because of its umami. If your sauce still doesn’t come alive after that, you can do my second trick and add a bit of lemon juice. That always works for me. But try the soy sauce trick first. You’ll be amazed.

Farfalle with Mushrooms and Sausage in a Light Cream Sauce

adapted from Fine Cooking Magazine

Ingredients
1 lb farfalle (bowtie) pasta (I’m partial to Barilla brand pasta)
4 qts water
2 Tbsp salt

2 Tbsp extra virgin olive oil
1/2 lb bulk sweet Italian sausage or 1/3 lb bacon, sliced to cubes
1/2 lb polska kielbasa, large diced
1 onion, diced
1 cup asparagus, sliced on a diagonal (about 8 spears)
2 cups sliced mushrooms (I used baby bellas this time but you can use white button or portobellos or even shiitakes if you want)
1 bell pepper (any color you like), diced
2 large handfuls of spinach (about 1 bunch or 2 cups baby spinach)
1/4 cup chopped sundried tomatoes (the ones packed in olive oil), make sure to get some of that oil into the pasta too (it adds a lot of flavor)
1 tsp Italian seasoning (or combination of your choice of dried herbs)
1/2 cup dry vermouth (sweet vermouth will work too)
1/2 cup low-salt chicken broth
1/2 cup heavy cream
Salt and freshly ground black pepper, to taste and don’t forget the dash of soy sauce (about 1 Tbsp)
Garnish: grated Parmesan and chopped parsley

Method:
1. Bring water to boil in large pot. Add salt and throw in pasta. Give it a stir every so often while cooking. Follow timing on your pasta box. Check to make sure pasta is done. Drain pasta and do not rinse in cold water.
2. While water is boiling, prep ingredients and start cooking. Add pasta to cook as you continue to make your sauce.
3. In a large stainless steel pan, heat olive oil over medium heat. Add bacon or Italian sausage and sauté till bacon is slightly crisp or sausage is halfway done. Add kielbasa sausages and continue to cook till lightly browned.
4. Throw in diced onion and sauté till onions are soft. Add Italian seasoning and salt and pepper to taste.
5. Toss in the asparagus, mushrooms and peppers. Sauté for 1-2 minutes till mushrooms start to wilt.
6. Add sundried tomatoes.
7. Add vermouth and chicken broth. Bring to boil and then simmer till reduced by about half.
8. Throw in the spinach now and let it wilt in the sauce.
9. Add cooked pasta to sauce and toss around to coat pasta. Add in heavy cream and additional flavorings (like soy sauce or lemon juice) and toss. Taste and adjust seasonings.

Farfalle with Asparagus, Spinach, Mushrooms and Sausage

Farfalle with Asparagus, Spinach, Mushrooms and Sausage

Plate up and garnish with parmesan cheese and parsley. Sometimes, the pasta is so flavorful already that I omit this step.

If you want to spice up your pasta, feel free to add some dried red chili flakes or Tabasco to your sauce.

Enjoy!

Cheers, Annie

This article was entered into the Presto Pasta Nights roundup, hosted this week by Ben of What's Cooking

Subscribe to our blog and get all our recipes for free, sent to your RSS reader or your Inbox!

Hungry for more quick and easy dishes? Click below:

Quinoa Salad with Shrimp and Asparagus Recipe

Old Bay Blackened Halibut

Stir-Fried Green Beans with Savory Tofu and Peanuts

Steamed Egg Tofu with Ground Pork and Shrimp

Five Quick Asian Dishes: Two Tofus, Two Ways

Continue Reading: "Quick and Easy Pasta With Light Cream Sauce Recipe"...

Wednesday, February 04, 2009

No Knead No More

Well, it started out okay...

Bread Flour, Whole Wheat Flour, Yeast and Salt

Bread Flour, Whole Wheat Flour, Yeast and Salt

I had made a New York Times No Knead Bread a while back, but hadn't attempted one recently. If memory serves, the crust was perfect but the crumb (inside of the bread) was chewier than I preferred. I just hadn't gotten around to doing another one.

Seeing as we had the Foodbuzz 24, 24, 24 Chinese New Year Cioppino post coming up, I got the crazy idea to make my own bread to go along with the cioppino. When I watched Chef John from Foodwishes.com make a No Knead Ciabatta Bread recipe a couple of weeks back , I thought this would make the perfect occasion to try doing No Knead Bread again. The whole appeal of this type of recipe is, it's simple enough for a non-baker like me to make at home without a lot of effort.

No Knead Bread Recipe

Adapted from Foodwishes.com

Ingredients

375 grams bread flour
120 grams whole wheat flour
1/4 teaspoon active dry yeast
1-1/2 teaspoon salt
2 cups warm water

Mixing Flour, Salt, Yeast and Water for No Knead Bread

Mixing Flour, Salt, Yeast and Water for No Knead Bread

Covered it with foil and let it sit in the oven (at room temperature) for 18 hours. The dough was very bubbly, soft, wet, sticky, and "gluten strand-ified".  So far, so good.

No Knead Dough After First Rise

No Knead Dough After First Rise

Here's Where I Think it Went Wrong

According to the recipe, you're supposed to drizzle a little olive oil in a sheet pan and then sprinkle on lots of corn meal. I think I drizzled too much olive oil, and dumped on even more corn meal. Also, I think I didn't use the right kind of corn meal. This one was more like flour instead of the coarse, grainy type you see used for pizza dough recipes

No Knead Ciabatta Dough on Sheet Pan

No Knead Ciabatta Dough on Sheet Pan

I covered it with a clean towel and let it rest, forgetting that I was supposed to flour the top of the dough first. Two hours later, the towel was sticking to the dough and I had to carefully separate it like gauze from an oozing burn wound (ick!) Not pretty.

I put it in a 425*F oven for 35 minutes, with another pan of water on the bottom rack to create steam. Here's what it looked like when I pulled it out. I had high hopes.

No Knead Ciabatta Bread

No Knead Ciabatta Bread

After letting it cool down, I cut into it. Then I took a bite.  Hmm...

Sliced No Knead Ciabatta Bread

Sliced No Knead Ciabatta Bread

Like the other no knead bread that I did, the crust was very nice, but the inside was kinda tough and chewy. In fact, the bottom of the bread seemed to be undercooked. I was not happy with the way the bread turned out, so I decided to not serve it for the cioppino dinner and went with bread done by professionals.

At dinner, Michael of Cooking for Engineers confirmed that he, too, was not impressed by the No Knead Bread recipe. He had made a dozen loaves as research for an article, but he ended up not writing it because he was not happy with his results. Carolyn the Food Gal encouraged him to write about his results anyway. We'll see.

I am not saying that the No Knead Bread recipe is bad. I'm certainly not blaming Chef John's recipe for my poor results. People all over seem to have success with the recipe. But going 0 for 2 makes it hard for me to consider another attempt.

Have you had success with the No Knead Bread recipe? I'd love to hear your experiences. Leave a comment and tell us about it!

Aloha, Nate

For more SUCCESSFUL baking recipes, click below:

Homemade Baked Char Siew Bao

Chocolate Chip Cookie Recipe

Pandan Chiffon Cake

Homemade Malaysian Pineapple Tarts, Part 1

Aunty Marlene's Banana Muffins Recipe

Continue Reading: "No Knead No More"...

Thursday, January 29, 2009

Cioppino Hot Pot Recipe

Here is the recipe for the cioppino hot pot that we made for our recent Foodbuzz 24, 24, 24 dinner

Cioppino Hot Pot

The first time I visited California, my uncle took me down to Monterey to go see the aquarium there. That evening, we went out to dinner and I ordered the cioppino. It was the best, most amazing seafood soup I had ever tasted. I was hooked on cioppino.

Fast forward several years later to when Annie and I had been living here in the Bay Area a few years. I've always had that cioppino on my mind. One evening, Annie made a huge pot of cioppino for us and a group of friends, using the Tadich Grill Cioppino recipe from Saveur Magazine. Everyone loved it.

Covering the Cost

In fact, our guests loved the cioppino so much, they said that they would gladly pay us to make it again. All that wonderful but expensive seafood made doing this dish at home cost-prohibitive. But if we had some help getting the ingredients, we could do it. What could be better than having someone else cover the cost of the meal?

Enter the Foodbuzz 24, 24, 24 program. Each month, Foodbuzz features 24 blogs doing 24 meals in a single 24 hour period. If you are selected as one of the 24 bloggers to present a meal that month, you receive a stipend that will help cover the cost of the meal. Cool beans!

Build a Better Cioppino

When Annie and I were developing our proposal for the meal, we were thinking of incorporating a Chinese New Year theme. Hot pot is a really popular dish among Chinese, especially around Chinese New Year. (In fact, Kian Kho of the excellent Red Cook food blog also did an amazing hot pot dinner for his Foodbuzz 24, 24, 24 meal. I guess great minds think alike!)

But I didn't want to do just a regular hot pot. I wanted to give it a San Francisco Bay twist to it. I thought, what's a seafood soup dish that's popular in the San Francisco Bay Area. *ding!* (lightbulb flashes on) Cioppino! Of course!

We could totally do this! It would be great, because we wouldn't have to worry about how much all the seafood was going to cost. In fact, it would be better and healthier to do a cioppino hot pot-style. Why?

Higher in Flavor, Lower in Fat

The original Tadich Grill cioppino recipe calls for all the fish, shrimp and scallops to be dredged in flour and fried in butter and oil. A cup of olive oil and 16 tablespoons of butter, to be exact. Sure, that cioppino would have tons of flavor. But that's an awful lot of fat. And remember, Annie hates frying fish.

Doing this cioppino hot pot-style, there would be no fish frying. Everything gets cooked in the broth, right at the table. The meal would be high in flavor yet lower in fat. Me likes!

Procuring and Preparing the Ingredients

We knew exactly where to go to get our seafood: our favorite fishmonger, Pat from Mission Fresh Fish. Pat has supplied us with fish for several of our recipes, including Pan-Fried Sanddabs, Wild Salmon Cakes, and Ikan Pepes. And he always gives us a good deal.

We gave him a call, told him what we were doing and what we wanted and placed our order. The day of the dinner, we went over to the Saratoga Farmer's Market to pick up our seafood. As soon as we got home, we started prepping.

First, we peeled the large shrimp, leaving the shells on just the last tail section. We took the peeled shrimp shells and boiled them in some water to make a shrimp stock, which we then strained.

Large Shrimp and Cooked Bay Shrimp for Cioppino

Large Shrimp and Cooked Bay Shrimp for Cioppino

Next, we sliced up the halibut fillets into thin slices. We also cleaned the scallops, removing any of the harder muscle. The scallops gave off a lot of liquid, so we had to drain them on paper towels for a while.

Sliced Halibut and Large Scallops for Cioppino

Sliced Halibut and Large Scallops for Cioppino

Then, we cleaned the clams and mussels. We tried our best to pick out the dead ones (they don't close tight when you squeeze them). We pulled off the mussel "beards" as well.

Clams and Mussels for Cioppino

 Clams and Mussels for Cioppino

Finally, we removed the cooked Dungeness crab bodies from their shells and cleaned off the gills and guts. Then we cut each body section into quarters.

Dungeness Crab Sections for Cioppino

Dungeness Crab Sections for Cioppino

The ingredient list for the cioppino broth is:

1 medium yellow onion, peeled and chopped
1 thumb of ginger, peeled and finely minced
2 medium carrots, peeled, trimmed, and chopped
1 rib celery, chopped
1 green bell pepper, cored, seeded, and chopped
1 leek, white part only, trimmed, cleaned, and chopped
1⁄2 small fennel bulb, trimmed and chopped
2 28-oz. cans crushed Italian tomatoes
2 tbsp. tomato paste
4 bay leaves
1 tsp. dried oregano
1 tsp. dried thyme
1 tsp. dried basil
2 pinches cayenne
Salt and freshly ground black pepper

First, the veggies were sauteed in a large stock pot with 8 Tablespoons of butter and 1/2 cup olive oil.

Sauteeing Vegetables for Cioppino Broth

Sauteeing Vegetables for Cioppino Broth

Then Annie added the crushed tomatoes and tomato paste, followed by 6 cups of shrimp broth. Next came the herbs and spices. For an added Asian twist, we put in a stalk of lemongrass that had been lightly crushed. We brought the cioppino broth to a boil, then lowered the heat and simmered, stirring occasionally and adjusting the seasonings to taste.

Adding Crushed Tomatoes to Cioppino Broth

 Adding Crushed Tomatoes to Cioppino Broth

(Oh, one more thing. Remember the crab shells from the Dungeness crab? There's a lot of lovely crab fat and tomalley left in the shell. We scraped all that into the cioppino broth as well. Mmmmm-MM!)

As the dinner hour got closer, Annie heated up a large skillet with a couple Tablespoons of oil and 2 cloves of garlic (minced). She then poured in 2 cups of Sauvignon Blanc and brought that to a boil. Working in batches, she tossed in the clams and mussels, covered the skillet, and let them steam for a few minutes. The clams and mussels that popped open were transferred to a bowl and set aside. (We discarded any that didn't open.)

Steamed Clams for Cioppino

 Steamed Clams for Cioppino

Dinner Time - Let's Eat!

I had set up a portable butane stove in the middle of our dining table. After our Thai-inspired Caesar salad course was cleared, we started cooking the cioppino hot pot. We transferred some of the broth from the large stock pot into a shallower pot, and brought that to a boil over the butane stove. Then we lay down some of the shrimp, fish, scallops, clams, mussels, and finally Dungeness crab sections into the broth. Covered the pot and let it come to a boil again.

Cioppino Hot Pot Boiling
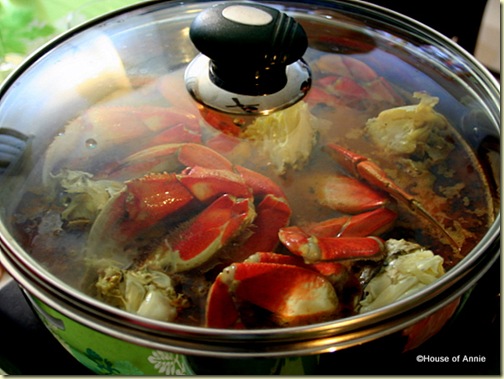
 Cioppino Hot Pot Boiling

Within a few minutes, the cioppino broth came to a boil. We ladled out all the seafood into individual bowls (one of our guests, Michael from Cooking for Engineers, has a good picture of his bowl of cioppino.) Then, it was time to chow down.

Ladle Full of Cioppino
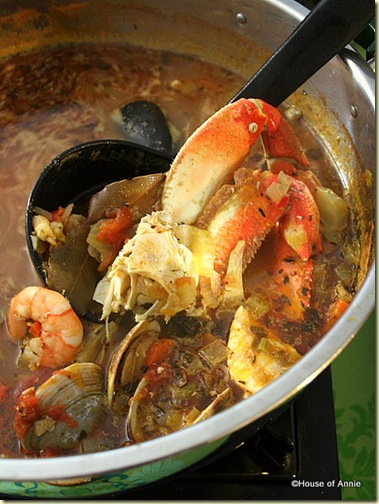
Ladle Full of Cioppino

I could tell that there wasn't as much butter in this version of cioppino compared to the previous versions. But that didn't matter, because the stew was bursting with so many other flavors. From the sweet shrimp, scallops and crab to the firm halibut flesh to the briny clams and mussels, it was perfect.

After everyone finished their first portion, we refilled with more cioppino broth from the stock pot, and started a second batch of seafood boiling. After that second helping, we were feeling pretty full, but pretty good!

Aloha, Nate

If you like this recipe, won't you subscribe (it's free!) to receive all our latest posts to your RSS reader or your Inbox?

Continue Reading: "Cioppino Hot Pot Recipe"...

Wednesday, June 11, 2008

Roli Roti Porchetta (San Francisco)

What's the best roast pork you've ever eaten?

I've eaten a lot of different kinds of roast pork over the years, from Chinese roast pork, to char siu, to Hawaiian-style kalua pig, to pulled pork barbecue, and many others. I've even had some awesome roast pork knuckle (I didn't even know pigs had knuckles) from a restaurant in the state of Kedah in Malaysia.


And then, I discovered porchetta. Ever since reading this article on Eating Asia, we've been wanting to visit the Roli Roti rolling rotisserie vendor at the San Francisco Ferry Building to have some of this delicious roast pork. One fine Saturday morning, we had occasion to drive up to San Fran to shop at the Farmer's Market there and, of course, buy some porchetta.


Chicken, chicken, porchetta, and chicken roasting on the rotisserie. Potatoes are sitting on the bottom tray, catching all the heavenly drippings from above.


When we first got there in late morning, there was already long line of people waiting for his porchetta to be finished. While we watched from the queue, he pulled the pork roast off the rotisserie, cut a chunk off the end, and examined it. It was still pink in the middle. He told us that he couldn't sell it to us because it wasn't fully cooked yet. "Come back in about 50 minutes."

Well, we came this far. We decided to stick around and peruse the other vendors at the market, checking back every 15 minutes "just in case". We went back twice because it wasn't done the first time. By the time the pork finally passed the chef's muster, the line was much smaller because it was already getting to about 1:30 in the afternoon. We were ravenous. We hadn't eaten lunch, preferring to simply graze at the farmer's market stalls while we waited for the porchetta to finish.

Besides a half chicken and some potatoes, we got one pound of his porchetta. It is seriously good stuff! Fatty and delicious, well seasoned with rosemary, fennel, whole peppercorns, and sea salt. We gratefully took it, sat down on a picnic bench, and gorged on perfect pork.


It is too bad that his porchetta is only sold at the Ferry Building Farmer's Market, even though he has rolling rotisserie trucks at farmer's markets all over the Bay Area. He just won't trust any of the other cooks with his pork.

Roli Roti Rotisserie Truck at the San Francisco Ferry Building Farmer's Market on Saturdays from 8 to 2. Follow the smell of roasting meat, then stand in line and hope he has any left by the time you get to the counter.

Aloha.

Continue Reading: "Roli Roti Porchetta (San Francisco)"...

Tuesday, April 29, 2008

Pizzeria Andiamo's (San Jose)

One Friday evening, Annie was craving a salad from California Pizza Kitchen for dinner. The nearest CPKs to us in San Jose are either at the Oakridge Mall or the Valley Fair Mall. Neither of which I felt like driving 20 minutes to the mall, then wasting 10 more minutes fighting for parking in the garage, and then waiting in the restaurant for another "15 to 20 minutes" (which inevitably turns into 45 minutes to an hour during primetime) with our two growling tummies plus the kidlets'. No way, Jose!

Also I didn't feel like a salad. But perhaps something Italian...? I fired up the web browser and went over to Restaurant.com to see if there were any Italian places closer to us. Lo and behold, there's one right in our neighborhood: Pizzeria Andiamo's on San Felipe Rd at Yerba Buena. We had eaten there in the distant past but they had recently changed owners and I was meaning to go back.

I printed out a Restaurant.com coupon, we got the kidlets into the car, and off we went. Within 10 minutes, we had found parking right in front of the restaurant, and by some great fortune were seated right away! Take THAT, CPK!

We hadn't had fried calamari since our last poor experience at Gumba's in Sunnyvale (I'll post about that experience someday). I've found that most restaurants around here don't do decent fried calamari. But we thought we'd give Andiamo's a try. You never know, right? Thankfully, these squid were perfectly fried and went well with both the marinara dipping sauce (not seen) as well as the baslamic vinegar that the waiter suggested.


I was originally leaning toward getting a Pesto Castroville pizza with artichoke hearts, prosciutto and garlic on pesto sauce. But the waiter convinced me to go with his favorite, the Chicken Club. It has chicken breast, bacon, red onions, cheese and tomatoes on top of Ranch dressing sauce. Daniel wanted pineapple on his pizza so we compromized on a large pizza - half "Hawaiian" (why do they call it "Hawaiian"? Just because it has pineapples doesn't make it Hawaiian!) and half Chicken Club.


I'm sorry, but the Chicken Club just didn't do it for me. The Ranch dressing sauce didn't impress at all. Worse, the diced tomatoes were just lame. But what do you expect from fresh tomatoes when it isn't tomato harvest time? Shoulda stuck with my first instincts and gone with the Pesto Castroville. I ended up eating (and enjoying) more of Daniel's half than mine.

Annie got the house salad of Spring greens, sliced apples, candied walnuts and gorgonzola cheese. She was happy.

Overall, we had a good experience. The food was good, for the most part, and the staff was very helpful and accommodating. Not to mention the fact we saved 1/3 off the bill by using a Restaurant.com gift certificate.

We'll be back. After all, I've gotta try that Pesto Castroville pizza.

Aloha.


View Larger Map

Open: Mon - Sat 11 - 9; Sun 9 - 8:30

More Eating Out in San Jose: Dynasty (dim sum), East Lake (Chinese), Goveas (Mexican), Halu (ramen)

Continue Reading: "Pizzeria Andiamo's (San Jose)"...