Please wait a few seconds while we redirect you
to the new and improved House of Annie website at
www.houseofannie.com !

Tuesday, May 18, 2010

Pork with Leeks and Basil

This is one of those slap-dash dishes that turned out better than expected.

Pork with Leeks and Basil

leeks pork herbs

This dish came about one day when I looked into my fridge and realized I had a little bit of this and a little bit of that left that needed to be used up. I had a couple leftover leeks from the leek and potato soup I made. And I also had some Thai basil and green onions left over from the last time I made larb. With all these random herbs and greens in my fridge (including some red chillies), I decided I would do something that would use it all up in one dish.

Leeks, Thai Basil, Green onions and Chillies

chopped leeks chile peppers green onions thai basil

I always keep some some sliced pork in the freezer that I had divided up for days just like these when I am in a hurry but wanting to make a stirfry quickly. I would get some tenderloin or country style pork ribs and slice up the meat into thin slices. Then put them into quart-sized ziplock bags and lay them out as flat as possible. Then freeze them. Don’t forget to label them—meat somehow takes on an undistinguishable character when it freezes (is this pork? chicken? beef?—yeah, I’ve been there!). Once you have them frozen in this way, it is so easy to take them out to defrost. The thin flat layer makes it a quick defrost when you’re in a hurry.

Marinating Sliced Pork

marinating pork

Armed with my leftovers and meat, I was set to go. I wasn’t quite sure how I was going to season it but I decided to just let my instincts take over. And it worked really well. The soy-based sauce complemented the basil and leeks very well and made it somewhat Malaysian. The fish sauce, Thai basil and chilli gave it a Thai flavor. I guess you could call this a Thai-Malaysian fusion dish! (If the fusion is both Asian, would you still call it fusion? Hmmm…somewhat confusing eh? ^_^)

Confusing terms maybe, but the flavors were spot on. The leeks were just wonderful with the pork. And the Thai basil gave it a nice licorice-y sweet flavor. Somehow, they all played so nicely together even though in the beginning I worried that I would have too many competing flavor.

Pork with Leeks and Thai Basil Recipe

Ingredients:

1lb pork, sliced
2 leeks, sliced thin
2 cloves garlic, minced
1/2 cup Thai basil leaf
1/2 bunch green onion, chopped
1 red chilli, sliced
1-2 Tbsp vegetable oil

Marinade:

2-3 Tbsp soy sauce
2 Tbsp dark soy sauce
1 Tbsp sugar
1 Tbsp fish sauce
1/2 Tbsp oyster sauce
1 tsp white pepper
1 tsp salt

Method:

1. Season the pork with the marinade ingredients and leave to marinate for 30 minutes.
2. While pork is marinating, prep the rest of the ingredients: chop the garlic, slice the leeks, chop the green onions, slice the red chilli, and remove the leaves of the Thai basil from its stem.
3. Heat wok over high heat and put in the vegetable oil. Throw in garlic and leeks and stirfry, making sure to keep tossing them around so as not to burn them. Continue to stirfry till leeks are slightly wilted.

Stir-frying Leeks

stir-frying leeks

4. Add pork, along with all the marinade and toss around for about 5-8 minutes until pork has cooked through.
5. Lower heat to medium, add the Thai basil, green onions and chilli and toss to mix.
6. Taste and adjust flavors—the dish should be distinctly salty-savory with a hint of sweet, smoky, caramel notes from the thick soy sauce and sugar.

Dish out and enjoy over rice.

Pork with Leeks and Basil

pork with leeks and basil

So next time you find yourself looking in your fridge and you have a host of different herbs inside looking to be used up, be adventurous and put them together in a stirfry. You just never know what new flavors you might unearth as you play with your food.

In the meantime, you can of course, always intentionally get all these ingredients and try out my dish to see if it works for you the way it did for me.

Enjoy!

Cheers, Annie

Continue Reading: "Pork with Leeks and Basil"...

Tuesday, March 30, 2010

Recipe for Thai Larb

Interchangeable ingredients, crunchy counterpoints: an orchestra of flavors that can lead to overeating!

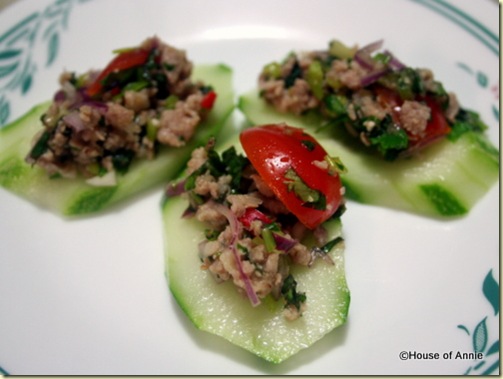
thai larb on cucumber slices

If you have never tried Thai larb, you really have to. It’s not really too hard to make and the ingredients are so interchangeable. And of course the flavors are distinctly Thai—a little sweet, a little sour, a little spicy and a little salty. Which is everything you need to lead to overeating! Thankfully, the dish itself is quite healthy with the amount of green herbs in it that you can justify the overeating.

The Thai Orchestra

I first got to know about larb when I lived in Hawaii and a group of Thai students arrived at my International dorm to stay for one semester. They cooked Thai food everyday and they were so generous in sharing all they made. I never ate as much Thai food as I did that one semester. As a matter of fact, I ate so much Thai salads and other dishes that I ended up developing a sore in my mouth from all the lemon juice they used in their cooking! The pain was totally worth it!

Whenever I make this dish now, I always think of my Thai friends fondly. They showed me that Thai food was an orchestra of different yet complementary flavors that would make beautiful melody in your mouth. You’d think they would be complicated but most of their recipes were simple and a matter of taste—a little bit of this and then that, taste, and add more to get the right balance. And here’s the wonderful thing about larb—it invites improvisation.

That semester, my friends made larb numerous times using ground pork, ground chicken, fish paste, and even cut up hotdogs. The herbs and vegetables that went in it also depended on what was available—cilantro, mint, Thai basil, sawtooth leaf, green onions, tomatoes, red chillies, and shallots. Use all or some of them as you wish or have on hand, with the only one that I find most necessary being the shallots.

Crunch Time

As a final touch, add a dusting of roasted rice powder for that nice crunchy mouth feel. I didn’t know where to buy roasted rice powder here in Kuching. In San Jose, I would normally just pick up a pack from the Asian grocery store. But it’s really easy to make it yourself. All you need is some raw rice that you roast in a dry, hot wok until the rice is nicely browned. Cool it down and then grind it with a spice grinder or in a mortar and pestle until you have fine granules of rice. Any extras can be kept for the next time you need it.

Once assembled, you just need a host of raw vegetables to act as the conduit for the larb. These vegetables are the counterpoint for larb’s yumminess. Usually, I like to use sliced cucumbers or iceberg lettuce cups to hold my larb as their refreshing crunch goes perfectly with the full-flavored larb. Other good options include green cabbage, French endive and bell peppers.

Thai Larb Recipe

Ingredients:
1 lb ground pork (or ground chicken, fish paste, or sliced hotdogs)
1 Tbsp vegetable oil (or you could even get away with just using a little water)
1 Tbsp fish sauce (we like the Three Crabs brand)
4-5 shallots, sliced thin
2 Tbsp roasted rice powder

Use a combination of 3 or 4 of the following herbs (or all if you so desire, just adjust amount if using all):
1/2 cup Thai basil, sliced
1/2 cup cilantro, sliced
1/3 cup green onions, sliced
1/3 cup sawtooth leaf herb, sliced
1/2 cup mint leaves, sliced
1/3 cup cherry tomatoes, quartered (about 8-10 cherry tomatoes)
1-2 (or more) Thai bird’s eye chillies, sliced thin (or black pepper if you can’t take the heat of the chillies)

For the sauce:
Juice from one lemon
2-3 Tbsp fish sauce
2-3 Tbsp sugar (or Thai palm sugar, or a sugar substitute which is what I use)

Method:
1. Heat up wok over medium heat and add vegetable oil (or water). Add ground pork and 1 Tbsp fish sauce and stir around till it is broken up and cooked through. Remove and cool.

browning ground pork for larb

2. Chop up your herbs and shallots. Add them to the cooked pork.

shallots cilantro basil and pork for larb

3. Add sauce ingredients. Taste and adjust seasonings. The larb should have a balance of salty, sour, sweet and spicy. Adjust to your own liking. Some prefer it sweeter, others more sour or salty.

thai larb

4. Finish by mixing in the roasted rice powder.
5. Serve along with raw vegetables like sliced cucumber, iceberg lettuce, green cabbage, French endives, and/or bell peppers.

thai larb on cucumbers

Enjoy!

Cheers, Annie

Since this recipe uses shallots, I am entering this post in this week’s Weekend Herb Blogging roundup, hosted by Haalo from Cook Almost Anything.

Continue Reading: "Recipe for Thai Larb"...

Monday, October 05, 2009

Seven Secrets for Perfect Thai Fried Chicken Wings

Thai Fried Chicken Wings

Thai Fried Chicken Wings

Who doesn’t like fried chicken? I know it’s something I can’t resist. As a matter of fact, when I was pregnant with my kids, the only thing I ever had cravings for was fried chicken. No, I didn’t crave pickles, and I didn’t crave ice cream. I ONLY wanted fried chicken. And after eating it, I would be so happy and contented.

Thing is, I don’t really like to deep-fry at home. As a matter of fact, I try to stay away from deep-frying as much as I can. I just don’t like how it makes my whole house oily and how much it makes myself oily.

But ok, when I saw this recipe for Thai-marinated fried chicken at Chez Pim’s site, I just could not resist it. The chicken looked so scrumptious, and the flavorings were distinctly Thai but without the spicy bite. And I could just imagine the crunchy snap as you take that first bite into crispy skin. Yum!

Thai Fried Chicken Wings

Thai Fried Chicken Wings

And so even though I normally don’t like to fry at home, I gave in for this Thai fried chicken recipe. And it was worth it. The chicken was amazingly good. The flavors of the fish sauce, oyster sauce, garlic and cilantro made it mad good! Even my son, who is normally a selective eater, made approving noises while chowing down on these fried chicken! “Hmmm…um…this is very good, mommy! Mmm…can I have another one? Mmmm…” With praise like that, how could I not make this again? I actually have made this recipe about three times now since finding it. So much for not liking deep-frying…

But ah, readers, I have found the secret to deep-frying without too much of a mess: Use a deep dutch oven (like my beloved 5-quart Le Creuset oval dutch oven pictured below). You don’t have to fill with too much oil, and the oil stays pretty much contained in the pot.

The Le Creuset heats the oil very evenly leading to a really nice even browning of the chicken. And I find that if you have to fry, smaller parts are easier than big pieces of chicken. Therefore, I recommend frying chicken wings, which cook up faster and more evenly than chicken legs. I tried them both and the next time I made this Thai fried chicken recipe, I used only chicken wings.

The other trick that Pim recommended was to use rice flour in coating the chicken. I’ve also done this when I first discovered this trick while living in Hawaii in the graduate dorm. A Japanese friend was making chicken karaage using mochiko (glutinous rice) flour, and the deep fried chicken pieces were scrumptious—I’ll have to share that recipe sometime soon. The mochiko flour makes the Thai fried chicken crispy and flavorful! Give it a go and tell me how it works for you!

Thai Fried Chicken Wings Recipe

adapted from Chezpim.com

Ingredients:
2 lbs or 1kg chicken wings (or chicken parts)
4-6 cloves of garlic (if you’re like me, you’d go with 6!), peeled
1 Tbsp chopped cilantro roots (or the bottom stems if you cannot get the roots—I used them both!)

Garlic and Cilantro with Cilantro Roots

Garlic and Cilantro with Cilantro Roots

1/2 Tbsp freshly ground black pepper
1 tsp kosher or large grained sea salt (don’t use fine salt)
3 Tbsp oyster sauce
1/4 cup fish sauce
About 2 cups rice flour
enough oil for deep frying

Method:
1. In a mortar or food processor, pound or chop the garlic, cilantro roots, and kosher salt into a rough paste.
2. Transfer the paste into a large bowl, add the oyster sauce and fish sauce and stir to mix well.

oyster sauce, fish sauce, ground garlic and cilantro

3. Rinse and dry the chicken pieces thoroughly, then place them into the bowl. Toss and rub the chicken pieces all over with the marinate mixture. Cover the bowl with plastic and let marinade in the fridge for at least 3 hours (I marinated them overnight).

Marinating Thai chicken wings

4. When you are ready to fry the chicken, place your pan over medium-low heat, fill it with enough oil (I used Canola) to cover about 2 inches from the bottom of the pan. Let the oil come up to frying temperature (How do you know the oil is ready? I use the Martin Yan method of placing wooden chopsticks in the pan and waiting for bubbles to form around the chopsticks).
5. Meanwhile, put the 2 cups of rice flour into a large plate (a pie plate works very well for this.) When the oil is ready, take the chicken pieces, one at a time, dredge them with the rice flour. Shake each piece to remove excess flour and place them, gently, into the hot oil. Do this in batches so as not to crowd your pan.

Dredged Thai chicken wings

6. Don’t let the oil get too hot. If the chicken is browning to quickly and you see large bubbles forming around the chicken, lower your heat lest you get half-cooked chicken. It should just be gently bubbling and sizzling in the pan.

Frying Thai chicken wings

7. Fry the chicken until they are golden brown and crisp. If you are using larger pieces, cut into one to make sure they are cooked through. If the juices do not run clear, stick them into a warm oven to finish cooking.
8. To retain their crispiness, here’s a trick I learned from Alton Brown, place the chicken on a rack with paper towels underneath the rack to wick the oil away. If the chicken is placed directly on paper towels, the moisture from the chicken will get trapped in the paper towel and cause the chicken to get soggy. So by putting the paper towels under the rack, the oil still gets wicked away but the space between allows the chicken to stay crisp.

Thai Fried Chicken Wings

Thai Fried Chicken Wings

Enjoy on its own or add a little sweet chilli sauce to add another layer of flavor!

To recap, here are the seven secrets for perfect Thai fried chicken wings:

  1. Use a deep dutch oven
  2. Use smaller pieces of chicken
  3. Dredge the chicken in rice flour instead of regular flour
  4. Test the oil temperature with the bubbling chopstick method
  5. Don’t crowd the pan
  6. Gently cook the chicken
  7. Drain the chicken on a rack over paper towels

Cheers, Annie

Since the cilantro roots were harvested from our garden, we are entering this post in the 37th edition of Grow Your Own, created by Andrea of Andrea’s Recipes.

Hungry for more chicken recipes? Click below:

“Huli Chicken” recipe

Smoked Shoyu Chicken recipe

3 Cups Chicken recipe

Malaysian Chicken Wings: Two Ways

Braised Chicken with 40 Cloves of Garlic

Continue Reading: "Seven Secrets for Perfect Thai Fried Chicken Wings"...

Tuesday, September 22, 2009

Simple, Sweet and Spicy Cucumber Salad

sweet and spicy cucumber salad

I bet that for those of you that grow your own veggies, you’re probably inundated by cucumbers right now if you’re growing them. That and zucchinis—well, if you’re growing zuchs, you should expect to be inundated!

Cucumbers are lovely to eat when they’re fresh. Crisp, juicy, and so cool when the summer is so hot. Living here in Malaysia, cucumbers are used raw in so many dishes (mostly as garnishes but also as a nice contrast to spicy and heaty foods).

While visiting a friend’s aunt recently, we were invited to stay for dinner (have I already mentioned how hospitable everyone is here?). She served us this cucumber salad and Nate just loved it. It was really delicious, a nice combination of sweet, tart and spicy. I, of course, asked for a recipe. It was such a simple recipe and I couldn’t wait to try it out myself.

Picking Pickle

The next day, I went off to the market and bought myself two cucumbers, some Thai chili peppers, and a lemon among other vegetables. You know, I didn’t really know how to choose the cucumbers so I let the vendor pick it out for me. He showed me how the two he picked up still had the brown flower hanging off the end to indicate how fresh and young it was. I trusted him and they were very nice.

The reason I say I don’t know how to pick a cucumber is because the variety they have here in Malaysia is very different from that in the US. Over here, the cucumbers are not dark green the way they are in the US (I still remember the first time I picked one at the store in the US and looked for the least green, most fat and smooth one only to cut in open and find that it was very seedy and bitter!). They are light green/yellowish green with speckles of dark green. If anyone has any tips on picking cucumbers, whatever variety they are, please leave a comment!

Anyway, I took these two cucumbers home and halved them lengthwise and then sliced these half moons thinly.

slicing cucumbers thinly

Then I sprinkled sugar and salt on the sliced cucumbers.

sprinkling sugar on cucumbers

Tossed it all together with my hands and then added the sliced Thai bird chilies.

scraping seeds off chiles

Lastly I squeezed the juice of one lemon on the salad.

squeezing lemon juice on cucumbers

At that point, I tossed it with a spoon (never a good idea to use your hands when you’re working with hot peppers—might come back to bite you when you accidently rub your eyes!) and let it sit for an hour in the fridge. At that point, the salad released quite a bit of water. You can choose to drain the water, or just scoop out the cucumber leaving the juices behind. Et voila! A nice, cool salad to enjoy with almost anything Asian with a little spicy zing at the end.

So simple it seems silly to write the recipe down but here it is:

Sweet and Spicy Cucumber Salad

Ingredients:
2 medium cucumbers, halved lengthwise then sliced thinly
2 Tbsp sugar
1 Tsp salt
Juice from 1 lemon
2-4 Thai bird chilies, sliced and deseeded.

Method:
1. Sprinkle sugar, salt and lemon juice over sliced cucumber.
2. Add chilies.
3. Toss with a spoon till sugar and lemon juice has coated cucumber slices.
4. Set aside for one hour or more in the refrigerator.
5. Serve and enjoy!

Simple, Sweet and Spicy Cucumber Salad

sweet and spicy cucumber salad

Cheers, Annie

This post was entered into the September 2009 edition of the Think Spice blog event, created by Sunita of Sunita’s World and hosted by Kitchen Chronicles.

Hungry for more simple recipes? Click below:

Corned Beef, Carrots and Colcannon Recipe

Quick and Easy Pasta With Light Cream Sauce Recipe

Sweet and Sour Fried Fish Recipe

Steamed Egg Tofu with Ground Pork and Shrimp

Continue Reading: "Simple, Sweet and Spicy Cucumber Salad"...

Thursday, June 04, 2009

Of Facebook and a Thai Recipe

I have a love-hate relationship with Facebook. I love how it has allowed me to be connected with many friends that I’ve lost touch with over the years. It’s amazing how many old high school/college friends I’ve come to know again just from looking up different connections. And Facebook also allows me to keep up with all these friends via their status bars. In a time when we barely have time to shoot emails to each other, this little status updates have helped me to find out which friends are having children, which friends are travelling, which ones have just broken up with their significant others or gotten engaged. It’s amazing how much we can know from that little status bar!

But then again, do I really need to know what is going on with everyone? And do I need to get “cyber hugged” and gifted dimsum, or flowers, or good morning wishes or any other “cyber” thing in the one million and one applications that can be found on Facebook? And then, there are all these polls—which city/country/continent should you live on, what superhero are you, what does your color say about you, etc. (many of which are surprisingly accurate, but not so grammatically).

And then there are causes. The (Lil) Green Patch that donates money to save the rainforest (has anyone really confirmed this?), the charities that we can support (I support one called LSV-an orphanage in China that takes in handicapped children). Though a great way to showcase some charities, others are more likely time-wasters.

And the games on Facebook! Like quick trends, some start off really fun and after a while, they get tedious or lose their following. And again, a real time-waster as well as something that will cause your eyes to strain too much and your wrists to get carpal tunnel. I speak from experience. Yes, I’m as addicted as most of you out there to these games. Every so often I tell myself that I’m only going to play one game…yeah, you see where I’m going already right? WHO plays only ONE GAME?!?! C’mon, you know who you are…just for five minutes, you say and the next thing you know, it’s a whole hour that has gone by. Time wasting device at its greatest.

And what do you do when you receive a note in your email saying so-and-so wants to befriend you and you don’t even know who on earth they are? Or even worse, you know who they are but you don’t really care to know them that well and indecision grips you…should you not dis them and accept them as a friend and then they will know everything about you and what is happening in your life OR should you ignore them and hope they have forgotten that they asked to be your friend?

I’ve done both, and now I have too many friends to know what to do with. It makes it hard to be really honest in my status bar so most times I end up talking about what I cooked that day (safe, shouldn’t offend anyone). And I don’t really know how I feel either about those friends that have befriended me and then somehow didn’t think I was worthy and defriended me. Yup, Facebook doesn’t tell you when that happens, but you find out eventually. Ah well…do unto others…(yup, done that too). Sorry if that was you and you’re reading this.

So, why am I going on about Facebook and what does this have to do with House of Annie? Nothing I guess, except this is a blog after all and I have the right to talk about something non-food related right? To make it relevant, I will say that I won’t give up Facebook because of the fact that I can indeed get connected with people I haven’t been in touch with for a while. Case in point, I just reconnected with another old friend from my days in the graduate dorm in Hawaii and I couldn’t be happier. The reconnection helped me to remember the good times we shared in the kitchen and how she shared this Thai dish with me.

So here it is, Nat’s Pumpkin with Egg and Green Onion recipe. It’s a simple homey recipe which calls for kabocha squash (I’m sure butternut will work just as well). Like most Thai dishes, it has that interplay of sweet, salty and savory working. Unlike most Thai dishes, this one doesn’t have any heat to it (which isn’t to say you can’t go ahead and add some).

Pumpkin with Egg and Green Onion

Ingredients
2 Tbsp vegetable oil
half a kabocha squash (or other similar squash or pumpkin), cut into 1 inch cubes
2-3 garlic cloves, minced
1/3 cup water
1 1/2 Tbsp sugar, or more to taste
2 eggs, beaten
2 tsp fishsauce, or more to taste
3-4 green onions, cut into 1 1/2 inch length pieces

Method
1. In a frying pan, heat up vegetable oil over medium heat. Add garlic and lightly brown for a minute.
2. Add kabocha squash to pan and add water. Partially cover pan and cook till squash is just tender.
3. Add sugar to dish and mix it in.
4. Add in beaten eggs and a little bit more water if it looks like it’s too dry.
5. Season with fishsauce and taste. The pumpkin should have absorbed the flavors of the sugar and fishsauce nicely and the eggs should have a nice savory flavor.
6. Add in green onions and allow to wilt.

Serve over rice and enjoy!

(Sorry, no pics. Next time I make it, I’ll put the pics up.)

Cheers, Annie.

So…Facebook…are you glad for it or mad at its amazing ability to suck up all your time? Share your stories with us!

Hungry for more Facebook games to waste your time on? Click below:

Hell’s Kitchen

Bejeweled Blitz

ChainRxn

GeoChallenge

WordChallenge

Continue Reading: "Of Facebook and a Thai Recipe"...

Friday, April 17, 2009

Thai Son-in-law Eggs Recipe

I made these Son-in-law eggs recently when I had a glut of hard-boiled eggs after Easter.

Thai Son-in-Law Eggs

Thai Son-in-Law Eggs

The first time I had son-in-law eggs was in Hawaii (yes, at that amazing graduate dorm). My Thai friend, Pepper introduced this to me and we set out to make it together. It’s a really delicious dish!

Crispy or Chunky?

My memories of how the son-in-law eggs was made back then are vague. So I looked up a bunch of recipes online to check if my memory of the dish is correct. Most of the recipes I found asked for the shallots to be fried till crisp.

But the way I remember Pepper and I made son-in-law eggs was to pan fry the shallots until the shallots were just softened, and then add the tamarind juices and other seasonings. Then we added the eggs to the sauce and let the eggs soak up some of that yummy flavor.

I guess that makes my take on son-in-law eggs a little non-authentic. But it’s still a very good dish because the sautéed shallots in the tamarind sauce gives it a chunkier, chutney-like quality. Whatever it is, I just like it this way so I’m going to stick to that. Try it out and let me know if you like it too.

Fried or Boiled?

Another one of my memories of making son-in-law eggs include how difficult it was to fry the boiled eggs. They have a nasty tendency to pop and splatter on you! In my opinion, the fried part of the egg is too chewy and doesn’t have a pleasant texture anyway.

I think I have made this dish only one other time since then, and that time I chose not to fry the boiled eggs. I thought it was perfectly fine. So if you have a distaste for frying, I would say try doing it without. It seems to taste just as good.

For this post, I decided I would give frying one more shot and, yeah… (Reminder to self: nix the frying and just cook the eggs in the yummy sauce.)

Thai Son-in-law Eggs Recipe

Ingredients:
6 hard-boiled eggs (deep fried if you prefer or left plain if you don’t care)
1/4 cup tamarind paste mixed with 1 cup warm water to soften and mushed to extract juice (it normally comes sold in a block or sometimes in a plastic tub but some stores also sell the extract in liquid form—if you get that kind, please add about 3 Tbsp to the water and more later if you need more tang)

Tamarind Pulp and Water

Tamarind Pulp and Water

2 Tbsp palm sugar (brown sugar will work too but palm sugar gives a nice smokiness that you won’t get from brown sugar)

Palm Sugar (Gula Melaka)

Palm Sugar (Gula Melaka)

1 tsp fish sauce
1-2 Thai bird-eye chili (use as many as your heat tolerance will allow), halved
4-5 shallots, sliced thin
2 Tbsp vegetable oil
1/4 cup chopped fresh cilantro

Method
1. If you plan to fry the eggs, heat a pot filled with oil (enough to cover 1/3 of the egg) and roll them around until they are blistered and golden brown. Be careful, they tend to pop and spit at you.

IMG_2715

2. Remove eggs and set aside to drain on paper towel

3. Heat 2 Tablespoons oil in a sauce pan. Add shallots and sauté over medium heat until softened and just beginning to brown.

4. Strain the tamarind pulp and pour the tamarind juice into the saucepan with the shallots. Add fish sauce, palm sugar and bird-eye chilli.

Straining Tamarind Pulp

Straining Tamarind Pulp

5. Bring sauce to a boil. Put eggs back into the saucepan and coat eggs with sauce. Reduce heat and simmer for 5-10 minutes until the sauce thickens slightly. Taste sauce and adjust seasoning as necessary. The flavors should be a balance of sweet, salty, tangy and spicy.

6. Remove eggs and cut them in half lengthwise. Arrange on plate. Spoon the sauce over the eggs and garnish with cilantro.

Thai Son-in-Law Eggs

Thai Son-in-Law Eggs

Enjoy over rice!

Why do they call them “Son-in-Law” eggs anyway? I honestly have no clue and looking it up online didn’t provide any one, good answer. Ehh…whatever it is, it’s a delicious recipe and I hope you will try it out.

Cheers, Annie

If you like this recipe, please subscribe to receive all our latest posts to your RSS reader or your Inbox!

Continue Reading: "Thai Son-in-law Eggs Recipe"...

Tuesday, January 27, 2009

Thai-Inspired Caesar Salad Recipe

Thai-Inspired Caesar Salad Recipe

This is the recipe for the "Thai-inspired" Caesar salad that our neighbor showed us, which we served at our recent Foodbuzz 24, 24, 24 Chinese New Year dinner.

"Thai-Inspired Caesar salad"

Ingredients for Salad

2 hearts of Romaine lettuce, chopped
1 cup chopped cilantro
4 hard-boiled egg whites, chopped
Fried won ton noodles
cubed chicken breast (optional)

Ingredients for Dressing

1/2 onion, thinly sliced
3 Tbsp Italian dressing

1 tsp finely minced garlic
4 hard-boiled egg yolks
1 Tbsp peanut butter
2 Tbsp mayonnaise
1/4 cup water
2 tsp fish sauce
1/2 cup Italian dressing
1 Tbsp sugar (to taste)

Method:

1. Thinly slice half a white onion and marinate it with the Italian dressing.

Thinly sliced onion marinating in Italian dressing

2. Hard boil 4 eggs. When cooked, cool, drain, then peel the eggs. Cut them in half and separate the yolks from the whites. (Chop the whites up and add them to the salad.)

3. Mash the egg yolks in a bowl.

IMG_1126

4. Add the garlic, peanut butter, mayonnaise, water, fish sauce, and Italian dressing. Stir well to combine. It should be a smooth sauce, with very little lumps.

5. Add the marinated onions to the dressing.

6. Add in the sugar, a little at a time, until it reaches the desired balance of sweet to tart. (We used white sugar, but palm sugar from Thailand would also work.)

When ready to serve, lightly toss the lettuce, egg whites and fried won ton noodles together with the dressing, then plate up.

Thai-Inspired Caesar Salad

Thai-Inspired Caesar Salad Recipe

What I like about this dressing is that you can customize it to your tastes. It is nice and garlicky but it also has the added peanut element, not to mention the fish sauce that replaces the Worcestershire in the original recipe.

Aloha, Nate

Hungry for more salads? Click below:

Chopped Shrimp Waldorf Salad

Sweet Corno di Toro Peppers in Mexican Chopped Salad

$15 Heirloom Tomato Caprese Salad for $5

Strawberry and Tomato Salad with Maple

Continue Reading: "Thai-Inspired Caesar Salad Recipe"...

Wednesday, September 10, 2008

Thai Green Curry

Thai Green Curry


Thai Green Curry


Good Thai food is quite hard to find here in San Jose. The Thai restaurants around here tend to over sweeten their dishes and what we end up with is an unbalanced amount of sweetness that doesn’t satisfy. The only place that we consider somewhat decent is Krung Thai. (If you know of other restaurants that serve good Thai food in this area, would you let us know?)


So for the most part, I cook Thai at home. Thankfully, while I was living in the graduate dorm in Hawaii, I had many friends from Thailand who were fellow students. They taught me several Thai dishes that I can now cook from home with some ease.


One of my favorites is Thai Green Curry. It’s a very easy dish to make especially if you choose to use the prepared green curry paste that you can find in most Asian grocery stores. If you prefer to make your own paste, then the work does get harder. I personally just use a paste since it’s so convenient. Maybe one day, I will really try to make it from scratch.


Currently, the green curry paste that I like best is from the brand “Dancing Chef.” This brand cannot be found here in the US though. I get them from friends and family in Singapore. But before I found this brand, I used the “Mae Ploy” brand a lot. They are one of the better brands (according to my friends) for many Thai ingredients—curry pastes, coconut milk, etc.


Dancing Chef and Mae Ploy Brand Pastes


Dancing Chef and Mae Ploy Brand Thai Green Curry Pastes


Thai Curry is Different


I do want to note that cooking Thai green curry is quite different from cooking Malaysian red curry (which I’ll talk about in another post). The main difference is in how they use the coconut milk. If you've ever opened a can of coconut milk, you know that there is a cap of thick cream at the top of the can, and thinner milk at the bottom. In my mom’s Malaysian curry, she always adds the thickest coconut cream at the end of the cooking process. My Thai friends told me that it’s important to use the thick coconut cream first and let the oils rise to the top before adding the green curry paste. It’s almost like using the coconut as an oil to fry the paste in.


I’ve also seen different vegetables and meats added to Thai green curries. The one I make has always been with chicken but I’m sure you can vary your protein if you like. I also like to add bamboo shoots and eggplant to my curry. I’ve seen versions that use small pea-sized eggplant or the striped golf-ball sized eggplant in green or white. When I can find them, I sometimes use them. The pea-sized ones are more bitter and crunchy and I’m not as fond of them. You can also make this dish vegetarian by just adding lots of veggies and tofu.


So, on to the recipe…


Thai Green Curry


Ingredients:

1 Tbsp Mae Ploy brand Thai green curry paste or 1 pkt Dancing Chef paste

1 14.5 oz can of coconut milk (Mae Ploy or Chaokoh brands have worked well for me. Do not use light coconut milk)

1.5 lbs of chicken, cut into bite-sized pieces (you can use either bone-in or boneless, white or dark meat or both)

2-3 Thai lime leaves (optional)

2 Japanese/Chinese eggplant or a cup of Thai globe eggplants (Italian globes can be used if no other option is available — 1/2 will be more than enough), cut into large half moons.

1 can sliced bamboo shoots (again, the Mae Ploy or Chaokoh brands are preferable), drained and rinsed in boiling water to get rid of “tinny” flavor.

1 bunch of Thai Basil

Fish sauce to taste

sugar, to taste


Method:

  1. Skim off thick part of coconut milk from the can (it should be on the top portion of your can—don’t shake up the can before opening). Put into your pan and heat at med high. Stir occasionally. If it looks like it’s burning, turn the heat lower. When you see a film of oil rising from the coconut, add 1 Tbsp green curry paste and stir around, mixing well. Wait for a layer of green oil to float to surface.


  2. Add chicken and stir around to coat. Cook chicken till it’s almost done. You should again be able to see that layer of oil on top.


  3. Add the rest of the coconut milk and a couple of dashes of fish sauce (maybe about 1 tsp). Let it come to a boil and turn heat down.


  4. Add in bamboo shoots and eggplant and Thai lime leaf (if using). Cook until eggplant is translucent and cooked through.


  5. Switch off the heat and stir in Thai basil leaves (leaving some to garnish if you want). Taste and add more fishsauce and/or sugar if needed.


Serve this dish with jasmine white rice and you have an instant meal. It tastes even better the next day so hope for leftovers!


Thai Green Curry

This post was entered into the Weekend Herb Blogging roundup hosted by Canela & Comino and created by Kalyn of Kalyn's Kitchen.

Cheers, Annie


Related Posts:


Thai Beef Salad


Pad Woon Sen


Continue Reading: "Thai Green Curry"...

Wednesday, July 25, 2007

Thai Beef Salad

Thai food offers an alluring balance of sweet, sour, salty, and spicy. You've got sweet sugar, sour lime juice, salty fish sauce, and spicy chillies all melded together in a tantalizing and mouth-watering concoction. It's hard to resist.

Annie took a top sirloin steak, seasoned it lightly with s&p then broiled for 4 mins per side. After resting, she sliced it up and marinated the beef in fish sauce, lime juice, brown sugar, shallots, chili flakes, and chopped Thai bird chiles.

The salad greens included romaine lettuce, napa cabbage, carrots, green onions, mint, Thai basil, and cilantro. She laid out the veggies, pile on the beef, and then poured the remaining dressing over everything.


This was awesome!

Aloha.

Related recipes: Beef Tenderloin in Salt Crust, Churrasco Taco, Filet Mignon, Killer Kalbi, Korean Pancake

Continue Reading: "Thai Beef Salad"...

Friday, January 26, 2007

Pad Woon Sen

This Thai dish features bean thread vermicelli noodles, shrimp, fresh shiitake mushrooms, wood ear fungus, minced pork, bean sprouts, and fried eggs. Garnished with a little chopped cilantro and fresh squeezed lime juice. Healthy and delicious!


Aloha,

Nate.

Continue Reading: "Pad Woon Sen"...