Please wait a few seconds while we redirect you
to the new and improved House of Annie website at
www.houseofannie.com !

Tuesday, April 13, 2010

Egg Fu Yong with Green Beans and Daikon

A simple, yet satisfying dinner dish.

house of annie egg foo young

When I was growing up, eggs were not just something you had at breakfast. As a matter of fact, we probably had eggs more often at dinner time than we did at breakfast. I love all types of egg dishes. And I don’t really care what people say about eggs—they are the most economical and perfect food. One day, when I have my own place, I plan to raise my own chickens and get me some fresh eggs everyday!

So anyway, getting back to egg dishes, my mom would make egg fuyong every so often and we loved it. As a matter of fact, the simplest recipe—sauteed slice onions with beaten eggs (onion egg fuyong) is still one of my favorite egg dishes today. And my kids wolf it down too everytime I make it.

Sweeter Without the Shrimp

But every so often, my mom would make this style of egg fuyong—she would dice up some french or green beans and add some chopped up shrimp. After frying them, she would add the beaten eggs. Another dish I love!

These days I don’t eat as much shrimp. Firstly, they are expensive here in Kuching. Secondly, I am trying to cut down on shrimp (even though I love it very much) because of our concerns with wild-caught shrimp, and shrimp farming practices. So for this dish, I no longer add shrimp. I add diced onions instead for sweetness.

Also, I find that pickled daikon (takuan) or pickled radish works really well in this egg fuyong. It adds some sweet/sour flavors to this already umami-filled fuyong. And this is a great way to get my kids to eat their veggies without complaining.

Faster than a Frittata

What is an egg fuyong anyway? I actually didn’t know that they were called fuyongs until I went to the US. To me, they were just egg dishes. I believe that they are to the Chinese what frittatas are to the Western world. They are savory egg dishes with fillings mixed in.

However, the Chinese versions are much faster as we are not as concerned with keeping the dish together looking like a pie. It’s a quick toss and turn of the eggs and if some chunks break off, no biggie! Just flip pieces around until everything is cooked through and plate up.

Try it and let me know what you think.

Egg Fuyong with green beans, onion and daikon recipe

Ingredients:
3 Tbsp vegetable oil
2 cups french beans or yard-long green beans, diced
1 large yellow onion, diced
1/4 cup diced takuan or pickled radish
5 large eggs, beaten
2 tsp salt
1/2 tsp white pepper
1/2 tsp soy sauce

Method:
1. Heat oil in a non-stick pan or well-seasoned wok over medium heat.
2. Add onions and stirfry till starting to turn translucent, about 1 minute.

diced onions and takuan

3. Add takuan and green beans. Add 1/2 tsp salt. Saute till green beans are slightly cooked, about 1-2 minutes. Watch heat, make sure vegetables are not burning. If too hot, lower heat a little.

frying diced green beans

4. Beat eggs with remaining salt, white pepper and soy sauce. Beat to incorporate flavors.
5. Pour beaten eggs over beans and onions. Make sure that egg covers all the vegetables. Let uncooked egg run to the sides as you cook.

egg on green beans

6. When one side is set, about 2 mins, turn over to other side. It’s ok if you end up breaking the eggs a bit. I normally flip about one quarter at a time.

frying green beans fu yong

7. Let other side set. If needed, flip over once or twice more to fully cook.
8. Plate up and serve with rice.

egg foo young with green beans

Enjoy!

Cheers, Annie

Continue Reading: "Egg Fu Yong with Green Beans and Daikon"...

Thursday, March 25, 2010

Stir-Fried Cangkuk Manis

Here’s another quick and easy dish I learned to make here in Kuching.

Stir-Fried Cangkuk Manis

stir-fried cangkuk manis

Cangkuk Manis (“Chong-cook Ma-Niss”, meaning sweet leaf) or Mani chai in Hokkien is a vegetable that is very common here in Kuching. As a matter of fact, the same day that we arrived here and were introduced to paku, we also got introduced to Cangkuk Manis. Its texture when cooked is like spinach, but without the bitterness. This vegetable has a natural sweetness to it (which is why it’s name has the word “manis” – meaning sweet - in it).

How Sweet It Is

My friend Paul and his wife, Adeline, told us that this veggie is really easy to grow. Cangkuk Manis is actually the leaf of a bush commonly grown in Southeast Asia. Contrary to what you read in an earlier blog post on Paku, it is actually Cangkuk Manis that you can grow easily from it’s stem. “Just stick it in the ground and pretty soon it will start to produce leaves again” was how Paul explained it to us. I haven’t yet tried to do this because it’s so cheap to buy Cangkuk Manis at the store. For RM1, you get a big bunch!

Cangkuk Manis for Sale at Stutong Community Market

cangkuk manis for sale at stutong market

We’ve also ordered this dish in several restaurants and most times we’ve cooked or ordered it, they stir-fry this vegetable with eggs. The sweetness of the Cangkuk Manis really complements the egg nicely. Be that as it may, I was puzzled that at one particular restaurant, their Cangkuk Manis stir-fry was always sweeter than the ones I made at home. From the instructions I had been given, it was a simple stir-fry—just some garlic, shallots, egg, cangkuk manis and a bit of salt. But somehow, when I made it, the veggie did not sing with sweetness the way this particular restaurant’s did.

Anyway, after asking around and not being able to figure it out, we went to yet another restaurant where the dish was also sweeter (in a savory way). And that was when it dawned on me, they used oyster sauce!

D’uh! I should have guessed and tried it earlier. After all, oyster sauce is one of my favorite condiments to put on stir-fry veggies.

So, in this latest attempt at stir-fried Cangkuk Manis, I added some oyster sauce and finally, I had the flavor mystery figured out. Try this quick stir-fry if you are able to find this vegetable near you. I believe that in KL, they use this same vegetable in their Pan Mein. If you know it by another name, would you share?

Stir-Fried Cangkuk Manis Recipe

Ingredients
2 Tbsp vegetable oil
1 large bunch Cangkuk Manis, leaves stripped from stem and crushed
2 cloves garlic, minced
3-4 shallots, sliced thin
2 eggs, beaten
1-2 Tbsp oyster sauce
1/2-1 tsp salt
pepper to taste

Stripping and Crushing Cangkuk Manis

stripping cangkuk manis leaveshand shredding cangkuk manis leaves

Method
1. In a large wok, heat oil on medium high heat.
2. Add garlic and shallots and stir-fry for about a minute, until garlic is lightly browned and shallots are slightly translucent.
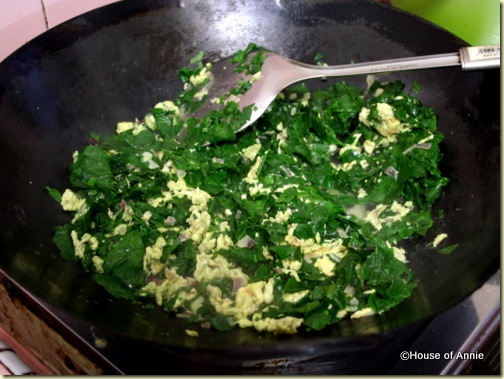
3. Add beaten eggs and stir them around quickly till they are all broken up and form little pieces. Be careful not to let them brown, you just want them barely cooked.

Stir-Frying Shallots and Eggs

stir-frying eggs and shallots

4. Add Cangkuk Manis leaves and stir around.

mixing cangkuk manis with egg

5. Add seasoning (oyster sauce, salt and pepper). Stir to incorporate the flavors. Add a little water if necessary to keep vegetables from drying out.
6. Taste and adjust seasoning.

Plate up and enjoy over rice!

Stir-Fried Cangkuk Manis

stir-fried cangkuk manis 2

Cheers, Annie

This post is entered into this week’s edition of Weekend Herb Blogging, administered by Haalo and hosted by frequent Grow Your Own contributor Graziana of Erbe in Cucina.

Continue Reading: "Stir-Fried Cangkuk Manis"...

Thursday, January 07, 2010

Cheese Pie with Peaches

A simple dessert that will satisfy your cheese cake cravings without going overboard with the calories. And making it is as easy as, well, pie!

Cheese Pie with Peaches

cheese pie with peaches
This isn’t a savory cheese pie like a spinach or a tomato cheese pie. It’s a dessert recipe I got from my Third Aunt a long time ago. It’s really very similar to a cheese cake except that the base is made using crushed Marie biscuits. You also don’t use as much cream cheese (only one 250g block) as most cheese cake recipes. And I would say it’s not as rich as a New York-style cheese cake.
Unlike some previous cheese cake attempts, I have never had any cracking issues when baking this cheese pie. I’ve even over-baked it a few times and it still comes out pretty good. So for those who don’t like the hassle of a bain marie (water bath) or if you like cheese cakes but would rather have a lighter version, this is the recipe for you.

Tips and Techniques

To make the cheese pie crust, you need to crush some Marie biscuits (if you cannot find Marie biscuits, cream crackers will work just as well, I imagine). Now normally, I would use a food processor to just blend them up. However, now that I’m in Malaysia, I haven’t had a chance to get myself a food processor. Thankfully, the mortar and pestle has been seriously handy in all my food preps. And even though it’s a lot more humbug, it does the job just as well.
marie biscuitscrushing marie biscuits
Besides the cream cheese filling, my aunt used to always add canned peaches to the pie. You could use peaches, apricots, mandarin oranges, cherries or even sliced pineapple. And once the pie is baked, you can also decorate the top with more canned fruit. Of course, if you want to use fresh fruit to decorate the top of your pie, you definitely can. I don’t recommend using fresh fruit in the filling part as the fresh fruit will cause the filling to become too watery.

Cream Cheese Pie with Peaches

Ingredients:
For the crust:
150g Marie biscuits, finely ground
62g butter, melted

For the filling:
250g cream cheese, at room temperature
4 oz sugar
1 egg
1/4 tsp vanilla essence
2 tsp gelatin dissolved in 2 Tbsp hot water
1 can sliced peaches (you may have leftovers)

Method:
1. Mix ground Marie crackers with melted butter evenly. Press into a 9 inch pan and up the sides. Refrigerate for at least 1-2 hours.
marie biscuits pie crust
2. Preheat oven to 350 F (180 C).
3. Beat cream cheese with sugar until well mixed.
4. Add egg and vanilla and mix till incorporated.

cheese pie filling

5. Add in the dissolved gelatine.
6. Arrange peaches on the crust. Pour cream cheese mixture over the peaches.

peach slices in cheese piepouring cheese pie filling
7. Bake pie for about 20-25 minutes until just brown on the edges of the pie (mine was just a little overbaked).
8. Cool the pie and then decorate with more fruit if desired.

baked cheese pie with peaches
Enjoy!
Cheers, Annie

Hungry for more desserts? Click below:

Easy Green Tea Tiramisu Recipe
Strawberry Shortcake Recipe
Pavlova Recipe
Es Teler - A Cool Indonesian Dessert
Honeydew Sago Dessert Recipe: A Refreshing Summer Treat!

Continue Reading: "Cheese Pie with Peaches"...

Saturday, December 12, 2009

Ultimate Italian Almond Macaroons

WARNING: this is NOT a cheap cookie!

Ultimate Italian Almond Macaroons

ultimate italian almond macaroons
So I had checked out FoodGal Carolyn Jung's blog right before Christmas last year, when she had posted a recipe for this cookie. She said it was the one cookie that she did every year and she always got requests for the cookie. Her post was so compelling that I went out that week and got myself all I needed to make this cookie.
It was such a simple recipe! It is a little bit messy and gooey when rolling the cookie dough in the slivered almonds but the resulting cookie is a delight—a really yummy, chewy, almond delight. And the smell of the almonds when it’s baking will get you in the holiday mood like nothing else. The fragrance is so amazing!

Tips and Techniques

These cookies may be simple to make, but they aren’t cheap. It takes 2 1/2 tubes of almond paste to make one batch of these cookies. We paid $8 at Safeway for one 7 ounce tube of almond paste. (Does anybody know where you can get it cheaper?)

7 oz Tube of Almond Paste: $8

7 ounce tube of almond paste: $8
The recipe calls for you to combine the almond paste and sugar in a food processor—I just used my mini prep and that worked fine but if you don’t have either, don’t let that hinder you. Try chopping it up with a knife or even using a mortar and pestle—the main key is to get it crumbly and then whisking in the sugar. You could also use your mixer to do the job.
The one thing I had problems with was rolling the cookies out. After mixing the egg whites into the almond paste mix, the resulting mixture was pretty sticky and gooey. So I used a spoon to scoop out the mix and dropped it into a plate that had the slivered almonds. I gently rolled the mix around the almonds and then picked it up and put it on my baking tray. I was a little worried that the cookie wouldn’t bake up well but it was really pretty once baked.
If you don’t know what to do with all those egg yolks after baking this recipe, may I recommend you try making either my banana cream pie or my lemon curd which calls for egg yolks. The lemon curd would make a wonderful gift for friends for the season as well. A bag of Italian macaroons and a jar of lemon curd—your friends will love you for the homemade goodness you bring!

Italian Almond Macaroon


makes about 5 dozen) taken from FoodGal’s blog which she adapted from “Classic Home Desserts

Ingredients
1 lb almond paste
1 3/4 cups sugar
4 large egg whites
About 1 lb slivered almonds

Method
1. Preheat oven to 350 F. Line 2 or 3 baking sheets with parchment paper.
2. Be sure to measure the almond paste accurately, as too little almond paste will create a super sticky dough that will be harder to work with (I got a sticky dough anyway, but don’t let that deter you!).
3. Break almond paste into pieces. Place in bowl of a food processor with the sugar. Pulse into almond paste is crumbled finely, and evenly combined with sugar.

almond paste and sugar crumbs
4. In a separate bowl, beat egg whites to soft peaks (I actually beat them till they were fairly stiff). Stir a little of the egg whites into the almond mixture; it will be fairly dry. Fold in remaining whites.
Folding egg whites into almond paste and sugar
5. Place slivered almonds in a shallow bowl. Roll almond paste mixture into 1-inch balls, keeping them as round as possible. If mixture is too sticky, alternately drop heaping teaspoonfuls into the bowl of almonds; use your fingers to roll the dough ball around until coated evenly with slivered almonds.
rolling cookie dough in slivered almonds
6. Place on prepared baking sheets, spacing 1 inch apart.
ultimate italian almond macaroons
7. Bake cookies until evenly pale gold, 15 to 17 minutes.
8. Cool cookies in pans on a wire rack for about 5 minutes. With a spatula, very carefully transfer cookies to the rack to cool completely. I could tell you that they store well but I suspect they will be gone in no time at all.

Ultimate Italian Almond Macaroons

ultimate italian almond macaroons
I brought these cookies to a Christmas party and they were gone very quickly and I got lots of compliments for them. Personally, I thought they were a little too sweet (for my Asian tastebuds) but it was pretty addictive and I *managed* to munch on several before getting to the party!
Enjoy!
Cheers, Annie

Hungry for more festive baking recipes? Click below:

Pavlova Recipe
Chocolate Chip Cookie Recipe
Pandan Chiffon Cake
Homemade Pineapple Tarts
Almond Cookies

Continue Reading: "Ultimate Italian Almond Macaroons"...

Saturday, November 14, 2009

Bread Pudding Recipe

This recipe for bread pudding is so easy and can be used for just about any stale bread you have lying around.

bread pudding baked with apples

Sometimes, when I’m making sandwiches, I save all the crust pieces in the freezer. If I have end pieces of bread, I save those too. When I’ve got a lot stashed up, I just break them all up and make this delicious bread pudding.

Of course, if you happen to have day old brioche bread, you could use that and have a really rich bread pudding but I think it’s just fine with regular bread. Matter of fact, when my friend’s mom gave me this recipe, she told me that you could use pretty much anything you have leftover that is going stale—bagels, doughnuts, sweet breads, french loaves, or any other bready thing.

Tips for Making Bread Pudding

I’ve baked this bread pudding quite often and here are some tips I recommend:
1. When you’ve assembled the bread pudding and poured the custard over it, leave it in the fridge for at least a few hours if not overnight so that the bread gets to soak up all the yummy custard. This will lead to a more cohesive bread pudding. Also, if you leave it overnight and bake first thing in the morning, you get to enjoy this for breakfast. Yum!

2. The original recipe called for raisins and apples to be placed on top. If you plan to use any fruit in it, especially dried fruit, don’t sprinkle the fruit on top. Instead, bury the fruit in between the bread. That way, the fruit won’t get dried out and burnt on the top (notice how burnt my apple slices got on top?).

3. The better the bread, the better the bread pudding. If you use wonder bread or really cheap white bread, you’re going to get gummy bread pudding.

4. Stale bread works better than fresh bread (you should be EATING your fresh bread anyway). But if you absolutely have to, I guess you could get some fresh bread to make this (toast it first to dry it out a little). OR, do like me, and go to those bread shops that sell day-old bread and buy some OR go to your favorite bread vendor at the farmer’s market and ask if they have day-old bread to sell to you.

This recipe normally makes enough to fill a 13x9 rectangular baking pan but if you want to make a smaller bread pudding, just cut the recipe based on how much bread you have and the size of your pudding container. Today, I used a deep round casserole dish and thought that the recipe might be a bit much, so I just cut it down by 1/4.

This bread pudding recipe also doesn’t give precise amounts for the broken bread. I would say just tear up the bread to fill your pan and then just pour the custard over it. For my casserole dish, I used about 10 or 11 Pullman loaf-sized slices of bread.

Alrighty then, on to the recipe.

Bread Pudding Recipe

makes one 13x9 pan

Ingredients:
12-16 slices (4-5 cups) stale bread or anything bready, broken up into pieces
4 cups milk (whole is best)
1 stick butter (4 oz), melted
1 1/4 cup sugar (I’ve gotten away with less especially if you’re using sweetened bread)
4 eggs
1 tsp vanilla
Optional ingredients: dried fruit (raisins, cherries, etc), fresh apple slices, bananas
1/2 tsp ground cinnamon

Bread Pudding Mise en Place

bread pudding mise en place

Method:
1. Place broken pieces of bread all over pan. If using fruit, layer some in the middle of the bread and cover with more bread.
2. Beat eggs with vanilla and then mix this with milk, butter and sugar. Whisk to ensure ingredients are mixed evenly.
3. Pour mixed ingredients (custard) over broken bread.

pouring custard into bread pudding

4. Sprinkle with cinnamon on top.

bread pudding before baking

5. Place bread pudding in fridge and let soak for at least 2 hours.
6. Preheat oven to 350 F.
7. Bake for about 1 hour or until tester comes out clean. If using a deep dish casserole, expect it to take a little longer.

I have another bread pudding recipe to share but that will have to wait for another post. That one is a tropical bread pudding that my friend Melissa made for our Ultimate Backyard Lu’au a few months ago that was also a great success. And I recently saw a post by Foodgal on a savory bread pudding from Thomas Keller’s “Ad Hoc at Home” cookbook that I am keen to try too. Man, talk about carb overload. I will need to make more friends to share all this yumminess!

In the meantime, enjoy this easy bread pudding and let me know if you like it!

bread pudding

Cheers, Annie

This post is entered into the Yeast Spotting Roundup for November 20.

Hungry for more bready goodness? Click below:

Dutch Apple Bread

Recipe for Corn Bread with Bacon

Buttery Dinner Rolls Recipe

Homemade Baked Char Siew Bao

Pandan Kaya Bread

Continue Reading: "Bread Pudding Recipe"...

Thursday, June 04, 2009

Of Facebook and a Thai Recipe

I have a love-hate relationship with Facebook. I love how it has allowed me to be connected with many friends that I’ve lost touch with over the years. It’s amazing how many old high school/college friends I’ve come to know again just from looking up different connections. And Facebook also allows me to keep up with all these friends via their status bars. In a time when we barely have time to shoot emails to each other, this little status updates have helped me to find out which friends are having children, which friends are travelling, which ones have just broken up with their significant others or gotten engaged. It’s amazing how much we can know from that little status bar!

But then again, do I really need to know what is going on with everyone? And do I need to get “cyber hugged” and gifted dimsum, or flowers, or good morning wishes or any other “cyber” thing in the one million and one applications that can be found on Facebook? And then, there are all these polls—which city/country/continent should you live on, what superhero are you, what does your color say about you, etc. (many of which are surprisingly accurate, but not so grammatically).

And then there are causes. The (Lil) Green Patch that donates money to save the rainforest (has anyone really confirmed this?), the charities that we can support (I support one called LSV-an orphanage in China that takes in handicapped children). Though a great way to showcase some charities, others are more likely time-wasters.

And the games on Facebook! Like quick trends, some start off really fun and after a while, they get tedious or lose their following. And again, a real time-waster as well as something that will cause your eyes to strain too much and your wrists to get carpal tunnel. I speak from experience. Yes, I’m as addicted as most of you out there to these games. Every so often I tell myself that I’m only going to play one game…yeah, you see where I’m going already right? WHO plays only ONE GAME?!?! C’mon, you know who you are…just for five minutes, you say and the next thing you know, it’s a whole hour that has gone by. Time wasting device at its greatest.

And what do you do when you receive a note in your email saying so-and-so wants to befriend you and you don’t even know who on earth they are? Or even worse, you know who they are but you don’t really care to know them that well and indecision grips you…should you not dis them and accept them as a friend and then they will know everything about you and what is happening in your life OR should you ignore them and hope they have forgotten that they asked to be your friend?

I’ve done both, and now I have too many friends to know what to do with. It makes it hard to be really honest in my status bar so most times I end up talking about what I cooked that day (safe, shouldn’t offend anyone). And I don’t really know how I feel either about those friends that have befriended me and then somehow didn’t think I was worthy and defriended me. Yup, Facebook doesn’t tell you when that happens, but you find out eventually. Ah well…do unto others…(yup, done that too). Sorry if that was you and you’re reading this.

So, why am I going on about Facebook and what does this have to do with House of Annie? Nothing I guess, except this is a blog after all and I have the right to talk about something non-food related right? To make it relevant, I will say that I won’t give up Facebook because of the fact that I can indeed get connected with people I haven’t been in touch with for a while. Case in point, I just reconnected with another old friend from my days in the graduate dorm in Hawaii and I couldn’t be happier. The reconnection helped me to remember the good times we shared in the kitchen and how she shared this Thai dish with me.

So here it is, Nat’s Pumpkin with Egg and Green Onion recipe. It’s a simple homey recipe which calls for kabocha squash (I’m sure butternut will work just as well). Like most Thai dishes, it has that interplay of sweet, salty and savory working. Unlike most Thai dishes, this one doesn’t have any heat to it (which isn’t to say you can’t go ahead and add some).

Pumpkin with Egg and Green Onion

Ingredients
2 Tbsp vegetable oil
half a kabocha squash (or other similar squash or pumpkin), cut into 1 inch cubes
2-3 garlic cloves, minced
1/3 cup water
1 1/2 Tbsp sugar, or more to taste
2 eggs, beaten
2 tsp fishsauce, or more to taste
3-4 green onions, cut into 1 1/2 inch length pieces

Method
1. In a frying pan, heat up vegetable oil over medium heat. Add garlic and lightly brown for a minute.
2. Add kabocha squash to pan and add water. Partially cover pan and cook till squash is just tender.
3. Add sugar to dish and mix it in.
4. Add in beaten eggs and a little bit more water if it looks like it’s too dry.
5. Season with fishsauce and taste. The pumpkin should have absorbed the flavors of the sugar and fishsauce nicely and the eggs should have a nice savory flavor.
6. Add in green onions and allow to wilt.

Serve over rice and enjoy!

(Sorry, no pics. Next time I make it, I’ll put the pics up.)

Cheers, Annie.

So…Facebook…are you glad for it or mad at its amazing ability to suck up all your time? Share your stories with us!

Hungry for more Facebook games to waste your time on? Click below:

Hell’s Kitchen

Bejeweled Blitz

ChainRxn

GeoChallenge

WordChallenge

Continue Reading: "Of Facebook and a Thai Recipe"...

Friday, April 17, 2009

Thai Son-in-law Eggs Recipe

I made these Son-in-law eggs recently when I had a glut of hard-boiled eggs after Easter.

Thai Son-in-Law Eggs

Thai Son-in-Law Eggs

The first time I had son-in-law eggs was in Hawaii (yes, at that amazing graduate dorm). My Thai friend, Pepper introduced this to me and we set out to make it together. It’s a really delicious dish!

Crispy or Chunky?

My memories of how the son-in-law eggs was made back then are vague. So I looked up a bunch of recipes online to check if my memory of the dish is correct. Most of the recipes I found asked for the shallots to be fried till crisp.

But the way I remember Pepper and I made son-in-law eggs was to pan fry the shallots until the shallots were just softened, and then add the tamarind juices and other seasonings. Then we added the eggs to the sauce and let the eggs soak up some of that yummy flavor.

I guess that makes my take on son-in-law eggs a little non-authentic. But it’s still a very good dish because the sautéed shallots in the tamarind sauce gives it a chunkier, chutney-like quality. Whatever it is, I just like it this way so I’m going to stick to that. Try it out and let me know if you like it too.

Fried or Boiled?

Another one of my memories of making son-in-law eggs include how difficult it was to fry the boiled eggs. They have a nasty tendency to pop and splatter on you! In my opinion, the fried part of the egg is too chewy and doesn’t have a pleasant texture anyway.

I think I have made this dish only one other time since then, and that time I chose not to fry the boiled eggs. I thought it was perfectly fine. So if you have a distaste for frying, I would say try doing it without. It seems to taste just as good.

For this post, I decided I would give frying one more shot and, yeah… (Reminder to self: nix the frying and just cook the eggs in the yummy sauce.)

Thai Son-in-law Eggs Recipe

Ingredients:
6 hard-boiled eggs (deep fried if you prefer or left plain if you don’t care)
1/4 cup tamarind paste mixed with 1 cup warm water to soften and mushed to extract juice (it normally comes sold in a block or sometimes in a plastic tub but some stores also sell the extract in liquid form—if you get that kind, please add about 3 Tbsp to the water and more later if you need more tang)

Tamarind Pulp and Water

Tamarind Pulp and Water

2 Tbsp palm sugar (brown sugar will work too but palm sugar gives a nice smokiness that you won’t get from brown sugar)

Palm Sugar (Gula Melaka)

Palm Sugar (Gula Melaka)

1 tsp fish sauce
1-2 Thai bird-eye chili (use as many as your heat tolerance will allow), halved
4-5 shallots, sliced thin
2 Tbsp vegetable oil
1/4 cup chopped fresh cilantro

Method
1. If you plan to fry the eggs, heat a pot filled with oil (enough to cover 1/3 of the egg) and roll them around until they are blistered and golden brown. Be careful, they tend to pop and spit at you.

IMG_2715

2. Remove eggs and set aside to drain on paper towel

3. Heat 2 Tablespoons oil in a sauce pan. Add shallots and sauté over medium heat until softened and just beginning to brown.

4. Strain the tamarind pulp and pour the tamarind juice into the saucepan with the shallots. Add fish sauce, palm sugar and bird-eye chilli.

Straining Tamarind Pulp

Straining Tamarind Pulp

5. Bring sauce to a boil. Put eggs back into the saucepan and coat eggs with sauce. Reduce heat and simmer for 5-10 minutes until the sauce thickens slightly. Taste sauce and adjust seasoning as necessary. The flavors should be a balance of sweet, salty, tangy and spicy.

6. Remove eggs and cut them in half lengthwise. Arrange on plate. Spoon the sauce over the eggs and garnish with cilantro.

Thai Son-in-Law Eggs

Thai Son-in-Law Eggs

Enjoy over rice!

Why do they call them “Son-in-Law” eggs anyway? I honestly have no clue and looking it up online didn’t provide any one, good answer. Ehh…whatever it is, it’s a delicious recipe and I hope you will try it out.

Cheers, Annie

If you like this recipe, please subscribe to receive all our latest posts to your RSS reader or your Inbox!

Continue Reading: "Thai Son-in-law Eggs Recipe"...

Thursday, April 16, 2009

Japanese Oden Recipe

Easter is now behind us and we were left with lots of boiled eggs to deal with. This is what happens when you have kids and neighbor’s with kids and we end up coloring a lot of boiled eggs and then in order not to waste them, we have to find ways to eat them all up without resorting to devilled eggs or egg salad sandwiches.

Too Many Easter Eggs

Too Many Easter Eggs

This past Monday, I came up with two ideas—Oden and Thai Son-in-law Eggs. I’ll post about the latter in a future post but for today, let me talk about Oden. Oden is one of those Japanese dishes that I learned while studying in Hawaii (I tell you, that international dorm has been more successful in giving me numerous culinary experiences than actual studying experiences!).

Japanese Oden

Japanese Oden

Some Japanese students at the dorm made Oden and shared it with me. I loved it and have since recreated it myself several times. Oden is a really simple dish that is perfect when the weather is still cold and you’re not feeling like anything too heavy.

The base stock is a dashi made with kombu and bonito flakes. I’ve cheated by using the Japanese Hon Dashi (Bonito Fish Soup Stock) when I’m in a hurry. Depending on your needs, feel free to make the stock from scratch or use the Hon Dashi (which is what I did this time around). If you have access to an Asian/Japanese grocery store, you could even get a pack of oden soup base mix and then your work is made even simpler.

Build on the Base

The rest of the ingredients is a mixture of daikon, boiled eggs, and different types of fishcakes. Some recipes call for the addition of konnyaku (konjac gelatin) and potatoes. That is the beauty of oden—it allows for a mixture of ingredients based on what you like.

I LOVE fishcakes of all sorts and I love going to the Japanese store and browsing all their different fishcakes and choosing the ones I want to put into my oden. One of the fishcakes I discovered that I absolutely love is called hanpen. If you can find this, you have to try it. It’s a very soft fishcake that comes in a block and that you cut into triangles to add to the soup stock. It expands quite a bit as you simmer the soup. The texture is pillowy soft and airy. It’s a textural wonder and very different from any other fishcake I’ve ever had. I always try to put that in when I can.

The only other ingredients besides the fishcakes that I feel are necessary are the daikon and boiled eggs.

Japanese Daikon Radish

Japanese Daikon Radish

I sometimes add the konnyaku for the textural component it lends but decided against it this time. And if you can get it, do get some of the seasoned yellow Japanese mustard to eat with it. They sell them at Asian grocery stores right next to the wasabi tubes—same brand, different colored mustards.

Once you’ve boiled it for a while, serve it with rice and fight for the fishcakes and ingredients you like best!

Japanese Oden

serves 6-8

Ingredients:
1 lb daikon (about 3 medium sized ones), cut into 3/4 inch rounds or if really big, halved and then cut into 1 inch half moons.
6 hard-boiled eggs, shelled
4-5 packages of assorted fishcakes (I like to get one packet of hanpen, one kamaboko, sliced, some fried fishballs and various other shaped ones)
1 package of konnyaku (cut into 8 triangles or if you want to be fancy, cut into flat rectangles, then cut a slit in the center and turn over to form ribbon pattern)*
6 small potatoes, halved*
7 cups dashi (make your own or use 7 cups water and 1 tsp hon dashi)
1/3 cup soy sauce, or to taste
1/4 cup mirin, or to taste
1 Tbsp sugar, or to taste
Hot yellow mustard paste

*optional ingredients

Method

1. In a large pot, heat dashi, soy sauce, mirin and sugar over high heat. Add daikon. Bring stock to boil then turn down to low and simmer for 30 minutes.
2. Add the rest of the ingredients, except the mustard, and simmer partially covered for about 2-3 hours. Add more water if necessary. Don’t allow the broth to reduce by more than half.
3. Taste the broth and if needed, adjust seasonings by adding more soy sauce, mirin or sugar as needed. The flavors should be lightly salty-sweet.
4. Serve the oden in bowls alongside rice and the mustard paste.

Japanese Oden

Japanese Oden

Enjoy!

Cheers, Annie

Subscribe today to get all our latest posts sent to your RSS reader or your Inbox!

Hungry for more Japanese food? Click below:

Broiled Salmon Collar Recipe

Sensational Sushi at Sakae Sushi (Burlingame)

Sake-Poached Asian Pears with Ume and Li Hing Sauce

Mana Bu's Musubi (Honolulu)

Korokke

Continue Reading: "Japanese Oden Recipe"...

Tuesday, March 17, 2009

Two Corned Beef Hash Recipes

Updated March 17, 2009

Originally posted April 8, 2007

What to do with all those leftovers from that Corned Beef dinner?

I know what you’re thinkin’:

Corned Beef Hash with Fried Egg

Corned Beef Hash with Fried Egg

We took half of our leftover corned beef and diced it up. Peeled and diced a couple of potatoes (since we mashed the boiled potatoes to make colcannon instead). Diced up a couple of peeled russet potatoes. Sliced up one onion.

Heated up some oil in my trusty cast iron skillet. First I fried up the onion until it was soft and translucent. Then I tossed in the potatoes, seasoned with salt and pepper, and let those sizzle in the pan until they started to brown.

Next I added the corned beef and mixed it in to distribute evenly. I didn’t want to turn it too much because I wanted the bottom part to get all nice and carmelized-crusty (“carmelusty?).

“Carmelusty” Corned Beef Hash

“Carmelusty” Corned Beef Hash

Removed the corned beef hash from the pan and then fried a couple of eggs. Topped the hash with the eggs, and this became dinner for the kids.

The kids? Well then what did the adults eat?

Adult Food

In our Corned Beef post, Annie talked about how the only corned beef she knew about growing up was corned beef hash in a can. Her Mum would mash it up, mix it with egg, and fry it with shallots. So we wanted to recreate the dish using our real corned beef.

First thing we did was to thinly slice up four shallots.

thinly slice up four shallots

Next, we took half the corned beef and finely minced it. I’d say it came to about two cups of corned beef.

finely minced corned beef

We beat together five eggs, then added the corned beef to the eggs. We also took a little chile pepper from our garden, sliced that up thinly, and added that to the corned beef and egg mixture.

minced corned beef and beaten eggs.

This time, we used a non-stick frying pan. Started off by frying the shallots in a little bit of oil until they began to turn brown. Then we poured the egg and corned beef mixture on top of it. (Five points for spotting the chile pepper!)

IMG_2411

We fried this until the eggs were cooked through and lightly browned. Then plated it up. I guess I would call it a “corned beef egg fu yong”, except without all that gloppy fu yong sauce. Annie calls it an "omelet thingy". Obviously, and advanced culinary term. ;-)

Corned Beef Egg Fu Yong / Omelet Thingy

corned beef egg fu yong

So there you have it. Two quick and easy recipes using leftover corned beef. Which one tastes better?

Honestly, I like them both. The corned beef hash is great, with the carmelusty fried potatoes and beef. The corned beef egg fu yong is also pretty tasty, with all that yummy fried egg plus the nice chili pepper bite.

I hope you get to try these recipes out yourself!

Aloha, Nate

If you like this article, subscribe to our blog (it’s free!) to receive all our latest posts to your RSS reader or your Inbox!

Hungry for more recipes using leftovers? Click below:

Spam Fried Rice

Hot Sour Gai Choy Soup with Roasted Pig's Feet and Duck Heads

Turkey Jook

How do You Top Mum's Popiah? With Kuih Pie Tee

Leftover Turkey Omurice

Continue Reading: "Two Corned Beef Hash Recipes"...