Please wait a few seconds while we redirect you
to the new and improved House of Annie website at
www.houseofannie.com !

Thursday, January 21, 2010

Tom Yam Fried Beehoon

Tom Yam Fried Beehoon

Elizabeth and I have been friends since high school. Our friendship was not the most immediate—she is naturally more suspicious and takes a long time to warm up to people. I, on the other hand, will talk to just about anyone who is near me. So the first time we met, I had come up to her to say hello and ask her name only to be met with a suspicious, “why do you want to know?” At least, this is what Elizabeth tells me. I don’t remember that at all. I only know that we’ve been good friends for a long time. We’ve been through years of sitting next to each other through high school, work (graduate school for me), and of course, FOOD.

Sharing Our Passion

For as long as I could remember, many afternoons after school, she would come back to my house and we would hang out for many hours (many times under the pretext of doing homework or studying for exams when in fact we would be watching videos, chit chatting or sneaking out of the house to go to the shops in the back to get snacks and drinks—we were teenagers and we were always hungry!).

These days, we both hardly meet because we live in different continents. But we are so thankful for the Internet for it has allowed us to continue our friendship through chats online. Every so often when we actually have free time that coincides, we will give each other a call. Many times, these calls will be filled with talk of foods and recipes that we’ve tried.

It’s really funny actually because growing up, we talked about food too BUT we never talked about cooking food, we only talked about EATING food—where to eat, what to eat, when to eat (often and sometimes immediately after we’ve eaten!). But we were no cooks—our cooking experience probably boiled down to cooking rice and instant noodles. We laugh now when we talk because we never imagined that the both of us would become so passionate about cooking.

So even though we haven’t physically met in many long years, we’ve stayed very much connected. She still is one of my closest friends. We’ve shared our lives—our struggles, our disappointments, our hopes, and our recipes. Whenever I tried a recipe that I really liked, I would always share it with her and she would do the same. You have all benefitted from this friendship as I’ve now shared several recipes that I got from her – Easy Green Tea Tiramisu, Hong Siew Braised Tofu, Khau Yoke - (with many more to come!).

Fit for a Family, Perfect for a Party

And this is how I got to know about this tom yam fried beehoon. Eliz was the one who first clued me in to it and told me I had to try it (it’s an Amy Beh recipe). And I have done so many times for many different occasions. This dish is really great for a weeknight meal. It’s also really great for a weekend party. It will serve a family or a whole group with equal ease and deliciousness. There is a slight amount of heat to this dish though, so the only ones I don’t recommend this to are younger children (my kids are starting to be able to handle the heat).

Beehoon (or rice vermicelli, maifan, mifun) is one of those noodles that I always keep handy in my pantry. They are an easy fix on days when you don’t know what to cook or when you have unexpected guests. With a few extra ingredients in your fridge, you could easily fry up some beehoon. As a matter of fact, here in Malaysia, they are used very frequently for breakfast. You will find them simply fried with some beansprouts and soy sauce and served with fried egg in many hawker stalls during breakfast time or if you’re in Kuching, you’ll find them in Sarawak Laksa (also a breakfast meal).

Bee Hoon – Rice Vermicelli

bee hoon, mi hoon, maifun, mifun

For me, I sometimes use beehoon when I’m cooking up my KL Hokkien Mee substituting the thick noodles for beehoon. They are really good that way. But this tom yam noodle dish is also really wonderful with beehoon. See, beehoon on its own is not very tasty. It’s really just a vehicle for the sauce that it soaks up. And this particular recipe has an especially flavorful sauce because of the addition of brown bean sauce and tom yam paste. The addition of the tom yam paste gives this noodles a discernible spicy tangy flavor (almost like Mee Siam, but not quite). The brown bean sauce counters these flavors with its salty sweetness. Add to that the other fillings and it’s a colorful, flavorful palate for your eyes and mouth.

Tom Yam Paste

tom yam paste

When we had our first official party at our house, I made this dish. I wanted to cook some things that were easy to do ahead of time. This tom yam beehoon is one of those. You just need to prep a few ingredients and the actual frying of it is very quick. A hot wok and some arm muscle and you’re good to go! Of course, if you’re cooking just for your family, the recipe as is will do (for the party I doubled the recipe).

Like many noodle dishes, the one tip I would give you is to make sure you prep all your ingredients and have them ready to go. Once you start frying the noodles, it is fast work and you won’t have time to chop something else up if you work while you cook.

Do give this noodles a try and let me know if you like it as much as Elizabeth and I!

Tom Yam Fried Beehoon Recipe

adapted from “At Home with Amy Beh” by Amy Beh

Ingredients:
200g beehoon (rice vermicelli), soaked in warm water for at least 15 minutes or longer, drained before cooking)
2-3 Tbsp vegetable oil
3 cloves garlic, minced
1 Tbsp brown bean sauce (tau cheong), if it’s whole beans, chopped or if using the ground one, fine as is
2 Tbsp tom yam paste (any brand is fine—available at most Asian grocery stores)
125g medium-sized shrimp, shelled and deveined
100g chicken meat (1 chicken breast), sliced thin (or you could use a cooked chicken breast, shredded)
1/4 tsp salt
1/2 tsp sugar
1/2 tsp sesame oil
1 block of firm tofu (taukwa), deep fried and sliced (I normally buy mine already fried but if you want, I’m sure it’ll taste just as good without frying)
100g garlic chives
100g beansprouts

Seasoning:
1 tsp fish sauce
1/4 tsp thick soy sauce
1/2 tsp sugar or to taste
dash of pepper
1/2 cup chicken stock

Garnishing (any or all of the below):
Fried egg omelette, thinly sliced
chopped cilantro
chopped green onions (about 2-3 stalks)
1 red pepper or jalapeno, sliced thin
fried shallots

*feel free to change about your fillings. No chives, throw in some green onions, no beansprouts, do without, no garnishes, no worries. It’s really not too fussy.

Method:
1. Season shrimp and chicken with salt, sugar, pepper and sesame oil for 10-15 minutes.
2. Heat oil on medium heat in a wok and fry garlic till fragrant but not burnt.

frying tom yam paste and garlic

3. Add chicken and shrimp and toss well till just opaque. Dish out and set aside.
4. Reheat wok on medium heat with more oil, put in brown bean sauce and tom yam paste. Stir it around for just half a minute being careful not to let the sauce burn. If there isn’t enough oil, add more. Add beehoon and stir in combined seasoning and mix well.
5. Add bean curd slices and return the fried shrimp and chicken to the pan. Add beansprouts and chives and toss to mix well.

tom yam fried bee hoon in wok

6. Taste and adjust seasonings.
7. Plate up and garnish.

tom yam fried bee hoon

Enjoy!

Cheers, Annie

What’s your favorite way to eat beehoon? Leave a comment and tell us!

This post was entered into Presto Pasta Nights roundup #146, hosted by Cupcake Muffin.

Hungry for more Malaysian noodle dishes? Click below:

Grace Place Sarawak Laksa

KL-Style Hokkien Mee Recipe

Pumpkin Mee with Prawns Recipe

7 Tips for Making Mouth-Watering Char Koay Teow

Continue Reading: "Tom Yam Fried Beehoon"...

Thursday, December 03, 2009

How to Make Miso Soup From Scratch

What Japanese meal would be complete without miso soup? Sure, you could make it from prepackaged stock but it's more fun to do it from scratch!

Miso Soup From Scratch

miso soup from scratch
Updated 3 Dec 2009
Originally posted 10 March 2007
My son loves miso soup almost as much as he loves Mac and Cheese. Whenever we are at a Japanese restaurant, it’s so easy to feed him. Get him a bowl of miso soup and a bowl of rice. He would take that bowl of rice and proceed to dunk it all into the bowl of miso soup, treating it almost like rice soup! Then, in less than 10 minutes, he would’ve slurped up the whole bowl and many times, would ask us to get him another one. We always watched in bemusement because it’s so simple and so cheap (compared to our love for sushi which costs a gazillion times more!) to make. Happily I’ve learned to recreate miso soup at home for him.

Miso Soup-er Easy

And miso soup is so easy to make! Not only that, it’s fast. It’s not like making chinese bone soups which require hours of simmering for it to taste really good. Miso soup requires only a dashi to make. And dashi is not something you simmer for long. It’s a quick cook which yields a yummy soup. Of course, you could go the easier route by using instant dashi packs or even instant miso soup packs but do give this a try. The flavors, when making your own, are more subtle and will contain less MSG than the instant ones.
Once you have the dashi made, it’s just a simple process of prepping some tofu, green onions and wakame seaweed. Then a few spoonfuls of miso and – tada - miso soup! One good trick I’ve learned from watching my friend make miso soup is when adding the miso paste, place it into a strainer and rub the miso paste in the soup base through the strainer. This will prevent clumps of miso paste from sinking to the bottom of your pot and also strains out the larger bits of beans that makes the soup gritty.
Another lesson I learned is to never bring your miso soup to a hard boil. It should just barely come to a boil before lowering the heat to a simmer. This preserves the flavors of the soup without making them harsh.
Give it a go if you’ve never made miso soup from scratch!

Miso Soup Recipe

adapted from The Japanese Kitchen by Hiroko Shimbo
Ingredients
2 quarts dashi
3-4 Tbsp miso (use any type you like but traditionally, it's white miso)

Shiro (White) Miso Paste for Miso Soup

shiro miso for miso soup
6oz soft tofu, cut into cubes (more if you like your miso soup to have more tofu)
2 Tbsp wakame seaweed, soaked in some water to soften

Wakame Seaweed for Miso Soup

wakame seaweed for miso soup
2 stalks of green onions, sliced thin
Method:
1. Heat up dashi to near boil.
2. Add miso paste and mix till dissolved in dashi. Use a small strainer to mix the miso paste into the dashi.
3. Bring to simmer. Add tofu, wakame that has been softened and green onions. Serve immediately.

Miso Soup From Scratch

miso soup from scratch closeup
Enjoy!
Cheers, Annie
For the use of wakame seaweed, I am entering this dish in the Weekend Herb Blogging roundup, administered by Cook Almost Anything and hosted by Just Making Noise

Hungry for more Japanese dishes? Click below:

Japanese Oden Recipe
Pan-fried gyoza
Gyoza
Broiled Miso Seabass

Continue Reading: "How to Make Miso Soup From Scratch"...

Friday, April 10, 2009

Hong Siew Braised Tofu in Wine Sauce Recipe

We use a lot of green onions (also called negi, scallions or Spring onions) in our cooking. A lot of times, we’ll cut off the green tops and leave the white stalks in a cup of water by the kitchen windowsill until the roots get longer and the green leaves start growing. Then, we’ll plant the green onions in a pot of soil or in one of our garden beds.

By Springtime, we’ll have a forest of green onions to use!

IMG_2667

They’re so easy to grow and care for. Just water the green onions every so often, harvest the outer leaves, and try to keep the snails away. You won’t have to buy green onions for months!

Here’s a classic recipe that utilizes some of our green onion bounty.

Hong Siew Braised Tofu in Wine Sauce

Hong Siew Braised Tofu in Wine Sauce

This recipe comes from Annie’s friend Elizabeth in Germany. Elizabeth also gave us the awesome Green Tea-ramisu recipe, so you know her recipes are worth keeping! This recipe for Hong Siew Braised Tofu in Wine Sauce is tasty as well as easy to prepare.

Hong Siew Braised Tofu in Wine Sauce

Ingredients

500 grams tofu (firm)
3 Tbsp vegetable oil
4-5 cloves garlic, chopped
6 slices ginger
green onions cut into 2.5 cm pieces

Sauce

3 Tbsp soy sauce
2 Tbsp Chinese rice wine
1 Tbsp sesame oil
1 Tbsp sugar
1/2 tsp salt
1/2 tsp fresh ground black pepper
slurry made from 1 tsp cornstarch and 1/2 cup water

Method

1. Cut tofu into 5 cm square x 1 cm thick slices. Drain on paper towels.

2. Mix together the sauce ingredients

3. Heat oil over medium heat in a non-stick pan. When the oil is hot, add tofu and pan fry until golden brown. Turn the tofu over and fry the other side. Remove the fried tofu from the pan.

Frying Tofu Blocks

Frying Tofu Blocks

4. Add garlic, ginger and green onions to the pan and fry until fragrant.

5. Pour sauce over the garlic, ginger and green onions. Stir well to combine.

Adding Wine Sauce to Garlic, Ginger and Green Onions

Adding Wine Sauce to Garlic, Ginger and Green Onions

6. Add the tofu back into the pan and settle the blocks into the sauce.

Add Fried Tofu to Wine Sauce

Add Fried Tofu to Wine Sauce

7. Cover the pan and lower the heat. Braise for 5 minutes.

8. Plate it up!

Hong Siew Braised Tofu in Wine Sauce

Hong Siew Braised Tofu in Wine Sauce

Garnish with more green onion. Serve over rice.

I love the taste of the fried tofu and the sauce has this classic Cantonese flavor to it. (Oh, by the way, you don’t have to eat the ginger if you don’t want to.)

This recipe was entered in the April 2009 Grow Your Own roundup, created by Andrea of Andrea’s Recipes and hosted this month by…House of Annie! Do send us your dishes created with things grown in your garden! Deadline is April 30.

Aloha, Nate

Hungry for more tofu recipes? Click below:

Stir-Fried Green Beans with Savory Tofu and Peanuts

Steamed Egg Tofu with Ground Pork and Shrimp

Five Quick Asian Dishes: Two Tofus, Two Ways

Continue Reading: "Hong Siew Braised Tofu in Wine Sauce Recipe"...

Monday, November 24, 2008

Stir-Fried Green Beans with Savory Tofu and Peanuts

My mom has gone back home but there are still so many yummy recipes she cooked up that we haven't blogged about.  So here is another dish that she cooked up one day that we really enjoyed and is pretty easy to make.  She was such a lively inspiration for this blog.  We told her that we were looking for more quick and easy Asian recipes and she started to rattle off a bunch that we could do.  Here is one of them.

Stir-Fried Green Beans with Savory Tofu and Peanuts

Stir-Fried Green Beans with Savory Tofu and Peanuts

This recipe has wonderful textures and flavors.  The tofu is firm and savory.  The beans are sweet and green with a slight crunch.  The fried peanuts add a really nice crunch and yummy nutty flavor.  And the dried shrimp ties all the flavors together with its sweetness.

The first thing you would need to do is the prep your peanuts.  Buy some raw peanuts from the Asian grocery store (they sell two types, the ones with skin and without, get the ones with skin on).  Then in a dry wok, add a little oil and cook the peanuts on medium-low heat turning frequently to prevent burning.  When the peanuts are fragrant smelling and cooked, remove and let cool.  Taste a few to make sure they are nicely crunchy (and try not to end up eating them all before making this dish!). 

As for the savory tofu, you can find these in your Asian grocery stores.  They are much firmer than your blocks of firm tofu and are brownish in color from the marinate they have been given.  If you want to try to make your own, there are recipes out there on how to make your own savory tofu.  Our favorite brand, Furama, can be found at 99 Ranch Market.

Furama Brand Savory Baked Tofu

Furama Brand Savory Baked Tofu

Stir Fried Green Beans with Savory Tofu and Peanuts

Ingredients:
2 tbsp dried shrimp (hae bee), rinsed then soaked in about 1/2 cup water
4 cloves garlic, finely chopped
1/2 lb green beans, chopped into 1 inch long pieces
2 blocks savory tofu (Furama brand tofu has four blocks all in one piece, use just two of the four, ie. half the package), cut into 1/2 inch cubes
1/3 cup raw peanuts fried with a little oil over med-low heat until brown and fragrant
2 tbsp oil
1 1/2 tbsp oyster sauce
1 tsp chicken bouillon
salt and white pepper to taste

Method:
1.  Fry the peanuts in a little oil over low heat until the peanuts are browned and fragrant. 
2.  Soak the dried shrimp in 1/2 cup water, reserve the soaking liquid.
3.  Heat the oil in a pan, fry the dried shrimp and garlic together until fragrant and the garlic is lightly browned (not burnt).

Frying Dried Shrimp (Hae Bee) and Garlic

 Frying Dried Shrimp (Hae Bee) and Garlic

4.  Add the tofu and and stir-fry for 30 seconds.
5.  Add the oyster sauce.

Frying Savory Tofu with Oyster Sauce

 Frying Savory Tofu with Oyster Sauce

6.  Throw in the green beans.

Stir-Frying Green Beans with Savory Tofu

 Stir-Frying Green Beans with Savory Tofu

7.  Add the chicken bouillon and the 1/2 cup reserved dried shrimp soaking liquid.
8.  Cook green beans for about 4 minutes until the beans are just cooked through (they should still have a slight crunch to them).
9.  Season with salt and pepper to taste.
10. Plate up and garnish with peanuts.

Stir-Fried Green Beans with Savory Tofu and Peanuts

Stir-Fried Green Beans with Savory Tofu and Peanuts

Enjoy!

Cheers, Annie

Hungry for more quick Asian recipes? Click below:

Indonesian-Inspired Sauteed Shrimp

Steamed Egg Tofu with Ground Pork and Shrimp

Five Quick Asian Dishes: Two Tofus, Two Ways

Steamed Shiitake Mushrooms with Bok Choy and Fatt Choy

Continue Reading: "Stir-Fried Green Beans with Savory Tofu and Peanuts"...

Sunday, October 26, 2008

Steamed Egg Tofu with Ground Pork and Shrimp

Here's another delicious, quick and easy Chinese dish put together by Annie's mum.

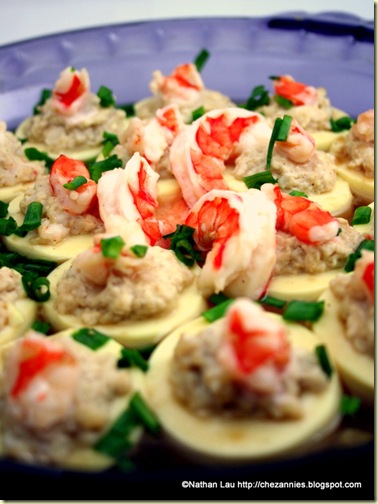
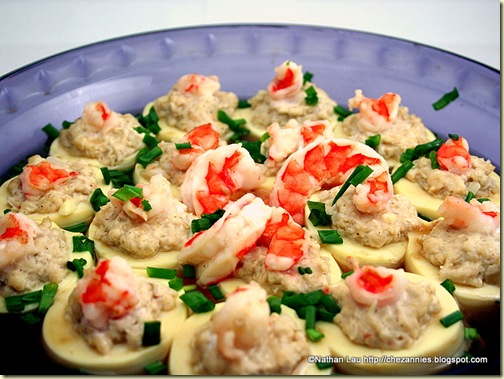
Steamed Egg Tofu with Ground Pork and Shrimp

Steamed Egg Tofu with Ground Pork and Shrimp

It's so nice to have Annie's Mum visiting because she cooks a lot of stuff for us that we don't often get to try. She has so much experience cooking all sorts of dishes! She's really been an inspiration to Annie and me. The only downside is, our waistlines have been expanding since she came! You see, her dishes are so tasty, it's hard to stop eating!

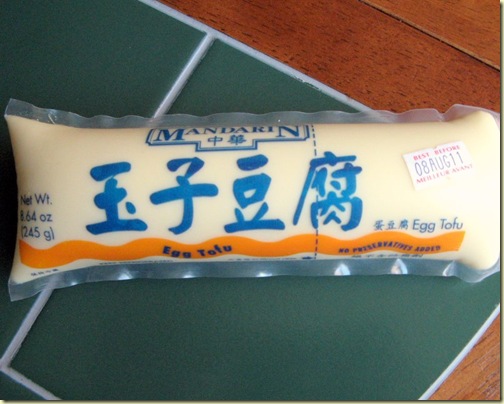
Here is one dish that Annie's Mum made recently that is pretty simple, yet full of flavor. It uses the same Mandarin brand Egg Tofu that we used in our popular "Two Tofus, Two Ways" recipe. Only instead of frying it, we steam it.

Mandarin Egg Tofu

mandarin egg tofu

Steamed Egg Tofu with Ground Pork and Shrimp

Ingredients

2 tubes egg tofu*
4 ounces ground pork
5 large shrimp, shelled
1 Teaspoon sesame oil
1 Teaspoon light soy sauce
1/2 Teaspoon ground white pepper
1 Teaspoon cornstarch
2 stalks green onion, chopped

*Note: if you can't get the egg tofu, use a block of regular or silken tofu.

Sauce Ingredients

1/2 cup chicken broth
1/4 Teaspoon cornstarch
1 Teaspoon oyster sauce
1 Teaspoon Chinese rice wine

Method

1. Finely mince 3 of the shrimp.
2. Mix the shrimp, ground pork, sesame oil, soy sauce, white pepper and cornstarch together
3. Cut the tofu crosswise into 16 round pieces, about 2 cm in thickness.
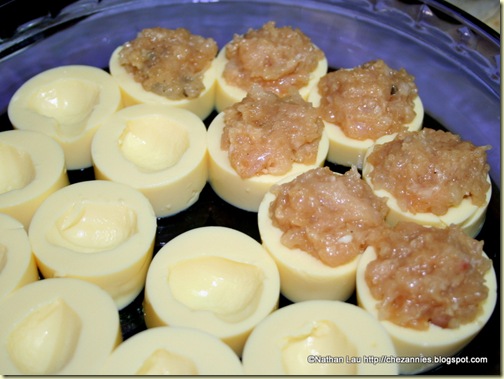
4. Lay the rounds in a shallow dish and scoop out the centers with a spoon to form a bowl.
5. Spoon some of the ground pork mixture into the tofu bowls.

Filling Egg Tofu with Ground Pork

Filling Egg Tofu with Ground Pork

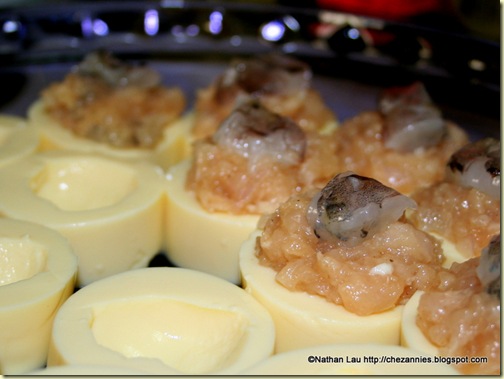
6. Slice the remaining 2 shrimp in half lengthwise and cut into 16 pieces.
7. Top each of the tofu and ground pork rounds with a piece of shrimp.

Topping Ground Pork with Shrimp

Topping ground pork with shrimp

8. Steam the dish for 15 minutes to make sure the ground pork is cooked through.
9. While the tofu is steaming, combine the sauce ingredients in a small saucepan and simmer over medium heat.
10. When the tofu is done steaming, remove dish from steamer, drizzle sauce over the tofu, and garnish with the chopped green onions. Serve hot with rice.

Steamed Egg Tofu with Ground Pork and Shrimp

Steamed Egg Tofu with Ground Pork and Shrimp

That flavor and textural combination of sweet, crunchy shrimp, savory pork, plus the silky smooth egg tofu, is so irresistible! How to stop eating it, tell me!

Only TWO DAYS LEFT to register for our Bloggerversary Giveaway! Only those who subscribe to this blog by email are eligible to win. Enter today!
Aloha, Nate

Hungry for More of Mum's Cooking? Click below!

Barley with Fuchok and Gingko Nuts

Vegetarian Chap Chye (Stir-fried Mixed Vegetables)

Pumpkin Mee with Prawns Recipe

Mum's Popiah is the Best!

How do You Top Mum's Popiah? With Kuih Pie Tee

Continue Reading: "Steamed Egg Tofu with Ground Pork and Shrimp"...

Tuesday, October 14, 2008

Vegetarian Chap Chye (Stir-fried Mixed Vegetables)

The day that I made the stir-fried cumin chicken, my mom decided to make what she called "Chap Chye." It was the perfect complement to the spice-laden chicken dish. It was flavorful but totally vegetarian. So I decided to write up the recipe today. This is a good way for me to remember it as it is a new recipe for me too.
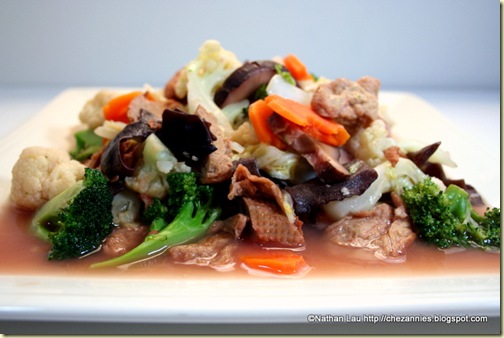
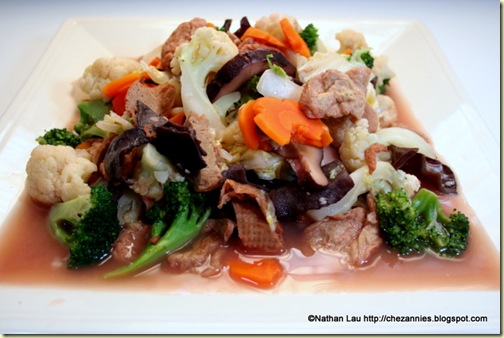
Vegetarian Chap Chye

Vegetarian Chap Chye (Stir-fried Mixed Vegetables)

When I was deciding to write on it, I asked my mom what to call it and she said "chap chye" so I looked it up on kuali.com to see if they had a similar dish (and also to help me figure out the spelling). What's interesting is that there were two dishes that were similar but slightly different from my mom's. One was called "Loh Hon Chai" and the other "Char Chap Chye" and both had components of my mom's dish but yet were different.

My mom laughingly said that she had probably combined both dishes into her own unique dish. Hey, whatever she did, it sure worked fine! She also said that this dish is really flexible and different vegetables can be used interchangeably.

Grateful for Mom

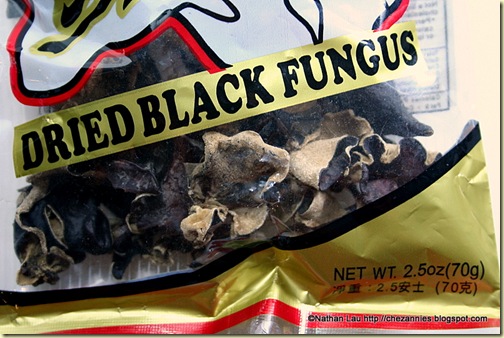
It's really good that my mom is here to show me how to make her chap chye. The recipe calls for black (or wood ear) fungus. I insisted that I already had this ingredient at home and we didn't need to buy more. But I learned that I had the wrong kind of black fungus. Did you guys realize that there were different types of black wood ear fungus? Well...let me enlighten you (now that I'm aware myself).

The one I had at home is thicker and not as good to eat in this stir-fry because it is too hard.

Dried Black Wood Ear Fungus (Thicker Type)

dried black wood ear fungus

The one I should have gotten is thinner and much better for this application. How can you spot the difference? The thicker one has a white layer on one side and the thinner one is black on both sides of the mushroom. There you go--learn something new! (We used the thicker one anyway and it wasn't too bad--you just have to soak it for a really long time!!).

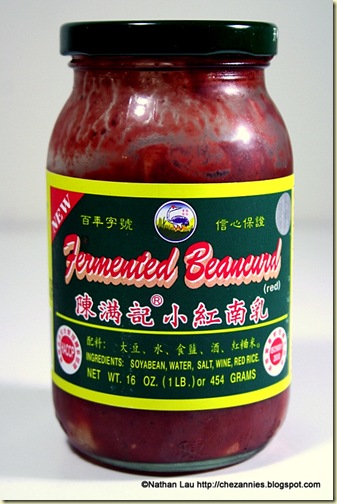
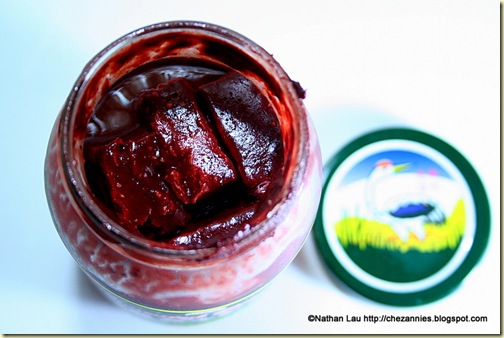
I also learned that there were different types of fermented bean curd. When we were shopping at the Asian grocery store, Mom bought this type of fermented bean curd because it was the correct one for this dish (and many others, which I'll blog about later). I would have avoided this fermented bean curd completely because the color is really, really RED.

Red Fermented Bean Curd

red fermented bean curd

Let me assure you, this fermented tofu isn't funky or sour at all. Because it's mushed up and mixed in to the dish, all you get are these slightly sweet, savory and salty flavors permeating the entire dish. It gives this dish the extra flavor punch that turns it from a nondescript vegetarian stir-fry into something uniquely delicious and memorable.

Red Fermented Bean Curd

red fermented bean curd

When I first cracked open the jar's lid, it made a loud "pooffff!" sound and sprayed out a little of the red sauce. I lifted the lid gingerly. Peeking at the contents of the bottle doubtfully, I asked my mom, "Is it supposed to do that?" She calmly responded matter-of-factly, "Yes, that is fine."

Ohh...kay...

Mom's Chap Chye recipe

Ingredients

2 Tbsp vegetable oil
2 cloves garlic, minced
2 small shallots, minced fine
1 cube fermented bean paste (mashed), and 1 tsp of the liquid
4 dry shiitake mushrooms (reconstituted and cut in half), water saved
4-5 whole wood-ear fungus (soaked and cut into same size as cut mushrooms)
Half a head of cauliflower, separated into 1 inch florets
1 large head of broccoli (cut into 1 inch florets)
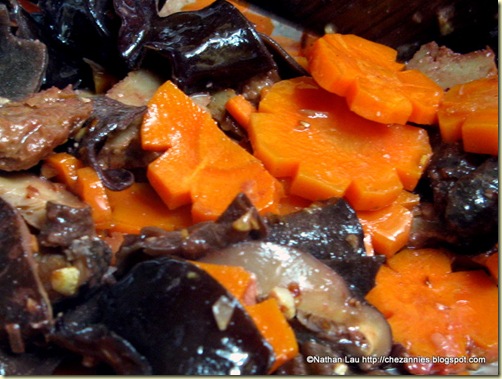
1 small carrot, sliced 1/4 inch thick (cut designs if desired--no, you really don't have to--I know I wouldn't but my mom would). You have my permission to slack on this. ^_^

Flower Design Cut into Carrot Slices

IMG_7046

1/2 head from a small Napa cabbage, cut in one-inch lengths
1-2 cans of braised gluten (mock meat), reserve liquid (we like this so we would add more but it's up to you)
1 tsp chicken bouillon
1 tsp salt (or to taste)

Method:

1. Heat pan to medium-high heat and add oil. Once oil is shimmering, add garlic and shallots and stir-fry until it is lightly browned.

2. Add in the fermented beancurd and the liquid. Stir around and then throw in the wood-ear fungus and shiitake mushrooms. Stir-fry for a minute.

3. Add in the carrots and stir-fry for 2 more minutes until carrots are slightly tender. If the pan looks dry, add some mushroom liquid (about half a cup) to the pan.

4. Add in the gluten along with the liquids from the cans. Stir-fry for another minute.

5. Throw in the cauliflower and broccoli and stifry to mix. Cover for 1 minute to soften, then add the napa cabbage (if pan is too dry, you can add another half cup of the mushroom liquid here). Add in salt and chicken bouillon to taste. Stir around to mix all the vegetables. Dish is done when all the vegetables are tender.

Mom's Vegetarian Chap Chye Plated

Mom's Vegetarian Chap Chye Plated

Enjoy!

Cheers, Annie

If you liked this article, won't you consider Subscribing by Email to receive all our latest articles in your Inbox? From time to time, we will run giveaways on this site. As a verified email subscriber, you will be automatically entered in each drawing!

Hungry for more vegetarian dishes? Click below:

Barley with Fuchok and Gingko Nuts

Sweet Corno di Toro Peppers in Mexican Chopped Salad

Lazy Heirloom Tomato Gazpacho

Five Quick Asian Dishes: Steamed Shiitake Mushrooms with Bok Choy and Fatt Choy

Five Quick Asian Dishes: Mustard Potatoes

Continue Reading: "Vegetarian Chap Chye (Stir-fried Mixed Vegetables)"...

Wednesday, October 01, 2008

Barley with Fuchok and Gingko Nuts

Have a cough?  How about a fever?  Sore throat?  No problem - drink some barley tea!

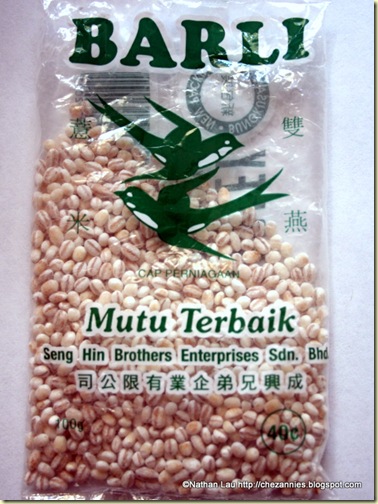
Pearl Barley

Pearl barley

Never heard of barley tea before?  Well, you have now.  Growing up, my mom boiled up a lot of barley tea for when we were sick, a little under the weather or just needing comfort.  The Chinese believe that barley is a cooling food so when you're coughing, or have a fever, you need the drink to balance out your heatiness.  I don't really know if I believe this, but hey, it tastes really good so I don't argue.

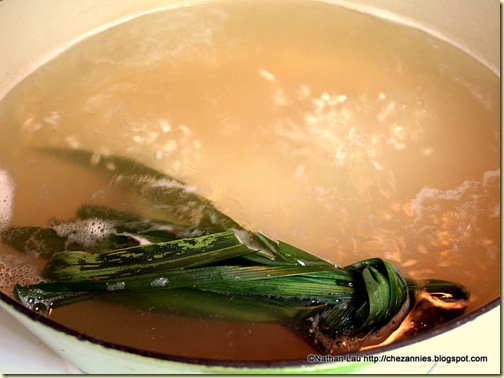
Served hot or cold, it's very refreshing on any day.  Basically, you just boil some pearl barley with lots of water, add some rock sugar (or plain ol' white sugar), and oh, if you happen to have some pandan leaves, throw a bunch of that in too.  Boil it until the barley gets soft and then drink it.  If you want, eat the barley too.

Boilling Barley Tea with Pandan

boiling barley tea with pandan

This past week, my son Daniel has been coughing a lot.  Since my mom is visiting from Malaysia, she of course boiled some barley for him.  He LOVED it and has been asking for more (we've run out and have to go get more pearls). I think this is a tradition that will carry on in my family.

Now this post isn't really about simple barley tea because that is just too easy.  There is a tong sui (soupy dessert) served in Malaysia (and yes, other countries too, but c'mon, I'm going to say in Malaysia cuz duh...I'm from there!) that features barley but is even more tasty by adding some special treats in it. 

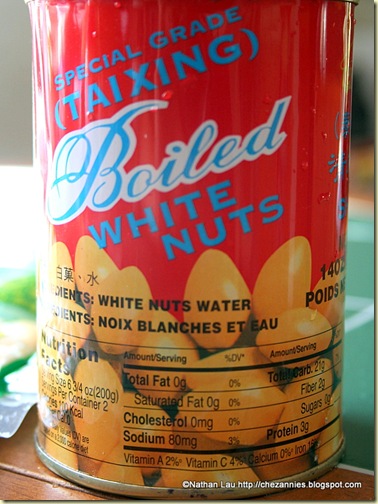
Gingko Nuts

gingko nuts

All these ingredients are delicious and also good for you.  How is it good?  Well, you have barley, which is a whole grain.  Then you have gingko nuts which are known to aid in memory, increase blood flow...oh, just google it and read it up yourself--the list is long!  Then there's fuchok (which is dried soybean curd, which is tofu!  And we all know how good tofu is for you!).

Fuchok (Bean Curd Sheets)

fuchok - bean curd sheets

Just one note on the fuchok.  Do make sure you get the right kind.  There are two types--one is thicker and meant for savory foods (like stews and soups) and the other (the one we want) is thinner and crumbles easily when crushed.  Some of the better ones will even melt in your barley drink when you boil it (which will make it almost like soybean milk).  But it's ok if it doesn't melt, it will get nice and soft which gives it a velvety, silky texture when you drink it.

Crumbled Fuchok

crumbled fuchok

Barley with Fuchok and Gingko

Ingredients:
1/2 cup barley pearls, rinsed
10 cups water
4-5 pandan leaves (if you can't find fresh leaves, look in the freezer section in your Asian grocery store--that's where we found ours)
1 package of fuchok (dried bean curd), crushed
1 can gingko nuts (if you can get fresh, certainly use it but don't forget to remove to bitter middle green bit)
1 egg, beaten
10 quail's eggs, boiled and peeled (optional)
2-3 pieces of rock sugar (or substitute with white sugar), to taste

Chinese rock sugar

Chinese rock sugar

Method:
1. Place barley, pandan leaves (knotted up to keep them all together for easier fishing out), and water in a large pot and bring to boil.  Once it's boiled, simmer for 45 more minutes.
2.  Add crushed fuchok and stir it in, bring to boil again and then simmer till fuchok has melted or gotten soft, about 20-30 minutes.
3.  Add rock sugar.  Start with two pieces and when melted, taste.  If not sweet enough, add a third piece. 
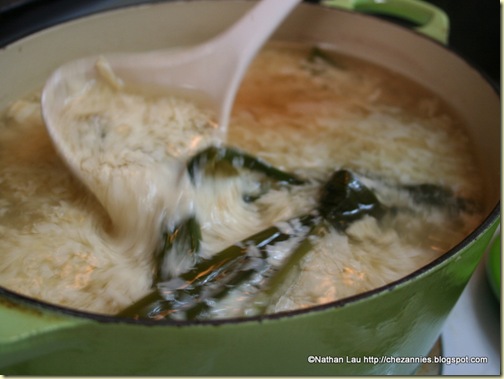
4.  Stir the soup, and while it's swirling, slowly drizzle the beaten egg in to form a ribbon in the soup. 

Stirring the Barley Soup with Pandan and Fuchok

Stirring the barley soup with pandan and fuchok

5.  Add quail's eggs if desired.  I used to love this when I was younger but my mom no longer adds this as she thinks that the cholesterol is not worth it.  Maybe I'll add it the next time.

Fish out the pandan leaves and discard.  Serve the soup hot or cold. 

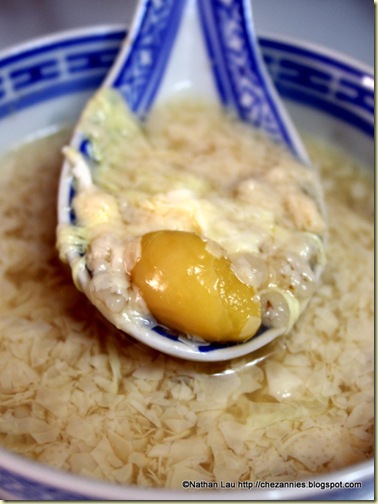
Sweet Barley Soup with Fuchok and Gingko Nuts

Sweet Barley Soup with Fuchok and Gingko Nuts

This is a pretty easy dessert to make so if you have access to the ingredients (most can be found at your Asian grocery store), do give it a try.  Enjoy!

If you liked this article, won't you consider Subscribing by Email to receive all our latest articles in your Inbox?  From time to time, we will run giveaways on this site.  As a verified email subscriber, you will be automatically entered in each drawing!


This article was entered in the Weekend Herb Blogging roundup created by Kalyn of Kalyn's Kitchen and hosted by Trembom.

Cheers, Annie


Hungry for more pandan flavored dishes? Click below:

Pandan Waffles
Nasi Lemak

Continue Reading: "Barley with Fuchok and Gingko Nuts"...

Sunday, September 28, 2008

Mum's Popiah is the Best!

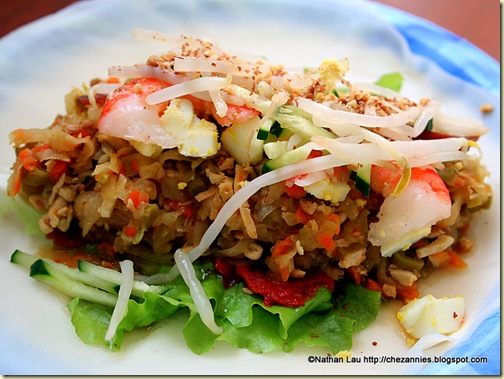
Annie's Mum is visiting us from Malaysia, which means that our house is tidier, the yard is straightened up more, and we are eating lots of tasty Malaysian food.  Mum is a great cook, and one of her signature dishes is popiah. Because everything in her popiah is handmade, you can taste the love.

Mum's Homemade Popiah is the Best!

Mum's Homemade Poh Pia is the Best

Popiah (also spelled poh piah, poh pia, baobing (薄饼)), is a Malaysian / Singaporean dish that's kind of like a fat Spring roll, only not fried.  Think of it as a "Malaysian burrito".  As with all burritos, the filling is what makes the dish so special.

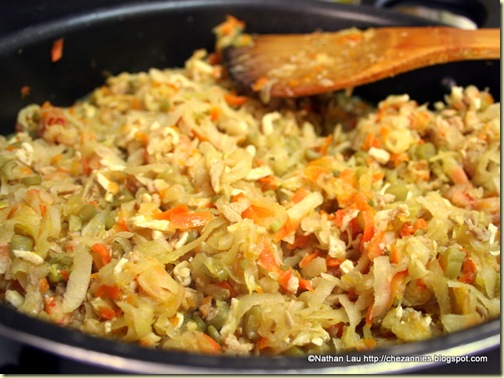
Mum's Homemade Popiah Filling

Mum's homemade Poh Pia Filling

Mum's popiah filling is made from shredded cabbage, grated carrots, grated jicama, finely diced belly pork, finely diced prawns, diced long beans, and finely julienned (yes, julienned) tofu. All of the shredding, grating,  dicing and julienning (is that a word?) was done by hand, not in a food processor.  Mum insists on doing it this way, as the machine method will somehow result in a less tasty mess.  The filling is cooked down for a few hours in a large pot, until all the ingredients are soft and melted together.

Not only is the popiah filling hand-made, but the fixings as well.

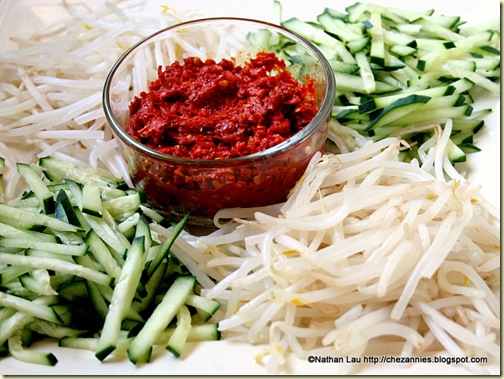
Mum's Homemade Popiah Fixins: Blanched Bean Sprouts, Julienned Cucumber, Chili Paste

Blanched Bean Sprouts, Julienned Cucumber, Chili Paste for Mum's Homemade Poh Pia

Here we have julienned cucumber, blanched bean sprouts, and freshly made chili paste.  Notice that the bean sprouts do not have that thin little "tail" that you normally see when you buy bean sprouts.  Mum picked each tail off by hand. Again, her insistence on doing it by hand is to preserve the quality of the popiah.

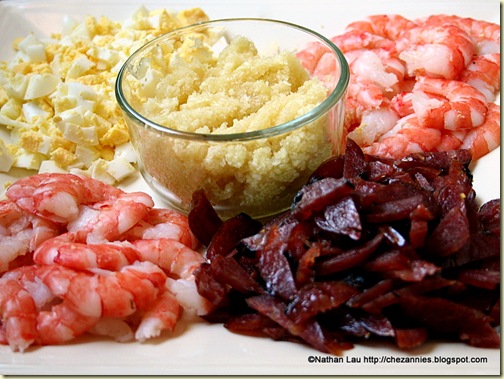
Mum's Homemade Popiah Fixins: Prawns, Hard Boiled Eggs, Chinese Sausage and Minced Garlic

 Prawns, Hard Boiled Eggs, Chinese Sausage and Minced Garlic for Mum's Homemade Poh Pia

Additional fixings include parboiled prawns that have been shelled, deveined and sliced in half, perfectly hard boiled eggs that have been diced by hand, sliced lup cheong (Chinese sweet sausage), and minced garlic.

The only modern conveniences Mum used was the food processor to make the chili paste, minced garlic, and chopped peanuts (not seen). That, and the store-bought spring roll wrappers for wrapping the popiah.

Spring Roll Wrappers for Mum's Homemade Popiah

 Spring Roll Wrappers for Mum's Homemade Poh Pia

Building the popiah takes skill and practice.  All of the ingredients are tasty, but you don't want to put too much or you will over-stuff the popiah and then it will explode all over your plate once you try to bite into it.  Plus, the perfect popiah will have a balance of flavors.

Popiah Filled with Mum's Popiah Fillings and Fixings

 Poh Pia Filled with Mum's Poh Pia Fillings and Fixings

Watch this video I made of Mum building and wrapping her popiah:

Mum's Homemade Popiah Rolled

 Mum's Homemade Poh Pia Rolled

As you can see in the picture, this popiah has burst open.  Not because it was over-stuffed, but because the skin wasn't freshly made.  A freshly made popiah skin is thin, pliable, and stretchy.  Unfortunately, you can't find freshly made popiah skin here in San Jose.  If you want freshly made popiah skin, you'll have to go to Malaysia or Singapore where the experts are.

Nevertheless, Mum's popiah are the best.  I have had popiah from hawker stalls in Singapore and Malaysia, even in Penang, where you will find the best food in the world.  Mum's popiah beats them all.  It's a perfect combination of sweetness from the flour sauce, the savoriness of the pork and the prawns, the spiciness of the chili and the garlic, and the cooling vegetables.  It's so yummy, you will gobble it down and hurriedly make another without even thinking about it.

Aloha, Nate

Did you like this post? Don't miss another!  Subscribe to this blog today and receive all new posts in your RSS reader or in your email Inbox!

Hungry for more Malaysian food?

Pumpkin Mee with Prawns Recipe

Honeydew Sago Dessert: A Refreshing Summer Treat!

7 Tips for Making Mouth-Watering Char Koay Teow

Hokkien Prawn Mee

"Rotiboy" butter buns

Continue Reading: "Mum's Popiah is the Best!"...

Tuesday, August 05, 2008

Five Quick Asian Dishes: Two Tofus, Two Ways

We've been nominated to win a prize in the "Protein Rich" contest being held on The Art of Cooking Indian Food! Our recipe for Tri-Tip Roast on the WSM is one of fifteen being voted on by readers for the prize of a $20 gift card. Out of all the many non-meat entries and chicken entries, I believe ours is the only beef entry. (Which is not surprising, considering the contest is being held on an Indian food blog ;-) )

I am asking you, my loyal readers, to head over to http://letusallcook.blogspot.com/ and vote for the Tri-Tip Roast on WSM entry in the reader poll, by August 10. We might not have as good a chance as "Jamaican Jerk Seasoned Tempeh Sandwich" or "Grits and Daal Adai" but let's see if the cow can represent!

If I had known the competition was going to be like this, I might have put up this tofu post instead of the tri-tip post. In any case, I offer this dish as another quick Asian dish that can be prepared in 15 minutes or less, in honor of Jaden's birthday:

Two Tofus, Two Ways


cold silken tofu 2


Growing up, my mom would make this cold tofu dish. We ate it with rice and it was so easy to eat, so soft and silky and really tasty. When I left home, this was one dish I tried to recreate. I’ve made it enough now that I’ve forgotten my mom’s version (I think she used to add Thai bird chillies and chopped dried shrimp in her version) and they’re truly my own.

I just made it recently for lunch and between Nate and I, we finished that block up in no time at all.

Cold Tofu topped with Fried Shallots and Garlic in an Oyster-Soy Sauce


Ingredients:
1 14-16 oz block of silken tofu
2 cloves garlic, minced
2 large or 4 small shallots, halved and sliced
1 Tbsp oyster sauce
3 tsp soy sauce
½ tsp kicap manis or thick soy sauce
1 Tbsp vegetable oil
1 Tbsp sesame oil
half bunch of green onions, diced

Method:

  1. Run a knife along the edges of the tofu tub and turn tofu over onto a plate.

  2. Heat up a small frying pan. Add vegetable oil and heat on med heat.

  3. Add sliced shallots and fry till light golden brown.

  4. Add garlic and fry for another 30 seconds.

  5. Add sesame oil, soy sauce, oyster sauce, and kicap manis. Stir around. Lower heat a little and watch that the sauce doesn’t burn.

  6. Throw in most of the green onions, saving 3 Tbsp for garnish. Remove from heat.

  7. Drain whatever water has come out of the tofu. Now, pour the shallot-garlic sauce over the top of the dish and garnish with remaining green onions.


cold silken tofu

Along with that dish, I also pan-fried some egg tofu. I’ve always loved this style of egg tofu in Malaysia. There, they were normally deep-fried and then braised or sauced over other vegetables and meats. For the longest time, I could never find these tubes anywhere in the US. But recently, they started showing up at the 99 Ranch Markets. I swooped up 4 tubes of them at my last visit. If you can get them, you have to give them a try.

mandarin egg tofu

Cooking them is really simple. I normally slice them into half-inch rounds and throw them on a non-stick pan with a little bit of oil. After 3-4 mins on med-high heat, I flip them on the other side and fry the other side till they are golden brown too. They are so tasty, you could eat them like that.

cold silken tofu 2

But if you want to boost their flavor even more, just make a little sauce of 1 tbsp oyster sauce, 3 tsp soy sauce, dash of white pepper, 4 tbsp water and 1 tsp cornstarch. Mix that together, turn the heat down to med-low and throw it into the pan with the tofu and gently fold. If the sauce gets too thick, just add a little bit more water. Dish up and enjoy!

Cheers, Annie

Five Quick Asian Dishes Series:


"1-4-7" Steamed Eggs
Two Tofus, Two Ways
Mustard Potatoes
Stir-Fried Beef with Ginger and Egg
Steamed Shiitake Mushrooms with Bok Choy and Fatt Choy

Don't miss a day in this series! Sign up to receive all our posts via RSS feed or by email

More food porn

Continue Reading: "Five Quick Asian Dishes: Two Tofus, Two Ways"...